• How to Fish Kelp Paddies in Southern California

    How to Fish Kelp Paddies in Southern California

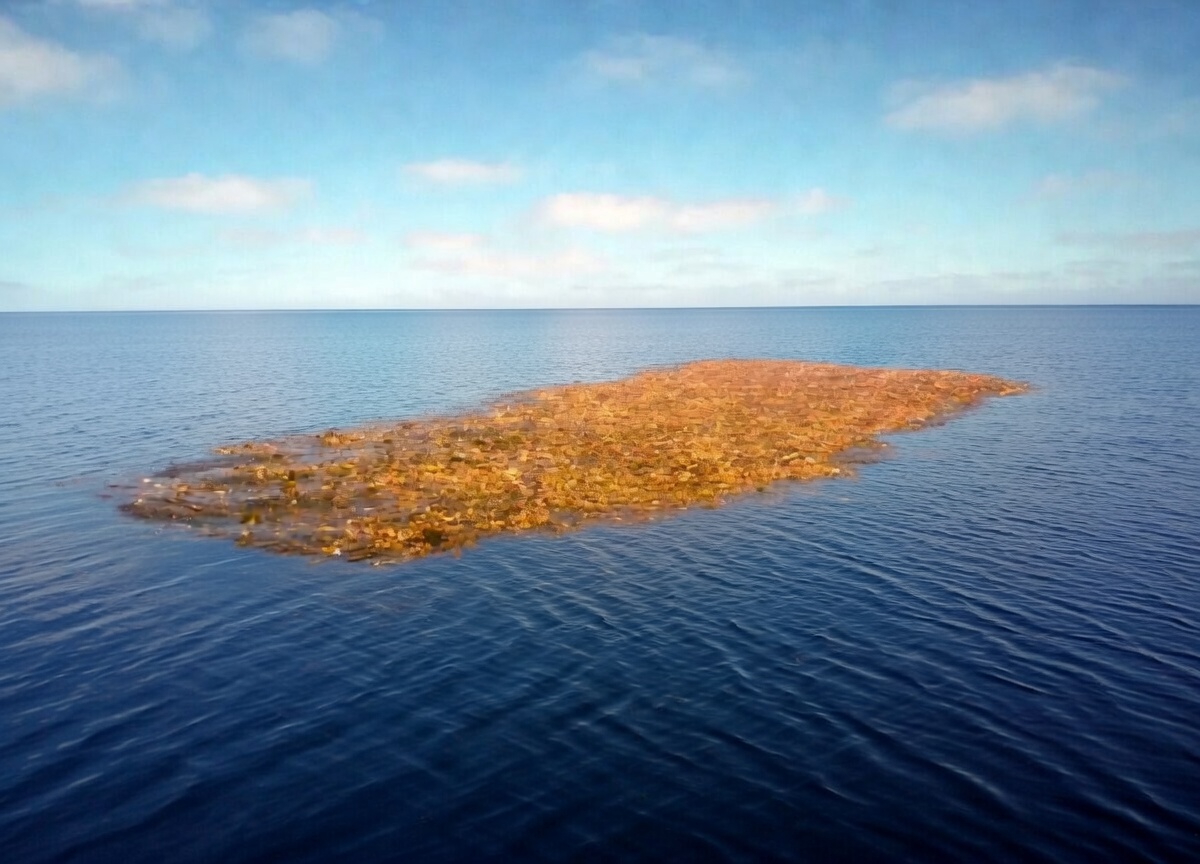
    Kelp paddies are floating islands of drifting kelp that accumulate in SoCal’s offshore waters, and they are fish magnets. A single clump of kelp the size of a dining table can hold dorado, yellowtail, yellowfin tuna, bonito, calico bass, and a cloud of baitfish underneath. Finding productive paddies is one of the most reliable ways to catch quality fish on SoCal’s offshore grounds — and knowing how to fish them properly is the difference between a handful of bites and a wide-open day.

    Why Paddies Hold Fish

    Floating kelp creates shade, which attracts small baitfish looking for cover in the open ocean. The baitfish attract predators. A fresh paddy that’s drifted into warm, clean water can build a food chain underneath it within hours — starting with microscopic organisms, then small baitfish, then progressively larger predators.

    Not all paddies are equal. The best paddies are in clean, blue water with good dorado temperatures (68°F+), have a visible bait ball underneath (polarized glasses are essential), and show signs of life — birds circling, bait flipping on the surface, or predators boiling near the edges. Dead, brown paddies with no visible life are worth a quick check but rarely produce consistent action.

    How to Find Paddies

    Kelp paddies form when strong swells or currents tear kelp from the coastal beds and carry it offshore. They concentrate along current edges, temperature breaks, and debris lines where different water masses meet.

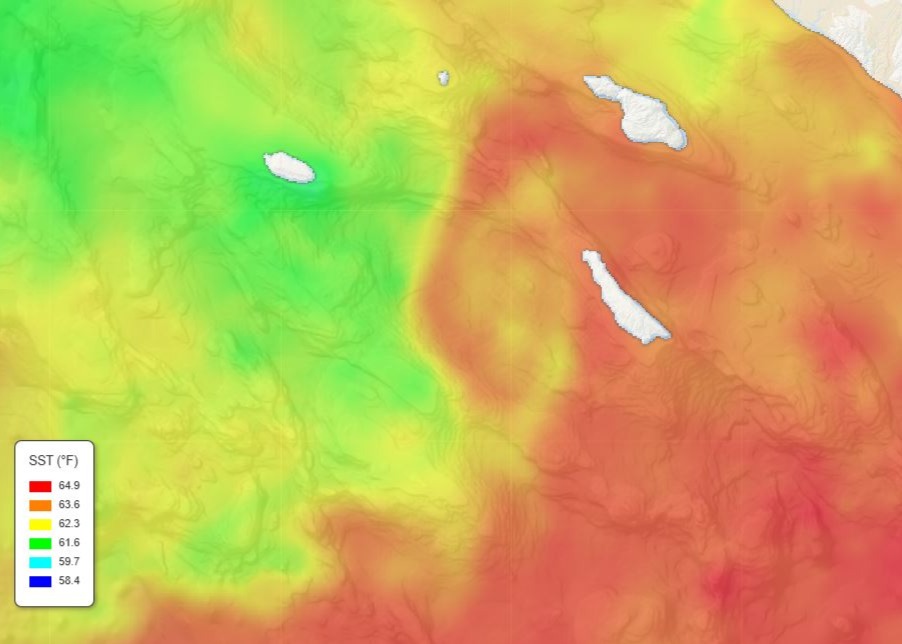
    SST charts: Check the SST chart on fishing-reports.ai for temperature breaks — paddies accumulate along these boundaries. Where warm offshore water meets cooler coastal water, floating debris (including kelp) collects in the convergence zone.

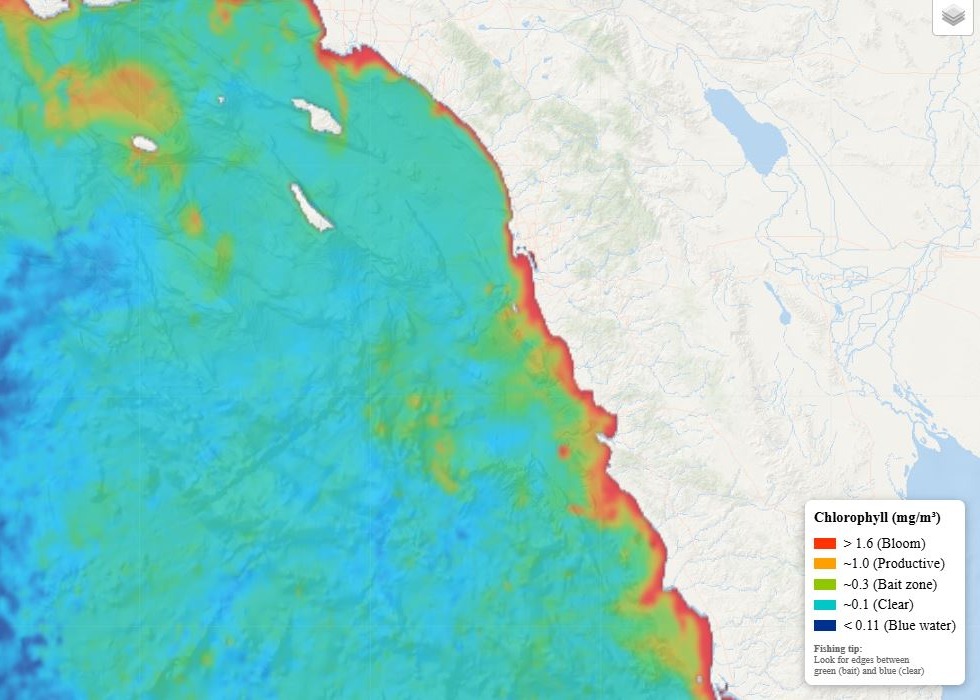
    Chlorophyll maps: The chlorophyll map shows where productive water meets clean water. Paddies in the transition zone between green (nutrient-rich) and blue (clean) water tend to hold the most fish because bait is nearby but the water is clear enough for predators to hunt.

    Fleet tracker: The fleet tracker shows where boats are clustering offshore. A cluster of boats 20+ miles out that aren’t on a known bank or high spot usually means they’ve found productive paddies.

    Visual scanning: Once offshore, slow down and scan the surface. Paddies range from basketball-sized clumps to mat-sized rafts. Look for bird activity — terns and shearwaters circling or sitting on paddies indicate baitfish presence. A good set of binoculars and calm seas make paddy hunting much easier.

    Species You’ll Find

    Dorado: The signature paddy species. Dorado associate with floating structure throughout their range, and SoCal paddies are no exception. When water temps are above 68°F, dorado are the first species to check for. They usually sit close to the paddy — often within 50 feet — and are the most aggressive feeders on artificials. See our best dorado lures guide.

    Yellowtail: Yellowtail relate to paddies differently than dorado — they often circle wider, 50–200 feet away, and hold deeper. They’ll come up for surface iron or live bait but are less likely to charge the paddy the way dorado do. Yellowtail prefer 65–72°F water, so early season paddies in slightly cooler water may hold yellowtail but not dorado.

    Yellowfin tuna: In late summer and fall, yellowfin will hold under paddies — usually deeper, 30–100 feet below the kelp. They’re harder to catch on artificials around paddies and often respond better to live bait dropped below the kelp mat. Fly-lining a sardine or small mackerel near the paddy with the current is the standard approach.

    Calico bass: Coastal paddies that drift near the islands or kelp beds often hold excellent calico bass. These fish relate to the kelp exactly like they do to fixed kelp beds — hiding in the canopy and ambushing bait that swims by.

    How to Approach a Paddy

    Approach is everything. A noisy, fast approach will scatter fish before you ever get a line in the water.

    Step 1: When you spot a paddy, slow down at least 200 yards away. Cut the engines to idle.

    Step 2: Idle upwind or up-current of the paddy. Let the drift carry you toward it. If there’s no wind, make a wide arc and approach from 100+ feet away.

    Step 3: Look before you cast. Put on polarized glasses and scan the water around and under the paddy. Look for shadows, color changes, or bait behavior that indicates predators. If you see fish, note their depth and position — this tells you what technique to start with.

    Step 4: Make your first cast count. The first lure or bait that hits the water near a fresh paddy often gets the best response. If dorado are visible, cast past the paddy and retrieve through the school. If you see fish but can’t identify them, start with a surface iron or popper to draw a reaction.

    Techniques for Paddy Fishing

    Casting Iron and Poppers

    The most exciting method. Cast past the paddy (never into it — you’ll snag the kelp) and retrieve through the zone where fish are holding. For dorado and yellowtail on the surface, a fast retrieve with a Tady 45 or Salas 7X is deadly. If they follow but won’t commit, switch to a popper. See our jigs vs irons vs poppers guide for when to switch.

    Fly-Lining Live Bait

    The most consistent producer. Hook a live sardine or mackerel and let it swim toward the paddy on a fly-line rig — no weight, just a hook and fluorocarbon leader. The bait will swim naturally toward the shade of the paddy, and anything holding underneath will eat it. This is the best technique for yellowfin tuna hiding deep under the kelp.

    Vertical Jigging

    When fish are holding deep — visible on the sonar but not coming to the surface — drop a flat-fall jig to their depth and work it. The fluttering action on the fall imitates a dying baitfish drifting down from the paddy. Deadly on yellowtail and yellowfin that won’t come up.

    Chunking

    Cut sardines into chunks and toss pieces near the paddy to create a chum slick. This draws fish up and closer to the boat. Once you see activity in the chum, drop a hooked chunk or live bait into the action. Particularly effective for starting a bite that’s been slow.

    Gear for Paddy Fishing

    Two setups cover most paddy situations: a 20lb spinning setup for casting iron, poppers, and light live bait (handles dorado and average yellowtail), and a 30lb conventional setup for live bait drops and heavier fish (yellowtail and yellowfin). Spool with braid and carry fluorocarbon leader in 20–40lb for different situations.

    Plan Your Trip

    Paddies form in warm, clean water. Check conditions:

    Tight lines!

  • How to tie a Dropper Loop Rig for Saltwater Fishing

    How to tie a Dropper Loop Rig for Saltwater Fishing

    The dropper loop rig is the workhorse of SoCal bottom fishing. If you’ve ever fished a party boat targeting rockfish, sheephead, or whitefish, you’ve seen this rig on every rail. It’s simple, effective, and lets you fish multiple baits at different depths — which is exactly what you want when you’re working structure and don’t know exactly where the fish are sitting.

    This guide covers how to tie the dropper loop knot, how to set up a complete rig, and when to use it versus a Carolina rig or other bottom rigs.

    What Is a Dropper Loop Rig?

    A dropper loop rig places one or more hooks on short loops that extend perpendicular to your main line, with a weight at the bottom. The hooks sit above the weight, suspending your baits at specific depths off the bottom. This design is different from a Carolina rig where the bait sits on the bottom — a dropper loop keeps baits up in the water column where species like rockfish, whitefish, and sheephead actively feed.

    Most SoCal dropper loop rigs run two hooks — one about 12 inches above the sinker and another 12–18 inches above that. This covers a band of water column and doubles your chances of finding where the fish are holding.

    How to Tie the Dropper Loop Knot

    Step 1: Form a loop in your line where you want the hook to sit. Make the loop about 4–5 inches across — this will become the arm that holds your hook away from the main line.

    Step 2: Pinch the crossing point with one hand. With the other hand, twist the loop around itself 6–8 times. The more twists, the stiffer the loop arm will be (which is what you want — it keeps the hook from tangling with the main line).

    Step 3: Find the center of your twists and push the top of the loop through the middle opening. Pull it through firmly.

    Step 4: Moisten the knot and pull both ends of the main line to tighten. The loop should stand out perpendicular to the line. If it lays flat against the line, you didn’t use enough twists — retie with more wraps.

    Step 5: Clip one side of the loop to create a single tag end, then tie your hook to this tag using a Palomar knot. Alternatively, you can pass the hook directly through the uncut loop — this lets you change hooks quickly without retying. See our complete knot guide for step-by-step instructions on the Palomar and other terminal connections.

    Repeat the process at your second hook position. Then tie a sinker to the bottom of the rig using a simple overhand loop or a snap swivel for quick weight changes.

    Complete Rig Setup

    Main line: 30–50lb fluorocarbon or heavy monofilament. Many anglers pre-tie dropper loop rigs on heavy mono and attach them to their braided main line with a swivel. This lets you swap entire rigs quickly if one gets tangled or cut off on the rocks. See our fishing line guide for specific brand recommendations by pound test.

    Hook 1 (lower): Positioned 10–14 inches above the sinker. Use a circle hook in 2/0–4/0 for rockfish and whitefish, or a J-hook if you prefer setting the hook manually. The Owner Mutu Circle (5163) in 2/0–3/0 is the go-to for dropper loop rigs — the medium wire handles rockfish and sheephead without straightening, and the circle design means jaw-corner hookups for easy releases on short fish. The loop arm should be 3–4 inches long — long enough to keep the bait away from the main line but short enough to avoid tangles.

    Hook 2 (upper): Positioned 12–18 inches above the first hook. Same hook size and style. This hook fishes higher in the water column, which often catches a different species than the lower hook.

    Sinker: 4–16 ounces depending on depth and current. For party boat fishing in 150–300 feet of water, 8–12 ounces is standard. For shallower rockfish spots (50–100 feet), 4–6 ounces works. Use a torpedo or bank sinker — their streamlined shape cuts through current better than round sinkers.

    For a complete breakdown of hook models, wire weights, and sizes for every SoCal bottom species, see our hooks by species guide.

    Best Baits for a Dropper Loop Rig

    Squid strips are the all-time top bait for dropper loop rigs — tough, stays on the hook, and catches everything. Cut a squid into strips about 3–4 inches long and 1/2 inch wide. Thread the hook through one end so the strip trails behind.

    Other top baits: shrimp (whole or pieces) for sheephead, sardine chunks for rockfish, and live anchovies when you can get them. Tip: double up by putting squid on one hook and shrimp on the other — you’ll quickly learn what the fish prefer that day.

    Tackle Setup

    Bottom fishing with a dropper loop doesn’t require the heavy offshore gear you’d use for tuna, but you still need enough backbone to haul fish up from deep structure:

    Rod: A 7-foot medium to medium-heavy rod for most party boat bottom fishing. Enough backbone to lift 8–12 ounces of lead plus a fish from 200 feet, with enough sensitivity to feel the bite.

    Reel: A 20lb class conventional reel or 30lb class for deeper water. Conventional reels are preferred over spinning reels for dropper loop fishing because the vertical drop-and-retrieve is easier to control.

    Line: 30–40lb braid as mainline with your pre-tied dropper loop rig attached via a barrel swivel. Braid’s zero stretch lets you feel bites clearly from 200+ feet, and its thin diameter cuts through current better than mono. See our braid vs fluorocarbon guide for why braid mainline with a mono/fluoro rig is the standard setup.

    Hooks: Circle hooks in 2/0–4/0 are the best choice for dropper loops — jaw-corner hookups, fewer gut-hooks, and better survival on released fish. The Owner Mutu Circle (5163) and Owner SSW Circle (5178) are both excellent for bottom fishing. See our hooks by species guide for specific models and sizes for rockfish, sheephead, and whitefish.

    For complete rod and reel pairing advice, see our best rod and reel combo guide.

    When to Use a Dropper Loop vs Other Rigs

    SituationBest RigWhy
    Bottom fish on structure (rockfish, sheephead)Dropper loopBaits suspended above rocks, less snags
    Halibut on sandCarolina rigBait right on the bottom where halibut ambush
    Surf fishingCarolina rigSlides with current, natural presentation
    Deep water party boat (200+ ft)Dropper loopTwo baits cover more water column
    Tuna on live baitFly-line rigFree-swimming bait, no weight
    Yellowtail on live baitSlider rigAdjustable depth, natural swim

    Tips for Fishing the Dropper Loop

    Drop to the bottom, then reel up 2–3 cranks. This lifts your baits into the active feeding zone and reduces snags. When you feel a bite, don’t jerk — if you’re using circle hooks, just reel tight and the hook will set itself. With J-hooks, a moderate lift of the rod is enough. Big hooksets pull the bait away from the fish more often than not.

    If you’re getting bit on one hook consistently but not the other, adjust. If the lower hook is producing, the fish are tight to the bottom — consider shortening the distance between your sinker and first hook. If the upper hook is hot, the fish are suspended — add a third dropper loop even higher.

    Pre-tie several rigs at home and store them on a rig winder. On the boat, tangles happen — having backups ready means you spend more time fishing and less time retying. Use different hook sizes on each rig so you can match what the fish want that day.

    Plan Your Trip

    Check conditions before you head out:

    Related Guides

    Tight lines!

  • How to Use Chlorophyll Maps to Find Fish Offshore

    How to Use Chlorophyll Maps to Find Fish Offshore

    🌊 View Today’s Chlorophyll Map

    Check the current chlorophyll conditions for SoCal and Baja right now on our free animated chlorophyll map — updated daily with NOAA satellite data. Pair it with the Animated SST chart or AI Enhanced Regional SST charts to find where bait is stacking up along temperature breaks.

    Most offshore anglers know about SST charts — sea surface temperature maps that show water temperature and temperature breaks. Fewer know about chlorophyll maps, and that’s a missed opportunity. Chlorophyll data tells you where the food chain starts, and ultimately, where gamefish are feeding.

    If SST charts tell you where fish are comfortable, chlorophyll maps tell you where fish are eating. Used together, they’re the most powerful combination of satellite data available to recreational anglers.

    What Chlorophyll Maps Show

    Chlorophyll is the green pigment in phytoplankton — microscopic plants floating at the ocean surface. Satellites measure the color of the ocean from space. Green water has high chlorophyll (lots of phytoplankton). Blue water has low chlorophyll (clear, nutrient-poor water).

    Why does this matter for fishing? Because the ocean food chain works like this:

    Phytoplankton → Zooplankton → Baitfish → Gamefish

    Areas with high chlorophyll are producing plankton, which attracts krill and small organisms, which attract anchovies, sardines, and squid, which attract tuna, yellowtail, dorado, and everything else you’re trying to catch. Chlorophyll maps show you the foundation of that food chain from 400 miles up.

    How to Read a Chlorophyll Map

    Chlorophyll maps on fishing-reports.ai use a color scale from blue to green:

    • Dark blue — Very low chlorophyll. Clear, deep oceanic water. Low productivity. Fish density is usually low unless there’s other structure (temperature breaks, seamounts, debris).
    • Light blue / cyan — Moderate chlorophyll. Transitional water. This zone often marks the boundary between productive coastal water and clean offshore water — a key area for fishing.
    • Green / yellow-green — High chlorophyll. Productive, nutrient-rich water. Baitfish concentrations are likely. Nearshore and upwelling areas typically show this.
    • Bright green / yellow — Very high chlorophyll. Extremely productive — often associated with active upwelling zones, river mouths, or nutrient plumes. Water may be too murky for pelagic fishing but holds bait.

    The Money Zone: The Chlorophyll Edge

    The single most valuable feature on a chlorophyll map is the chlorophyll edge — the boundary where green, productive water meets clean blue water. This is the fishing equivalent of the tree line at the edge of a field. Prey congregates along the edge, and predators patrol it.

    Here’s why the edge is so productive:

    • Bait stacks up — Small fish feed in the green productive water and get pushed against the boundary by currents. The edge acts as a concentration line.
    • Predators prefer clean water — Tuna, dorado, and billfish generally prefer the cleaner blue side where they can see and hunt effectively. They work the edge, darting into the green side to feed.
    • Current convergence — Chlorophyll edges often mark the boundary between two water masses moving at different speeds or directions. This convergence zone concentrates floating debris, kelp paddies, and bait.

    On the chlorophyll map, look for a sharp transition from green to blue. The sharper and more defined the edge, the better. A gradual fade from green to blue over 50 miles is less useful than a crisp boundary over 5 miles.

    Combining Chlorophyll with SST Charts

    This is where the real power lies. Each data layer tells you something different, and together they paint a complete picture:

    Step 1: Check the SST Chart

    Open the SST chart and identify water in the right temperature range for your target species. (See our species temperature guides for bluefin tuna, yellowfin tuna, dorado, yellowtail, white seabass, and halibut.)

    Step 2: Check the Chlorophyll Map

    Switch to the chlorophyll layer and find the chlorophyll edge in the same area. Where is the green-to-blue transition relative to the water temperature you identified?

    Step 3: Find the Overlap

    The magic spot is where three things intersect:

    1. Water temperature in the right range for your target species
    2. A chlorophyll edge (green meets blue)
    3. A temperature break (warm meets cool)

    When all three line up in the same area, you’ve found a high-probability fishing zone. This combination concentrates bait, provides the right thermal environment, and creates structure in the open ocean where gamefish feed.

    Step 4: Check the Fleet

    Confirm your analysis by looking at the fleet tracker. Are boats heading to or fishing in the area you identified? If the satellite data and the fleet agree, you’ve found the bite.

    Chlorophyll Patterns for Each Species

    Bluefin Tuna

    Bluefin often work the chlorophyll edge from the blue side. They’re comfortable in moderate-to-clean water and will push into greener water to feed on bait schools. Look for the chlorophyll edge where it intersects with the 62–68°F temperature range. Bluefin tend to hold along the edge rather than ranging through open blue water. When you find them, surface iron, poppers, and trolling lures are how you capitalize — have your tuna setup rigged with 50–65lb braid and ready before you reach the edge. For live bait along the edge, circle hooks on a fly-line rig are deadly.

    Yellowfin Tuna and Dorado

    Both species prefer the clean blue side of the edge in water 72°F+. They’re more sight-oriented feeders that want visibility. The best dorado fishing is often a few miles on the blue side of the chlorophyll edge, especially when kelp paddies or debris are present. The edge concentrates the floating structure that dorado associate with. Run a trolling spreadcedar plugs and feathers — along the blue side of the edge while searching for paddies. When you find fish on a paddy, switch to casting: surface iron (Tady 45) and poppers draw explosive strikes from both species. A 20lb spinning setup handles dorado, but size up to a 40lb class if yellowfin are in the mix.

    Yellowtail

    Yellowtail are less picky about water clarity than tuna or dorado. They’ll feed comfortably in greener, more productive water — especially around kelp beds and structure where chlorophyll levels are naturally higher. For yellowtail, the chlorophyll data is most useful for identifying areas of strong upwelling (very high chlorophyll) that concentrate squid and baitfish near structure. When you find 62–70°F water with high chlorophyll near islands or kelp, bring your iron and jigs. A 30lb class setup with 40lb braid handles everything from casting iron at boils to yo-yoing structure. See our hooks guide for the right hook sizes.

    White Seabass

    White seabass thrive in the greener, more productive water that other pelagics avoid. They’re often caught in areas with moderate-to-high chlorophyll where squid are spawning. If the chlorophyll map shows a productive zone near islands or kelp beds in 59–65°F water during spring, that’s white seabass territory. Fish the kelp edges at dawn with a slider rig and live squid on a 4/0–6/0 circle hook. A 20–25lb class setup with 30lb braid and 25lb fluoro leader is the standard. See our hooks guide for specific models.

    Halibut

    For inshore species like halibut, chlorophyll maps help you identify where bait is stacking up along the coast. High chlorophyll nearshore — especially near sandy flats and bay mouths — means baitfish concentrations that pull halibut into shallow water. This is when swimbaits and Carolina rigs on the sandy flats produce best. From shore, a 4000–5000 spinning reel on a 9–10 foot surf rod with 20lb braid covers it. See our halibut surf fishing guide for beach-specific techniques.

    Common Mistakes When Reading Chlorophyll Maps

    Fishing in the green — New users see high chlorophyll and think “bait = fish.” But if you’re targeting tuna or dorado, the green water itself is often too murky. Fish the edge, not the middle of the green zone.

    Ignoring the time lag — Chlorophyll responds to nutrients with a delay. An upwelling event might take 3–7 days to produce a visible chlorophyll bloom. And baitfish may take another few days to aggregate. A brand-new upwelling plume might not hold fish yet, but one that’s been established for a week is worth fishing.

    Cloud cover gaps — Like SST charts, chlorophyll maps are satellite-based and blocked by clouds. If the latest image is patchy, check the previous day’s image or use the multi-day composite view on the charts page.

    Trusting it alone — Chlorophyll maps are one piece of the puzzle. Always combine with SST data, fleet intel, swell conditions, and fishing reports. No single data source tells the whole story.

    Seasonal Chlorophyll Patterns in SoCal

    The chlorophyll picture off Southern California changes throughout the year:

    Winter–Spring (Jan–Apr): Strong coastal upwelling produces high chlorophyll nearshore. The green water extends well offshore, and the chlorophyll edge may be 30–50+ miles out. This is when the ocean is most productive overall — good for bait production that fuels the spring and summer fisheries. Prime time for white seabass in the green water and early-season yellowtail near structure.

    Late Spring–Summer (May–Aug): Upwelling relaxes, and the chlorophyll edge moves closer to shore. Offshore water becomes cleaner and bluer. Clear temperature and chlorophyll edges form between the coastal upwelling zone and the clean offshore water — these are prime fishing boundaries for bluefin, yellowfin, and dorado as warm water pushes in.

    Fall (Sep–Nov): Chlorophyll levels decrease as upwelling weakens and surface water warms. The green-to-blue transition can be quite sharp and close to shore. Look for remaining productive pockets around the islands and banks. Late-season dorado and yellowfin concentrate along these tightening edges.

    Plan Your Trip

    Ready to add chlorophyll data to your pre-trip planning? Start here:

    Related Guides

    Tight lines!

  • How to Read SST Charts for Fishing

    How to Read SST Charts for Fishing

    🌊 View Today’s SST Chart

    Check today’s water temperatures on our free animated SST chart — updated daily with NOAA satellite data. Pair it with the chlorophyll map and AI enhanced regional charts to find where fish are holding.

    Why SST Charts Matter for Fishing

    Sea surface temperature (SST) charts are one of the most powerful tools in a saltwater angler’s toolkit. They show you where warm and cold water masses meet, where currents are flowing, and ultimately where the fish are likely holding. Learning to read them takes your fishing from guesswork to strategy.

    Whether you’re running offshore out of San Diego chasing bluefin or trolling the Baja coast for yellowtail, understanding what you’re looking at on an SST chart can mean the difference between a wide-open bite and a long boat ride home.

    Understanding the Color Scale

    Every SST chart uses a color gradient to represent water temperature. Typically, cooler water appears in blues and greens while warmer water shows up in yellows, oranges, and reds. The exact temperature each color represents is shown in the chart’s legend — always check it, because the scale changes depending on the region and time of year.

    For Southern California waters in winter, you might see a scale ranging from 56°F to 64°F. In summer, that same region could show 62°F to 74°F. A chart of the Sea of Cortez in August might run from 80°F to 90°F. Context matters.

    What to Look For First

    Don’t get overwhelmed by the full chart. Start with these three things:

    1. Color contrast. Areas where colors change sharply — where deep blue sits right next to bright green, for example — indicate rapid temperature changes over a short distance. These are temperature breaks, and they’re where you want to fish. See our fishing the edges guide for how to work them once you’re on the water.

    2. Warm-water intrusions. Look for tongues or fingers of warmer water pushing into cooler areas. These often indicate current flow bringing warm offshore water closer to the coast, and gamefish follow them inshore. Dorado and yellowfin ride these intrusions, and the edges are where kelp paddies and debris collect.

    3. Eddies. Circular patterns in the temperature data indicate eddies — rotating pockets of water that concentrate bait and plankton along their edges. Warm-core eddies spinning clockwise (in the Northern Hemisphere) are particularly productive for tuna and billfish. The edges of these eddies are where you want to troll and cast iron.

    Satellite Data: What You’re Actually Seeing

    SST charts are built from satellite-mounted infrared sensors that measure the thermal radiation coming off the ocean’s surface. The data represents roughly the top millimeter of water. A few important caveats:

    Cloud cover creates gaps. Infrared sensors can’t see through clouds. If you notice blank spots or oddly smooth areas on a chart, that’s likely cloud contamination. Multi-day composite charts (like our 14-day SST animation) help fill these gaps by layering multiple days of data.

    Surface vs. depth. What the satellite sees is skin temperature. The water 10 or 20 feet down can be significantly different, especially in areas with strong thermoclines. SST charts tell you where to start looking — your fishfinder and temperature gauge tell you the rest of the story. When bluefin are sitting below the thermocline, flat-fall jigs and deep-set baits get down to where the fish are actually holding.

    Morning vs. afternoon. Solar heating can warm the surface by 1–2°F during calm, sunny days. Most satellites pass in the early morning or late evening to minimize this effect, but it’s worth knowing.

    What Temperature Does Each Species Want?

    Once you can read the chart, you need to know what temperature range to look for. Every species has a preferred window — here’s the quick reference for SoCal targets:

    SpeciesPreferred Temp (°F)Sweet SpotGear Guide
    Bluefin Tuna60–72°F62–68°FJigs · Lures · Reels
    Yellowfin Tuna68–78°F72–78°FLures · Poppers
    Dorado72–82°F74–78°FLures · Reels
    Yellowtail62–70°F64–68°FJigs · Reels
    White Seabass58–66°F60–64°FSlider Rig · Hooks
    Halibut56–68°F59–65°FSwimbaits · Carolina Rig
    Wahoo72–82°F76–80°F40lb Reels

    Find the temperature range for your target on the SST chart, then look for breaks within that range. That’s where the fish are concentrated.

    Reading SST Charts by Region

    Southern California

    The SoCal Bight is defined by the interaction between the cold, south-flowing California Current and warmer water pushing up from Baja. In spring and summer, look for warm-water intrusions pushing north past San Clemente Island and into the offshore banks. Bluefin tuna often stage along the leading edge of these warm pushes in 64–68°F water. Have your tuna setup rigged with 50–65lb braid and iron ready before you reach the break.

    Baja Pacific Coast

    The Baja coast features dramatic upwelling zones where cold, nutrient-rich water rises to the surface near headlands and points. Look for tight color gradients near Punta Colonet, San Quintín, and Cedros Island. Yellowtail and white seabass stack up along these upwelling boundaries. The chlorophyll map is especially useful here — upwelling creates bright green productive zones that concentrate bait along defined edges.

    Cabo & Sea of Cortez

    Warm-water species like dorado, wahoo, and marlin key on the warmest water. During summer and fall, look for blue water (80°F+) pushing close to the cape. In the Cortez, temperature breaks can form mid-channel between the Baja peninsula and the mainland — these are highway on-ramps for striped marlin. Run a trolling spreadcedar plugs and feathers — along these mid-channel breaks.

    Putting It Into Practice

    Here’s a simple workflow for planning your next trip using SST data:

    Step 1: Check the regional SST chart for your fishing area. Note any obvious temperature breaks or warm-water intrusions.

    Step 2: Compare today’s chart to the past few days using the 14-day animation. Is warm water pushing in or pulling back? Stable conditions fish better than rapidly changing ones.

    Step 3: Cross-reference with chlorophyll data. High chlorophyll (green water) adjacent to clean blue water is a bait magnet. Where bait stacks up, gamefish follow. See our chlorophyll map guide for the full breakdown.

    Step 4: Factor in the boat reports. Check what the fleet is finding — our fleet tracker shows you where the boats are running in real time. If multiple boats are working the same area, there’s probably a reason.

    Step 5: Check marine weather and swell conditions. A perfect temperature break doesn’t help if you can’t get there safely or fish it effectively in heavy seas.

    SST charts won’t guarantee fish, but they dramatically improve your odds by putting you in the right water. The more you study them and correlate what you see on the chart with what happens on the water, the better you’ll get at reading the ocean.

    Plan Your Trip

    Start reading the water today:

    Related Guides

    Tight lines!

  • Palomar Knot — How to Tie the Strongest Fishing Knot

    If you’ve ever lost a fish because your knot failed, you know the gut-wrenching feeling. All that time, all that anticipation — gone in an instant because of a weak connection.

    The good news? There’s one knot that consistently outperforms all others for connecting your line to hooks, lures, and swivels: the Palomar knot. It retains up to 95% of your line’s original breaking strength, it’s easy to learn, and it works with monofilament, fluorocarbon, and braided line.

    In this guide, you’ll learn why the Palomar is the strongest fishing knot, how to tie it step by step with pictures, and when you might want to use alternatives.

    Why the Palomar Knot Is the Strongest

    The Palomar isn’t just popular because it’s easy — it’s popular because the design distributes stress better than almost any other terminal knot.

    Double line through the eye. Unlike the clinch knot that uses a single strand, the Palomar doubles your line before passing through the hook eye. This spreads stress evenly across two strands instead of one.

    The overhand lock. The simple overhand knot creates a secure grip that doesn’t slip under pressure. When cinched properly, it locks down tight and stays put.

    Even pressure distribution. When a fish pulls, the force spreads across the entire knot rather than concentrating on one weak point. This is why Palomar knots rarely fail at the knot itself — when they do break, it’s usually the line above the knot.

    Palomar Knot Strength by Line Type

    Line Type Strength Retention Notes
    Monofilament 90–95% Excellent performance, standard technique
    Fluorocarbon 85–95% Wet thoroughly and tighten slowly — fluoro is stiffer
    Braided Line 90–95% Leave a longer tag end (¼”) to prevent slippage

    For a deeper look at the differences between these line types and which to use for each species, see our guides on braid vs mono vs fluorocarbon and best fishing line by pound test.

    How to Tie the Palomar Knot (Step by Step)

    What you’ll need: Fishing line (any type), a hook, lure, or swivel, about 6–8 inches of working line, and scissors or line cutters. Once you’ve practiced, this knot takes 15–30 seconds.

    To Start – Double the Line

    Take your tag end and fold it back about 6 inches, creating a loop of doubled line. You’ll be working with both strands together for the next few steps.

    Pro tip: Don’t skimp on length here. Starting with only 3–4 inches makes the knot difficult to tie. Use 6–8 inches.

    Step 1: Thread Through the Hook Eye

    Pass the entire doubled loop through the eye of your hook, lure, or swivel. Both strands go through together — this is what gives the Palomar its strength. You should now have the doubled standing line on one side and a loop sticking out the other.

    Struggling with small hook eyes? Try using a loop of lighter mono as a threader, or switch to a Uni knot for tiny eyes.

    Step 1 - Threading the doubled line through the hook eye

    Step 2: Tie an Overhand Knot

    With the doubled line, tie a simple overhand knot around the standing line. This is just like tying the first half of your shoes. Critical: keep this knot loose! The loop needs to stay large enough to pass the entire hook through in the next step.

    Step 2 - Loose overhand knot tied with the doubled line, loop still open

    Step 3: Pass the Hook Through the Loop

    Take your hook (or lure) and pass it completely through the large loop you created. Make sure the loop passes over the hook point and sits above the eye. The loop should end up resting on the line between the overhand knot and the hook eye.

    Using a large lure? This is where the Palomar can get awkward. For big crankbaits or swimbaits, you’ll need to use more line to create a larger loop.

    Step 3 - Passing the hook through the loop of the Palomar knot

    Step 4: Wet, Tighten, and Trim

    This is the most important step — don’t rush it.

    Wet the knot. Always wet with saliva or water before tightening. This reduces friction heat that can weaken your line by up to 20%, especially with fluorocarbon.

    Tighten evenly. Pull both the standing line and tag end at the same time while holding the hook. The knot should cinch down smoothly against the hook eye. Don’t jerk it tight — use steady, even pressure.

    Trim the tag end. Cut to about ⅛ inch for mono and fluorocarbon. For braided line, leave ¼ inch — braid is slippery and can slip if trimmed too short.

    Step 4 - The finished Palomar knot, cinched tight and trimmed

    The Finished Knot

    When tied correctly, your Palomar knot should sit snugly against the hook eye with the doubled line cinched tight, no twists or crossed lines, and a short neat tag end. Give it a test pull — grab the hook and standing line and pull firmly. Better to find a weak knot now than when you’re fighting a fish.

    Quick Reference Card

    1. Double 6 inches of line
    2. Thread loop through hook eye
    3. Tie overhand knot (keep loop large)
    4. Pass hook through loop
    5. Wet, tighten evenly, trim

    Remember: Wet → Pull both ends → Trim

    Common Mistakes to Avoid

    Not wetting the knot. Dry line creates friction heat when cinched, weakening fluorocarbon significantly. Always wet your knots — every single time.

    Pulling unevenly. If you only pull the standing line (not the tag end too), the knot won’t seat properly and can slip under load. Pull both ends simultaneously.

    Twisted loop. Make sure the loop passes cleanly over the hook without twisting. A twisted loop creates a weak point that can fail under pressure.

    Trimming too short on braid. Braided line is slippery. Leave a slightly longer tag end (¼ inch) to prevent slippage.

    Using too little line. Starting with only 3–4 inches of doubled line makes the knot almost impossible to tie well. Always start with 6–8 inches.

    Palomar vs. Other Popular Knots

    Palomar vs. Improved Clinch Knot

    Factor Palomar Improved Clinch
    Strength 90–95% 75–85%
    Ease of Tying Easy Easy
    Works with Braid Yes Poor
    Best For All-around Light mono only

    Verdict: Palomar wins on strength. The clinch knot is faster but significantly weaker, and it doesn’t hold well with braided line.

    Palomar vs. Uni Knot

    Factor Palomar Uni Knot
    Strength (Mono) 90–95% 85–90%
    Strength (Braid) 90–95% 90–98%
    Ease of Tying Very Easy Easy
    Versatility Terminal only Multiple uses

    Verdict: For mono and fluorocarbon terminal connections, Palomar wins. For braid, it’s nearly a tie — some tests show the Uni knot slightly stronger with braided line. The Uni is also more versatile since it can be used for line-to-line connections.

    Palomar vs. San Diego Jam

    Factor Palomar San Diego Jam
    Strength 90–95% 90–95%
    Ease of Tying Very Easy Moderate
    Line Diameter Better for light/medium Better for heavy
    Profile Slightly bulkier Streamlined

    Verdict: Both are excellent. Use Palomar for everyday fishing and the San Diego Jam for heavy tackle and big game situations where a streamlined knot profile matters.

    When NOT to Use the Palomar Knot

    The Palomar isn’t perfect for every situation:

    Very small hook eyes. If you can’t pass doubled line through the eye, use a Uni knot instead.

    Heavy line (40lb+). Thick mono and fluorocarbon can be too stiff to double easily. Consider a San Diego Jam or Uni knot for heavy tackle.

    Large lures already attached to line. The Palomar requires passing the entire lure through the loop. Re-tying to a large crankbait or swimbait can be awkward.

    Line-to-line connections. The Palomar is a terminal knot only. For joining braid to leader, use an FG knot, Alberto knot, or Double Uni. See our complete knot guide for braid-to-leader connections.

    Pro Tips for Maximum Strength

    Use the Double Palomar for braid. When using braided line, pass through the hook eye twice before tying the overhand knot. This creates more surface area friction and can increase strength by 5–10%.

    Test every knot. Before casting, give your knot a firm pull. Better to find a weak knot at the boat than when a trophy fish is on the other end.

    Re-tie after big fish. Even if your knot held, the line near the knot can be stressed and weakened. After landing a big fish, cut off a few inches and re-tie fresh.

    Practice at home. Tie 20 Palomar knots tonight while watching TV. Build that muscle memory so you can tie perfect knots in the dark, in the rain, when your hands are cold and fish are busting bait 30 feet away.

    When to Use the Palomar

    The Palomar is your best choice for tying hooks to line, attaching jigs and iron, connecting swivels on Carolina rigs, rigging soft plastics, and pretty much any terminal tackle connection. It’s the go-to knot for surf fishing, tuna fly-lining, iron fishing, and slider rigs — the one knot that covers almost everything.

    Hooks and Line Guides

    A strong knot is only as good as the hook and line on either end of it. Here are our complete guides:

    Plan Your Trip

    Related Guides

    Tight lines!