If you’ve ever lost a fish because your knot failed, you know the gut-wrenching feeling. All that time, all that anticipation — gone in an instant because of a weak connection.
The good news? There’s one knot that consistently outperforms all others for connecting your line to hooks, lures, and swivels: the Palomar knot. It retains up to 95% of your line’s original breaking strength, it’s easy to learn, and it works with monofilament, fluorocarbon, and braided line.
In this guide, you’ll learn why the Palomar is the strongest fishing knot, how to tie it step by step with pictures, and when you might want to use alternatives.
Why the Palomar Knot Is the Strongest
The Palomar isn’t just popular because it’s easy — it’s popular because the design distributes stress better than almost any other terminal knot.
Double line through the eye. Unlike the clinch knot that uses a single strand, the Palomar doubles your line before passing through the hook eye. This spreads stress evenly across two strands instead of one.
The overhand lock. The simple overhand knot creates a secure grip that doesn’t slip under pressure. When cinched properly, it locks down tight and stays put.
Even pressure distribution. When a fish pulls, the force spreads across the entire knot rather than concentrating on one weak point. This is why Palomar knots rarely fail at the knot itself — when they do break, it’s usually the line above the knot.
Palomar Knot Strength by Line Type
| Line Type | Strength Retention | Notes |
|---|---|---|
| Monofilament | 90–95% | Excellent performance, standard technique |
| Fluorocarbon | 85–95% | Wet thoroughly and tighten slowly — fluoro is stiffer |
| Braided Line | 90–95% | Leave a longer tag end (¼”) to prevent slippage |
For a deeper look at the differences between these line types and which to use for each species, see our guides on braid vs mono vs fluorocarbon and best fishing line by pound test.
How to Tie the Palomar Knot (Step by Step)
What you’ll need: Fishing line (any type), a hook, lure, or swivel, about 6–8 inches of working line, and scissors or line cutters. Once you’ve practiced, this knot takes 15–30 seconds.
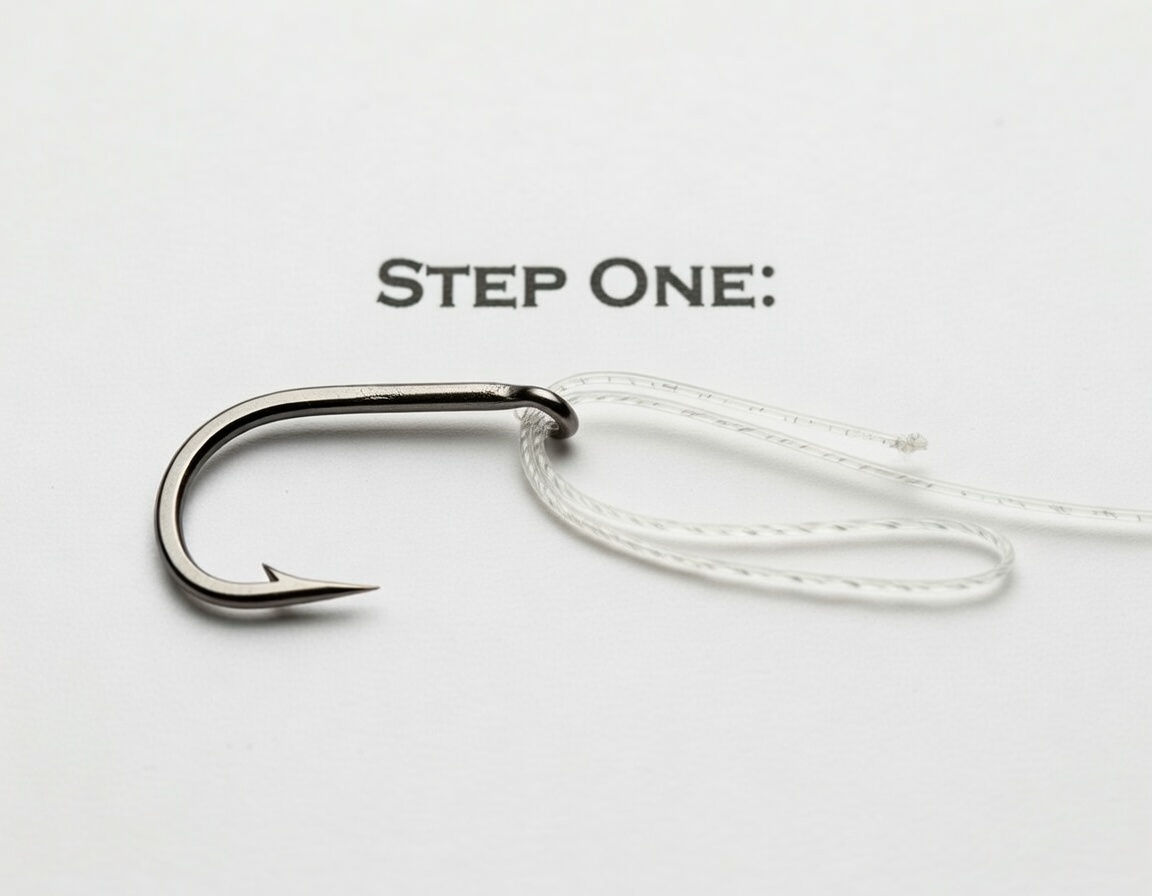
To Start – Double the Line
Take your tag end and fold it back about 6 inches, creating a loop of doubled line. You’ll be working with both strands together for the next few steps.
Pro tip: Don’t skimp on length here. Starting with only 3–4 inches makes the knot difficult to tie. Use 6–8 inches.
Step 1: Thread Through the Hook Eye
Pass the entire doubled loop through the eye of your hook, lure, or swivel. Both strands go through together — this is what gives the Palomar its strength. You should now have the doubled standing line on one side and a loop sticking out the other.
Struggling with small hook eyes? Try using a loop of lighter mono as a threader, or switch to a Uni knot for tiny eyes.
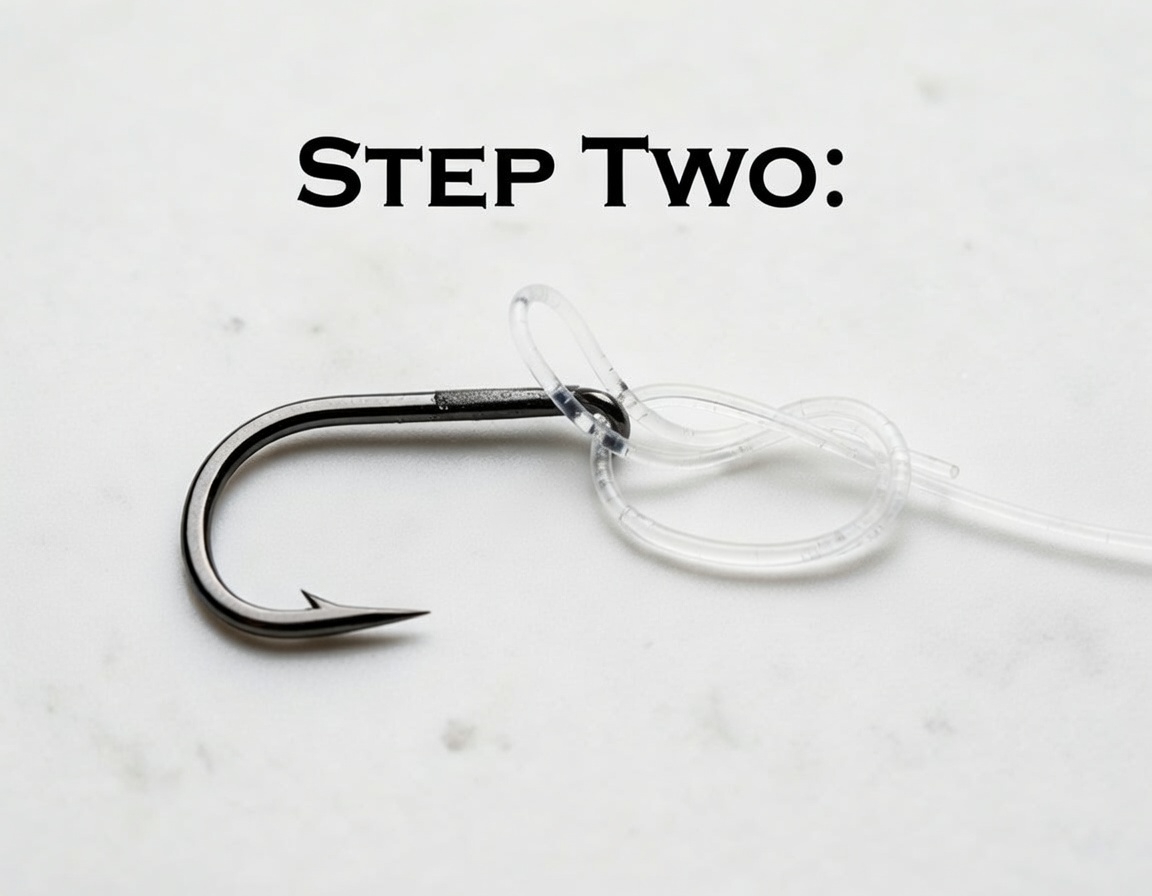
Step 2: Tie an Overhand Knot
With the doubled line, tie a simple overhand knot around the standing line. This is just like tying the first half of your shoes. Critical: keep this knot loose! The loop needs to stay large enough to pass the entire hook through in the next step.
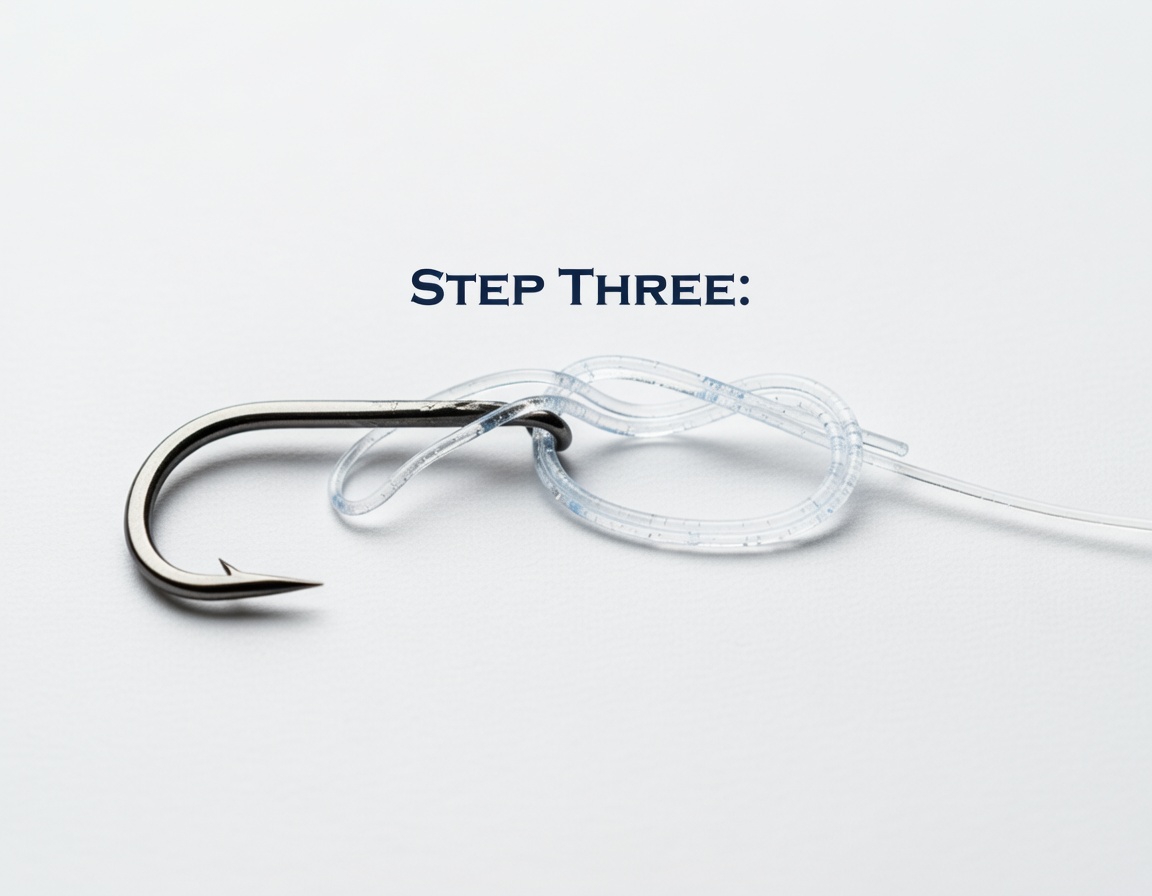
Step 3: Pass the Hook Through the Loop
Take your hook (or lure) and pass it completely through the large loop you created. Make sure the loop passes over the hook point and sits above the eye. The loop should end up resting on the line between the overhand knot and the hook eye.
Using a large lure? This is where the Palomar can get awkward. For big crankbaits or swimbaits, you’ll need to use more line to create a larger loop.
Step 4: Wet, Tighten, and Trim
This is the most important step — don’t rush it.
Wet the knot. Always wet with saliva or water before tightening. This reduces friction heat that can weaken your line by up to 20%, especially with fluorocarbon.
Tighten evenly. Pull both the standing line and tag end at the same time while holding the hook. The knot should cinch down smoothly against the hook eye. Don’t jerk it tight — use steady, even pressure.
Trim the tag end. Cut to about ⅛ inch for mono and fluorocarbon. For braided line, leave ¼ inch — braid is slippery and can slip if trimmed too short.
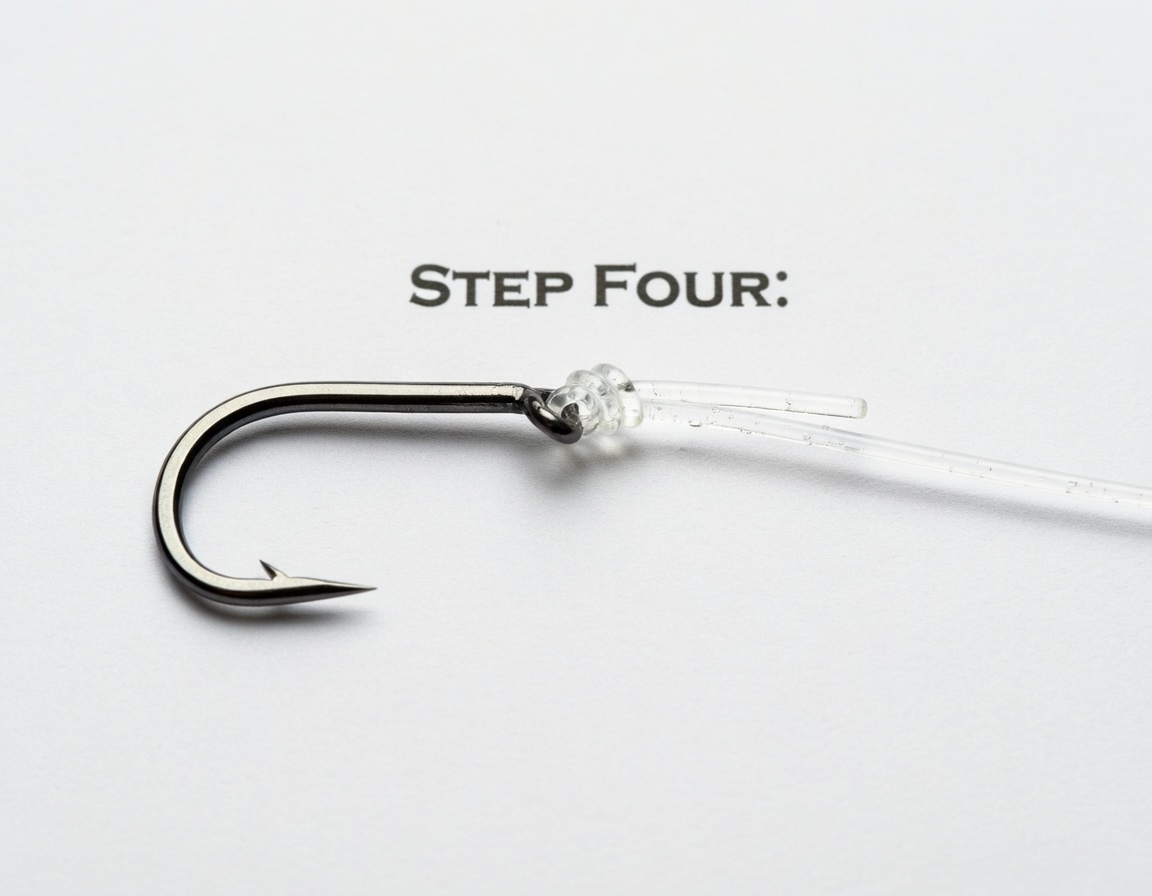
The Finished Knot
When tied correctly, your Palomar knot should sit snugly against the hook eye with the doubled line cinched tight, no twists or crossed lines, and a short neat tag end. Give it a test pull — grab the hook and standing line and pull firmly. Better to find a weak knot now than when you’re fighting a fish.
Quick Reference Card
- Double 6 inches of line
- Thread loop through hook eye
- Tie overhand knot (keep loop large)
- Pass hook through loop
- Wet, tighten evenly, trim
Remember: Wet → Pull both ends → Trim
Common Mistakes to Avoid
Not wetting the knot. Dry line creates friction heat when cinched, weakening fluorocarbon significantly. Always wet your knots — every single time.
Pulling unevenly. If you only pull the standing line (not the tag end too), the knot won’t seat properly and can slip under load. Pull both ends simultaneously.
Twisted loop. Make sure the loop passes cleanly over the hook without twisting. A twisted loop creates a weak point that can fail under pressure.
Trimming too short on braid. Braided line is slippery. Leave a slightly longer tag end (¼ inch) to prevent slippage.
Using too little line. Starting with only 3–4 inches of doubled line makes the knot almost impossible to tie well. Always start with 6–8 inches.
Palomar vs. Other Popular Knots
Palomar vs. Improved Clinch Knot
| Factor | Palomar | Improved Clinch |
|---|---|---|
| Strength | 90–95% | 75–85% |
| Ease of Tying | Easy | Easy |
| Works with Braid | Yes | Poor |
| Best For | All-around | Light mono only |
Verdict: Palomar wins on strength. The clinch knot is faster but significantly weaker, and it doesn’t hold well with braided line.
Palomar vs. Uni Knot
| Factor | Palomar | Uni Knot |
|---|---|---|
| Strength (Mono) | 90–95% | 85–90% |
| Strength (Braid) | 90–95% | 90–98% |
| Ease of Tying | Very Easy | Easy |
| Versatility | Terminal only | Multiple uses |
Verdict: For mono and fluorocarbon terminal connections, Palomar wins. For braid, it’s nearly a tie — some tests show the Uni knot slightly stronger with braided line. The Uni is also more versatile since it can be used for line-to-line connections.
Palomar vs. San Diego Jam
| Factor | Palomar | San Diego Jam |
|---|---|---|
| Strength | 90–95% | 90–95% |
| Ease of Tying | Very Easy | Moderate |
| Line Diameter | Better for light/medium | Better for heavy |
| Profile | Slightly bulkier | Streamlined |
Verdict: Both are excellent. Use Palomar for everyday fishing and the San Diego Jam for heavy tackle and big game situations where a streamlined knot profile matters.
When NOT to Use the Palomar Knot
The Palomar isn’t perfect for every situation:
Very small hook eyes. If you can’t pass doubled line through the eye, use a Uni knot instead.
Heavy line (40lb+). Thick mono and fluorocarbon can be too stiff to double easily. Consider a San Diego Jam or Uni knot for heavy tackle.
Large lures already attached to line. The Palomar requires passing the entire lure through the loop. Re-tying to a large crankbait or swimbait can be awkward.
Line-to-line connections. The Palomar is a terminal knot only. For joining braid to leader, use an FG knot, Alberto knot, or Double Uni. See our complete knot guide for braid-to-leader connections.
Pro Tips for Maximum Strength
Use the Double Palomar for braid. When using braided line, pass through the hook eye twice before tying the overhand knot. This creates more surface area friction and can increase strength by 5–10%.
Test every knot. Before casting, give your knot a firm pull. Better to find a weak knot at the boat than when a trophy fish is on the other end.
Re-tie after big fish. Even if your knot held, the line near the knot can be stressed and weakened. After landing a big fish, cut off a few inches and re-tie fresh.
Practice at home. Tie 20 Palomar knots tonight while watching TV. Build that muscle memory so you can tie perfect knots in the dark, in the rain, when your hands are cold and fish are busting bait 30 feet away.
When to Use the Palomar
The Palomar is your best choice for tying hooks to line, attaching jigs and iron, connecting swivels on Carolina rigs, rigging soft plastics, and pretty much any terminal tackle connection. It’s the go-to knot for surf fishing, tuna fly-lining, iron fishing, and slider rigs — the one knot that covers almost everything.
Hooks and Line Guides
A strong knot is only as good as the hook and line on either end of it. Here are our complete guides:
- Best Hooks by Species — Owner circle hooks, J hooks, and treble hooks for every SoCal species
- Circle Hooks vs J Hooks — when to use each and why it matters
- Best Fishing Line by Pound Test — specific braid and fluorocarbon recommendations by species
- Braid vs Mono vs Fluorocarbon — which line type to use and when
- Best Fishing Knots — FG knot, Double Uni, and every other connection you need
Plan Your Trip
- SST Chart — Find the temperature breaks where fish stack up
- Chlorophyll Map — Where bait is concentrating
- Marine Weather — Wind, swell, and conditions
- Fleet Tracker — See where the fleet is fishing
- AI Fishing Predictions — Data-driven forecasts for SoCal
- SD Fishing Season Calendar — What’s biting this month
Related Guides
- Best Fishing Knots
- Best Hooks by Species
- Circle Hooks vs J Hooks
- Best Fishing Line by Pound Test
- Braid vs Mono vs Fluorocarbon
- Carolina Rig Setup
- Dropper Loop Rig
- Fly-Line Rig for Tuna
- Slider Rig for Live Bait
- Best Yellowtail Jigs & Irons
- Best Tuna Jigs
- Best Lures for Dorado
- Best Swimbaits for Halibut
- Surface Iron Fishing Guide
- Best Rod & Reel Combos for SoCal
- Halibut Surf Fishing in SoCal
- Surf Fishing at Doheny
- SD Fishing Season Calendar
Tight lines!