You can have the best rod, reel, and line money can buy, but if your knot fails, none of it matters. A good knot is the weakest link you can control — and in saltwater fishing where fish are bigger, runs are longer, and abrasion is constant, the wrong knot will cost you fish.
You don’t need to know 50 knots. You need to know five or six really well and tie them consistently under pressure — on a rocking boat, in the dark, with a bite going off. Here are the knots that cover every saltwater connection you’ll need in SoCal.
The Essential Knots
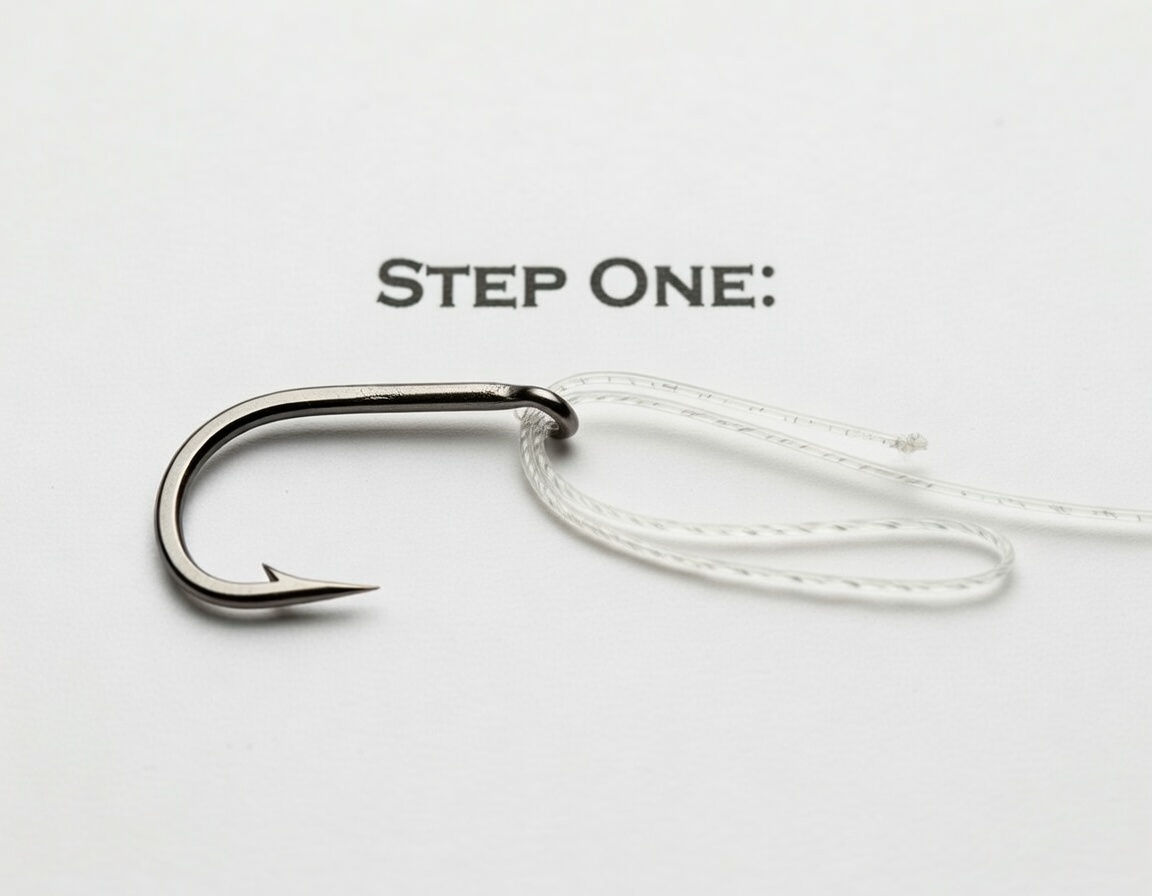
1. Palomar Knot — Best for Hooks and Jigs
The Palomar is the single most important knot in fishing. It’s incredibly strong (near 100% line strength when tied correctly), easy to tie, and works with braid, mono, and fluorocarbon. Use it every time you tie a hook, jig, or swivel to your line.
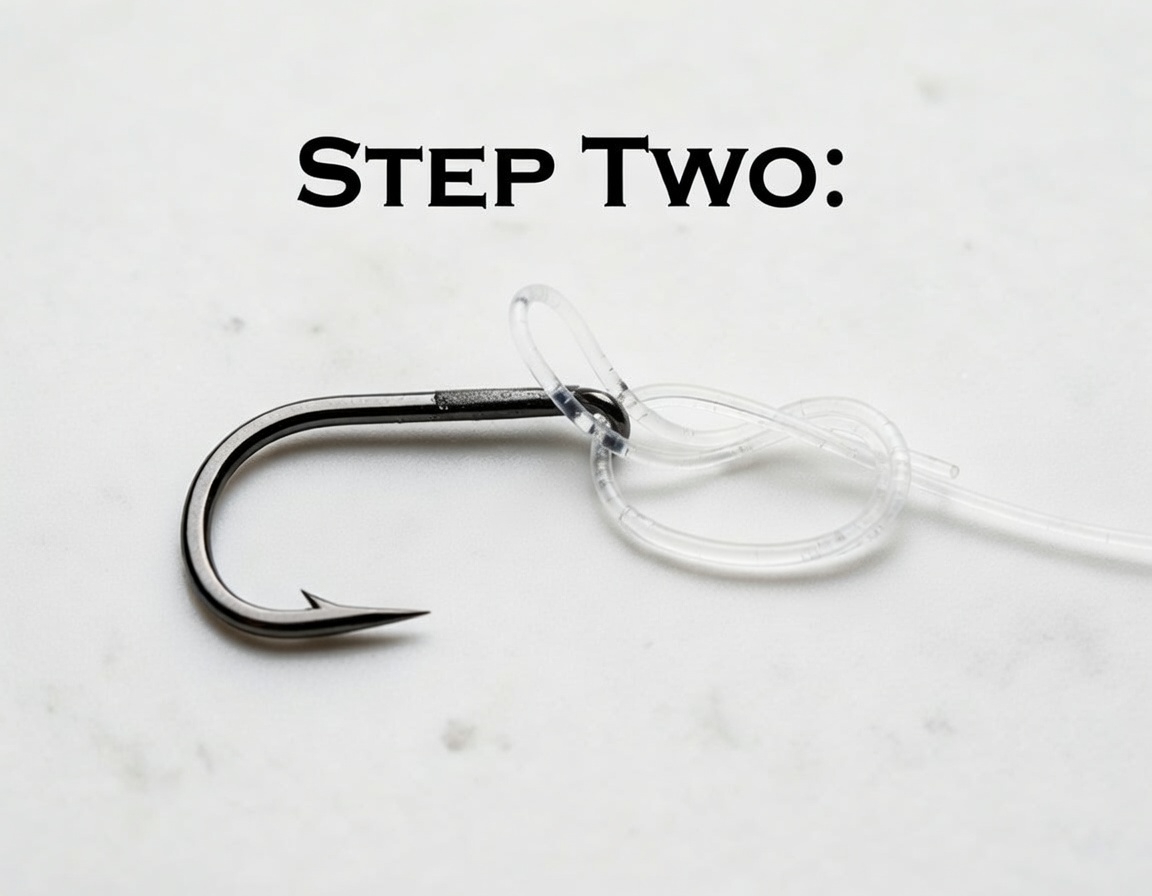
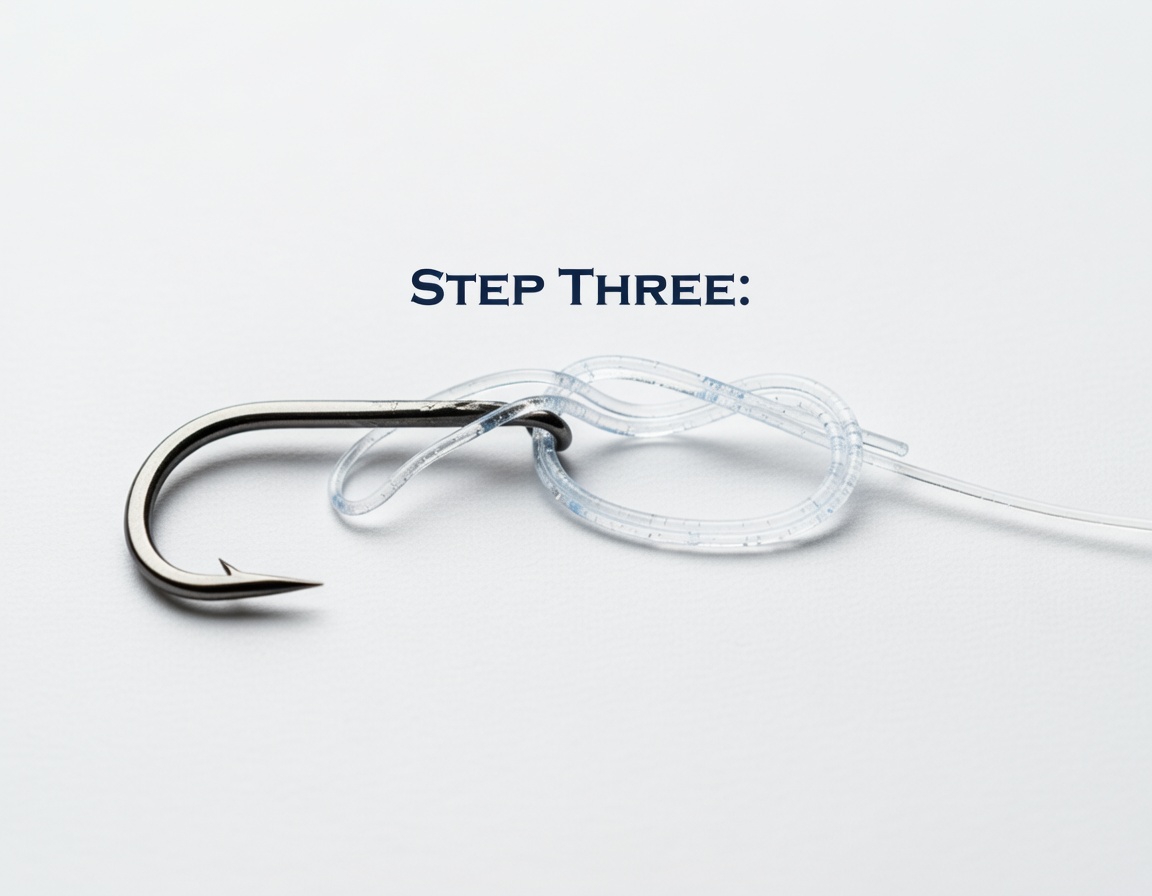
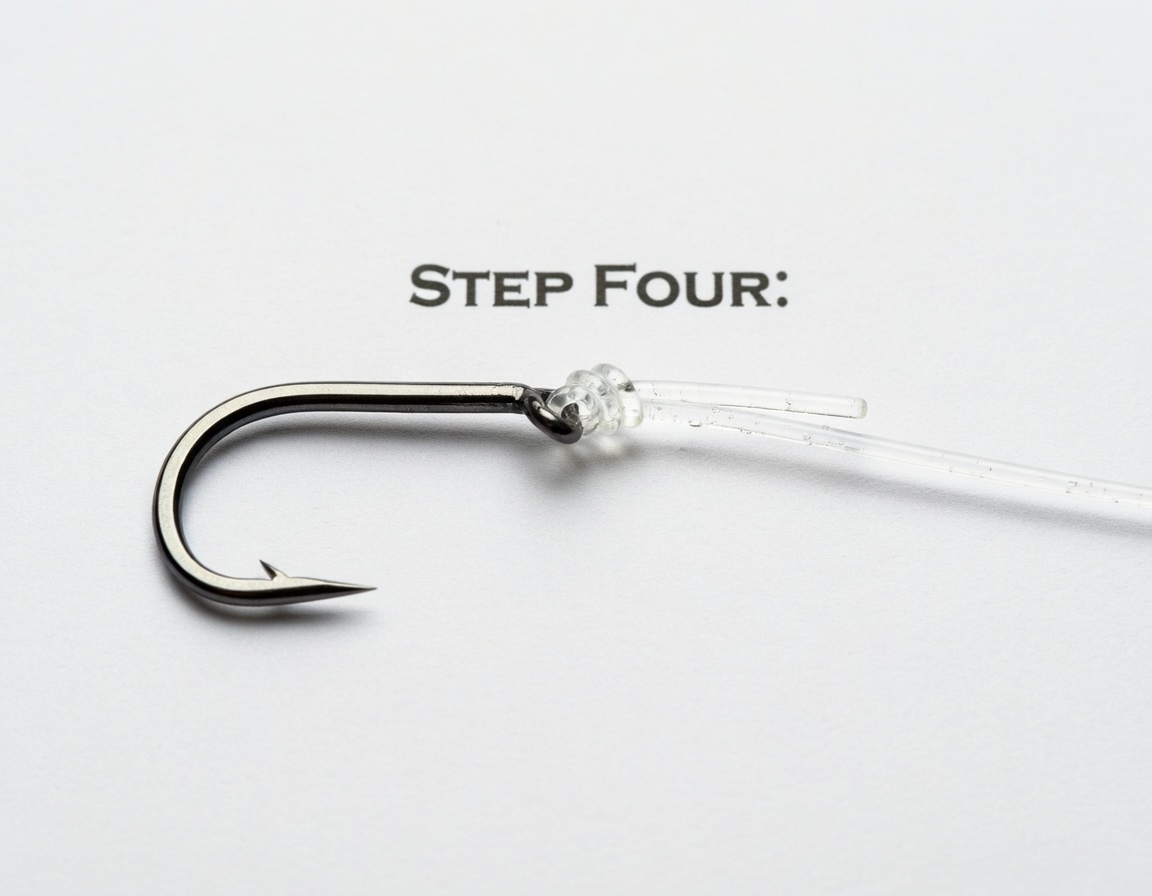
How to tie it: Double 6 inches of line and pass the loop through the hook eye. Tie a simple overhand knot with the doubled line, leaving the loop large enough to pass the hook through. Pass the hook through the loop. Moisten and pull both the standing line and tag end to cinch tight against the hook eye. Trim the tag.
The key mistakes people make: not wetting the knot before cinching (causes friction damage), not passing the loop completely over the hook (the knot will slip), and leaving the tag too short (it can pull through under load). See our step-by-step Palomar guide with pictures for the full breakdown.
2. FG Knot — Best for Braid-to-Leader Connections
The FG knot is the gold standard for connecting braided main line to a fluorocarbon or mono leader. It creates a slim, streamlined connection that passes through rod guides smoothly — critical when a fish runs and your knot has to fly through the tip. It’s harder to learn than other knots, but once you have it down, nothing else compares for braid-to-leader connections.
How to tie it: Hold the leader under tension (many anglers hold it in their teeth or use a knot tool). Wrap the braid around the leader in alternating directions — over from the right, then over from the left — creating a series of tight wraps. Do 15–20 wraps. Then finish with a series of half hitches on the braid side only, cinching each one tight. Trim the leader tag flush and the braid tag close.
The FG knot has a learning curve — expect to tie it 20–30 times at home before it becomes second nature. Watch a YouTube tutorial to see the hand motions. Once you get it, you’ll tie it every time. This is the knot connecting your 50–65lb braid to your fluoro leader on every tuna setup, yellowtail rig, and dorado outfit. An alternative that’s easier but bulkier is the Alberto knot (see below).
3. Uni Knot — Best Versatile Knot
The uni knot is the Swiss army knife of fishing knots. It works for tying hooks, joining two lines together (double uni), connecting to swivels, and even making a loop knot with a slight modification. It’s not quite as strong as the Palomar for hooks, but it’s incredibly versatile and fast to tie.
How to tie it: Pass the line through the hook eye. Double back to form a loop alongside the standing line. Wrap the tag end around both lines and through the loop 5–6 times (use 8 wraps for braid). Moisten and pull the tag end to tighten the wraps. Slide the knot down to the hook eye by pulling the standing line. Trim the tag.
The uni knot also works as a line-to-line connection: tie a uni knot on each line around the other line, then pull both standing lines to slide the knots together. This double uni is a reliable braid-to-leader connection that’s easier than the FG — just bulkier.
4. Alberto Knot — Easiest Braid-to-Leader Knot
If the FG knot is too fiddly for you, the Alberto knot is the next best option for braid-to-leader connections. It’s essentially a modified uni knot that handles the diameter difference between braid and fluorocarbon well. Not as slim as the FG, but significantly easier to tie — especially on a moving boat.
How to tie it: Double over 6 inches of the leader to form a loop. Pass the braid through the loop. Wrap the braid around the doubled leader 7 times going away from the loop, then 7 times coming back toward it. Pass the braid back through the leader loop (same direction you entered). Moisten and slowly pull tight. Trim both tags.
5. San Diego Jam Knot — Best for Heavy Hooks and Jigs
When you’re tying heavy circle hooks or big yellowtail jigs to thick fluorocarbon leader, the San Diego jam knot is hard to beat. It cinches tight against heavy wire hooks better than a Palomar (which can slip on thick hook eyes) and maintains near-100% knot strength with heavy fluoro. This is the knot for your 4/0–6/0 Owner circles on tuna fly-line rigs and big bait setups.
How to tie it: Pass the line through the hook eye. Wrap the tag end around the standing line 5–7 times, moving away from the hook. Pass the tag end through the loop closest to the hook eye, then back through the large loop you just created. Moisten and pull tight. It looks complicated written out, but it’s fast once you’ve done it a few times.
6. Improved Clinch Knot — The Backup
The improved clinch knot is probably the first knot most anglers learn. It’s reliable enough for mono and fluorocarbon up to about 30lb test, but it starts to lose strength with thicker diameters and doesn’t hold well with braid. Think of it as your backup — perfectly fine for basic applications but replaced by the Palomar and uni for most serious use.
Which Knot for Which Connection
| Connection | Best Knot | Alternate |
|---|---|---|
| Hook to mono/fluoro | Palomar | San Diego jam, uni |
| Hook to braid (no leader) | Palomar | Uni (8 wraps) |
| Jig or iron to leader | San Diego jam | Palomar |
| Braid to fluoro leader | FG knot | Alberto, double uni |
| Swivel connection (Carolina rig) | Palomar | Uni |
| Loop knot (for lure action) | Non-slip loop (Kreh) | Uni loop |
| Quick dropper loop | Dropper loop | Surgeon’s loop |
Knot-Tying Tips
Always wet your knots. Friction from cinching a dry knot generates heat that weakens line — especially fluorocarbon. A quick lick or dip in the water before pulling tight preserves full knot strength.
Pull knots tight slowly. Jerking a knot tight causes uneven wraps and weak spots. Steady, firm pressure seats everything properly.
Test every knot. After tying, give the line a firm pull. Better to find a bad knot before you cast than after a fish breaks you off.
Retie regularly. Fluorocarbon develops memory and micro-abrasions after catching fish. Retie after every few fish or any time you feel roughness near the knot.
Practice at home. Tying an FG knot for the first time while the tuna are biting is a recipe for frustration. Practice until muscle memory takes over.
Hooks and Line Guides
A strong knot only matters if it’s tied to the right hook with the right line. Here are our complete guides:
- Best Hooks by Species — Owner circle hooks, J hooks, and treble hooks for every SoCal species
- Circle Hooks vs J Hooks — when to use each and why it matters
- Best Fishing Line by Pound Test — specific braid and fluorocarbon recommendations by species
- Braid vs Mono vs Fluorocarbon — which line type to use and when
- How to Tie a Palomar Knot — step-by-step with pictures
Plan Your Trip
Knots tied? Check conditions before heading out:
- SST Chart — Find temperature breaks where fish stack up
- Chlorophyll Map — Where bait is concentrating
- Marine Weather — Wind, swell, and conditions
- Fleet Tracker — See where the fleet is fishing
- AI Fishing Predictions — Data-driven forecasts for SoCal
- SD Fishing Season Calendar — What’s biting this month
Related Guides
- How to Tie a Palomar Knot
- Best Hooks by Species
- Circle Hooks vs J Hooks
- Best Fishing Line by Pound Test
- Braid vs Mono vs Fluorocarbon
- Carolina Rig Setup
- Dropper Loop Rig
- Fly-Line Rig for Tuna
- Slider Rig for Live Bait
- Best Yellowtail Jigs & Irons
- Best Tuna Jigs
- Best Lures for Dorado
- Best Lures for Tuna
- Best Poppers for Tuna
- Surface Iron Fishing Guide
- Best Swimbaits for Halibut
- Best Reel for Bluefin Tuna
- Best Reel for Yellowtail
- Best Rod & Reel Combos for SoCal
- Best Water Temp for Bluefin
- Best Water Temp for Yellowtail
- Best Water Temp for Dorado
- Overnight Trip Packing List
- SD Fishing Season Calendar
Tight lines!