The dropper loop rig is the workhorse of SoCal bottom fishing. If you’ve ever fished a party boat targeting rockfish, sheephead, or whitefish, you’ve seen this rig on every rail. It’s simple, effective, and lets you fish multiple baits at different depths — which is exactly what you want when you’re working structure and don’t know exactly where the fish are sitting.
This guide covers how to tie the dropper loop knot, how to set up a complete rig, and when to use it versus a Carolina rig or other bottom rigs.
What Is a Dropper Loop Rig?
A dropper loop rig places one or more hooks on short loops that extend perpendicular to your main line, with a weight at the bottom. The hooks sit above the weight, suspending your baits at specific depths off the bottom. This design is different from a Carolina rig where the bait sits on the bottom — a dropper loop keeps baits up in the water column where species like rockfish, whitefish, and sheephead actively feed.
Most SoCal dropper loop rigs run two hooks — one about 12 inches above the sinker and another 12–18 inches above that. This covers a band of water column and doubles your chances of finding where the fish are holding.
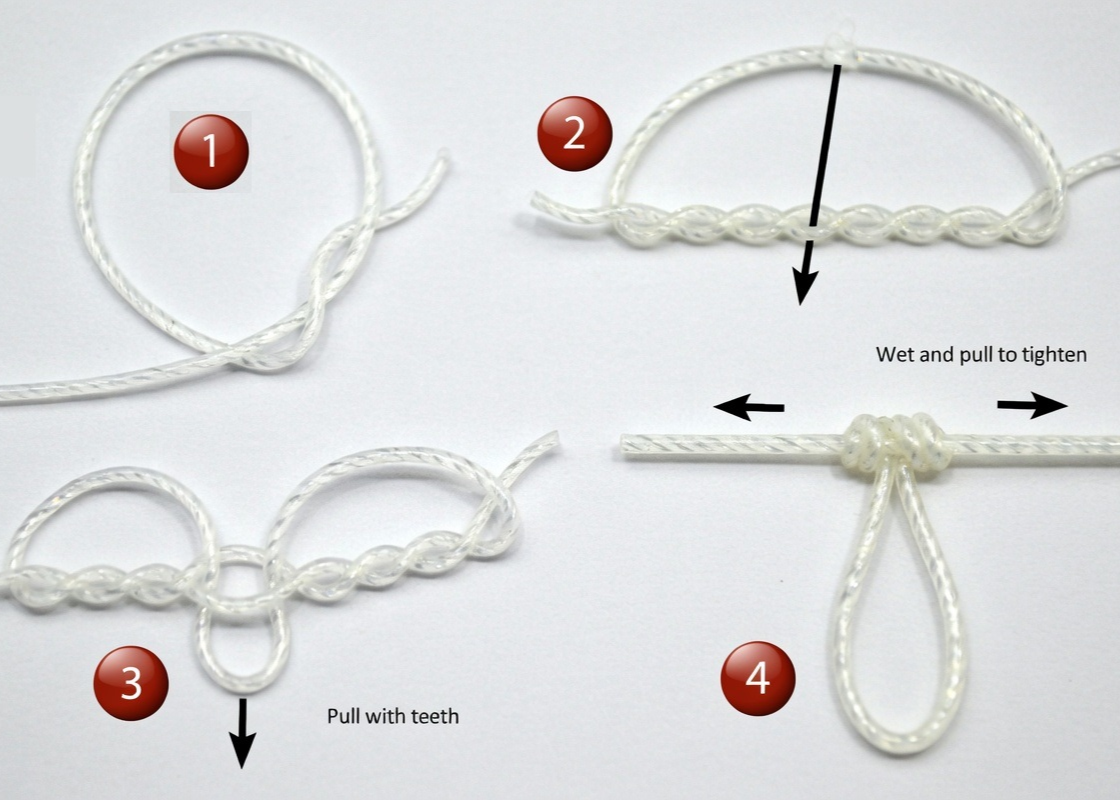
How to Tie the Dropper Loop Knot
Step 1: Form a loop in your line where you want the hook to sit. Make the loop about 4–5 inches across — this will become the arm that holds your hook away from the main line.
Step 2: Pinch the crossing point with one hand. With the other hand, twist the loop around itself 6–8 times. The more twists, the stiffer the loop arm will be (which is what you want — it keeps the hook from tangling with the main line).
Step 3: Find the center of your twists and push the top of the loop through the middle opening. Pull it through firmly.
Step 4: Moisten the knot and pull both ends of the main line to tighten. The loop should stand out perpendicular to the line. If it lays flat against the line, you didn’t use enough twists — retie with more wraps.
Step 5: Clip one side of the loop to create a single tag end, then tie your hook to this tag using a Palomar knot. Alternatively, you can pass the hook directly through the uncut loop — this lets you change hooks quickly without retying. See our complete knot guide for step-by-step instructions on the Palomar and other terminal connections.
Repeat the process at your second hook position. Then tie a sinker to the bottom of the rig using a simple overhand loop or a snap swivel for quick weight changes.
Complete Rig Setup
Main line: 30–50lb fluorocarbon or heavy monofilament. Many anglers pre-tie dropper loop rigs on heavy mono and attach them to their braided main line with a swivel. This lets you swap entire rigs quickly if one gets tangled or cut off on the rocks. See our fishing line guide for specific brand recommendations by pound test.
Hook 1 (lower): Positioned 10–14 inches above the sinker. Use a circle hook in 2/0–4/0 for rockfish and whitefish, or a J-hook if you prefer setting the hook manually. The Owner Mutu Circle (5163) in 2/0–3/0 is the go-to for dropper loop rigs — the medium wire handles rockfish and sheephead without straightening, and the circle design means jaw-corner hookups for easy releases on short fish. The loop arm should be 3–4 inches long — long enough to keep the bait away from the main line but short enough to avoid tangles.
Hook 2 (upper): Positioned 12–18 inches above the first hook. Same hook size and style. This hook fishes higher in the water column, which often catches a different species than the lower hook.
Sinker: 4–16 ounces depending on depth and current. For party boat fishing in 150–300 feet of water, 8–12 ounces is standard. For shallower rockfish spots (50–100 feet), 4–6 ounces works. Use a torpedo or bank sinker — their streamlined shape cuts through current better than round sinkers.
For a complete breakdown of hook models, wire weights, and sizes for every SoCal bottom species, see our hooks by species guide.
Best Baits for a Dropper Loop Rig
Squid strips are the all-time top bait for dropper loop rigs — tough, stays on the hook, and catches everything. Cut a squid into strips about 3–4 inches long and 1/2 inch wide. Thread the hook through one end so the strip trails behind.
Other top baits: shrimp (whole or pieces) for sheephead, sardine chunks for rockfish, and live anchovies when you can get them. Tip: double up by putting squid on one hook and shrimp on the other — you’ll quickly learn what the fish prefer that day.
Tackle Setup
Bottom fishing with a dropper loop doesn’t require the heavy offshore gear you’d use for tuna, but you still need enough backbone to haul fish up from deep structure:
Rod: A 7-foot medium to medium-heavy rod for most party boat bottom fishing. Enough backbone to lift 8–12 ounces of lead plus a fish from 200 feet, with enough sensitivity to feel the bite.
Reel: A 20lb class conventional reel or 30lb class for deeper water. Conventional reels are preferred over spinning reels for dropper loop fishing because the vertical drop-and-retrieve is easier to control.
Line: 30–40lb braid as mainline with your pre-tied dropper loop rig attached via a barrel swivel. Braid’s zero stretch lets you feel bites clearly from 200+ feet, and its thin diameter cuts through current better than mono. See our braid vs fluorocarbon guide for why braid mainline with a mono/fluoro rig is the standard setup.
Hooks: Circle hooks in 2/0–4/0 are the best choice for dropper loops — jaw-corner hookups, fewer gut-hooks, and better survival on released fish. The Owner Mutu Circle (5163) and Owner SSW Circle (5178) are both excellent for bottom fishing. See our hooks by species guide for specific models and sizes for rockfish, sheephead, and whitefish.
For complete rod and reel pairing advice, see our best rod and reel combo guide.
When to Use a Dropper Loop vs Other Rigs
| Situation | Best Rig | Why |
|---|---|---|
| Bottom fish on structure (rockfish, sheephead) | Dropper loop | Baits suspended above rocks, less snags |
| Halibut on sand | Carolina rig | Bait right on the bottom where halibut ambush |
| Surf fishing | Carolina rig | Slides with current, natural presentation |
| Deep water party boat (200+ ft) | Dropper loop | Two baits cover more water column |
| Tuna on live bait | Fly-line rig | Free-swimming bait, no weight |
| Yellowtail on live bait | Slider rig | Adjustable depth, natural swim |
Tips for Fishing the Dropper Loop
Drop to the bottom, then reel up 2–3 cranks. This lifts your baits into the active feeding zone and reduces snags. When you feel a bite, don’t jerk — if you’re using circle hooks, just reel tight and the hook will set itself. With J-hooks, a moderate lift of the rod is enough. Big hooksets pull the bait away from the fish more often than not.
If you’re getting bit on one hook consistently but not the other, adjust. If the lower hook is producing, the fish are tight to the bottom — consider shortening the distance between your sinker and first hook. If the upper hook is hot, the fish are suspended — add a third dropper loop even higher.
Pre-tie several rigs at home and store them on a rig winder. On the boat, tangles happen — having backups ready means you spend more time fishing and less time retying. Use different hook sizes on each rig so you can match what the fish want that day.
Plan Your Trip
Check conditions before you head out:
- SST Chart — Water temperatures at your fishing grounds
- Chlorophyll Map — Bait concentration and water clarity
- Marine Weather — Wind, swell, and current conditions
- Fleet Tracker — See where the fleet is finding bottom fish
- AI Fishing Predictions — Data-driven forecasts for SoCal
- SD Fishing Season Calendar — What’s biting this month
Related Guides
- Carolina Rig Setup
- Fly-Line Rig for Tuna
- Slider Rig for Live Bait
- Best Hooks by Species
- Circle Hooks vs J Hooks
- Best Fishing Line by Pound Test
- Braid vs Mono vs Fluorocarbon
- Best Fishing Knots
- How to Tie a Palomar Knot
- Best 20lb Reels
- Best 30lb Reels
- Best 7-Foot Offshore Rods
- Best Rod & Reel Combos for SoCal
- Spinning vs Conventional Reels
- Best Swimbaits for Halibut
- Best Water Temp for Halibut
- Best Water Temp for Bluefin Tuna
- Best Water Temp for Yellowtail
- Finding Temperature Breaks
- SD Fishing Season Calendar
Tight lines!