• Slider Rig for Live Bait Fishing

    Slider Rig for Live Bait Fishing

    The slider rig is one of the most effective live bait presentations for SoCal offshore fishing. It lets you adjust the depth your bait swims at without retying your rig — a critical advantage when fish are holding at a specific depth and you need to get your bait right in front of them. Whether you’re targeting yellowtail on a reef, white seabass in the kelp, or tuna under a kelp paddy, the slider rig gives you precise depth control with a natural bait presentation.

    What Is a Slider Rig?

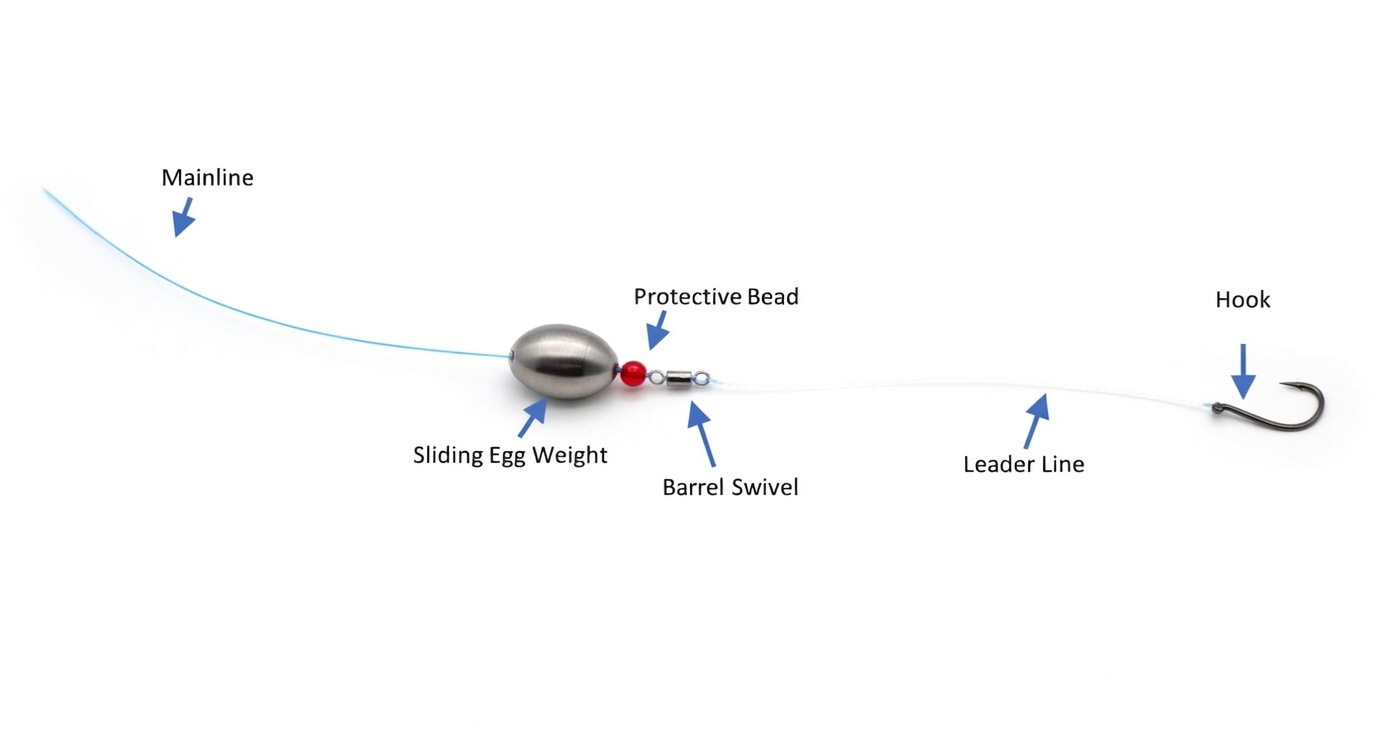
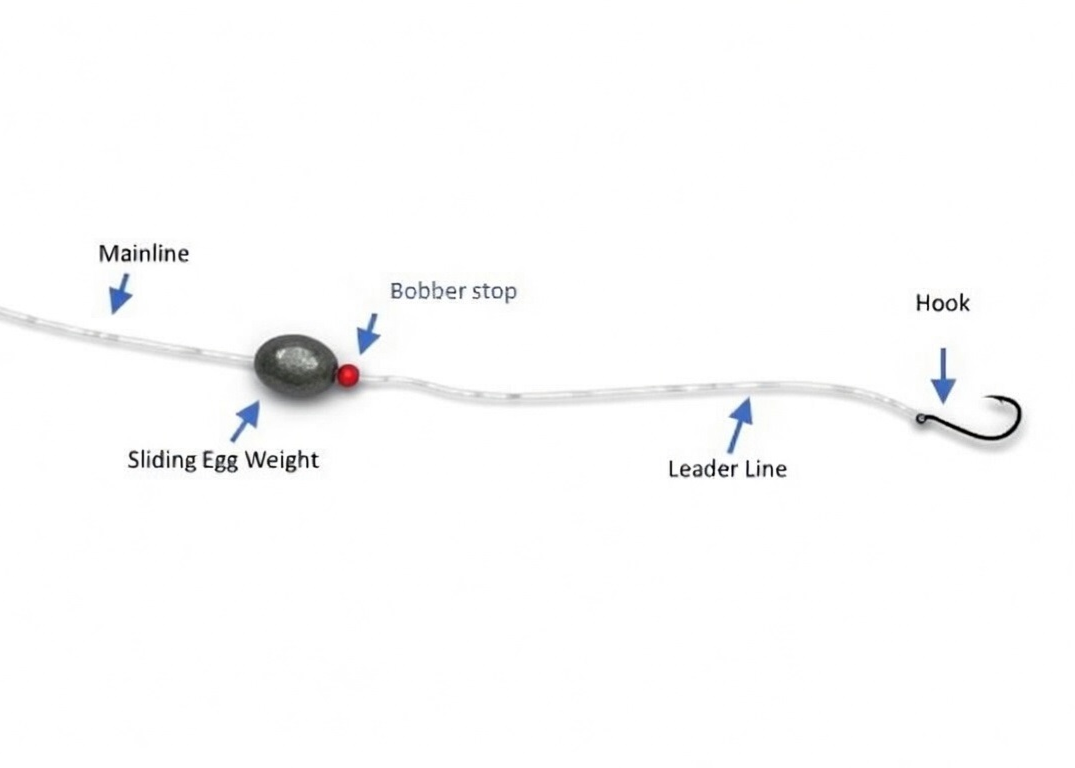
    A slider rig uses a sliding sinker on your main line, held at a set depth by a bobber stop — a small knot or rubber stop that you can move up and down the line. The sinker slides freely down the line until it hits the bobber stop, and your bait hangs below on a fluorocarbon leader tied directly to the main line. When a fish takes the bait, the line pulls through the sinker freely — the fish feels no resistance, so it doesn’t drop the bait.

    The slider is different from a fly-line rig (which uses no weight and lets the bait swim freely) and a Carolina rig (which sits on the bottom). The slider suspends the bait at a specific depth in the water column — wherever you set the bobber stop.

    How to Set Up a Slider Rig

    What you need: A bobber stop, an egg sinker (1–3 oz), fluorocarbon leader (20–40lb), and a circle hook in 1/0–4/0 (or a J hook if the boat allows — see our hooks by species guide for size selection by target). That’s it — four components.

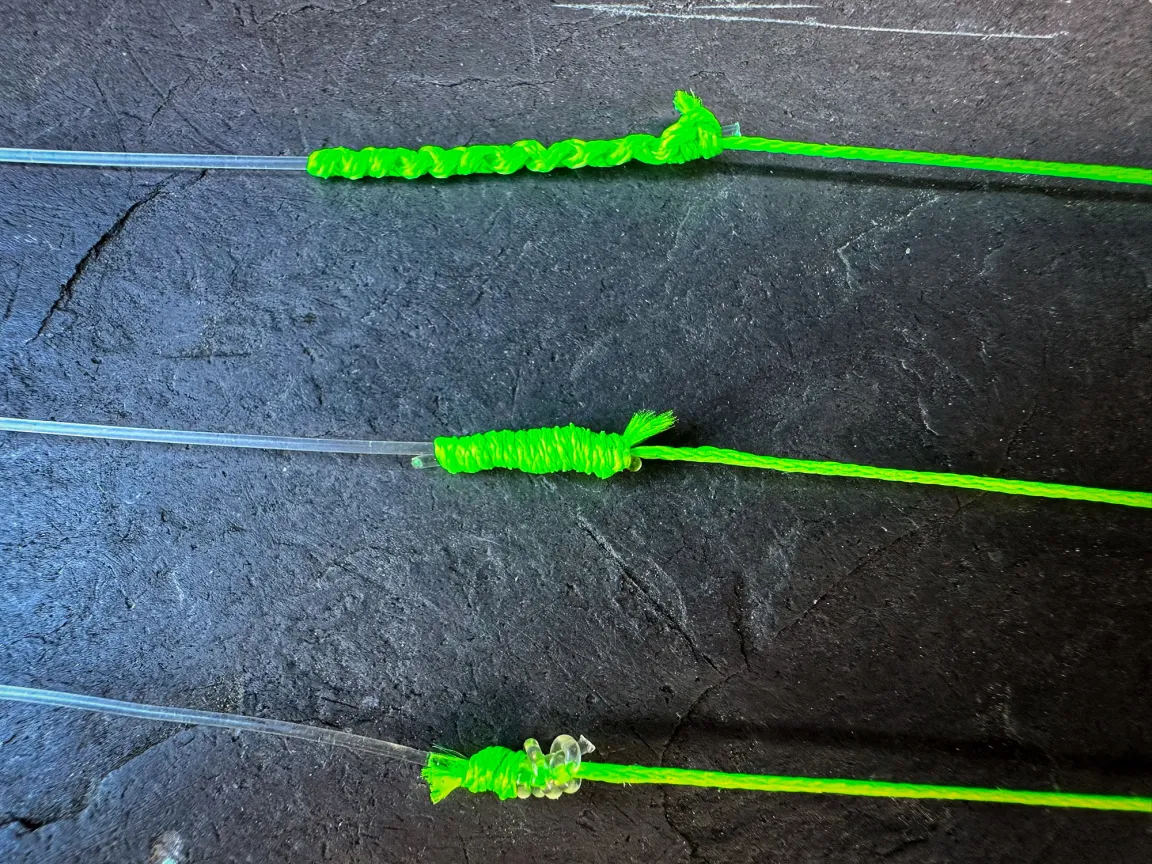
    On bobber stops: You have two options. A Rubber bobber stop are the best choice Buy on Amazon — they’re inexpensive, grip the line firmly, slide through rod guides cleanly, and are infinitely adjustable without retying anything. Keep a pack in your bag and you’ll always have them. Alternatively, if you’re on the water without one, a large enough knot in the main line can do the same job — a double overhand or a Palomar tag end left deliberately long will physically stop the sinker from sliding past it. It’s less adjustable than a proper stop but it works in a pinch.

    Step 1: Slide the bobber stop onto your main line at the depth you want your bait to fish. If you want your bait at 5 feet, measure 5 feet of line from your rod tip and place the stop there. The stop grips the line firmly enough to hold the sinker at depth but can be slid up or down with finger pressure when you need to adjust — no retying required.

    Step 2: Slide the egg sinker onto the line below the bobber stop. The sinker now floats freely on the line between the stop and the knot connecting your leader.

    Step 3: Tie your fluorocarbon leader directly to the end of your main line using a strong connection knot. The knot itself acts as a natural stop for the sinker — the sinker can’t slide past it. Cut 3–5 feet of leader.

    Step 4: Tie your hook to the end of the leader.

    The complete rig from top to bottom: main line → bobber stop → egg sinker (slides freely) → main line/leader knot → fluorocarbon leader → hook.

    How It Works

    When you drop the rig in the water, the sinker pulls the line down. The line slides through the sinker until the bobber stop reaches the sinker — at which point the rig stops descending. Your bait now hangs at the depth you set, swimming naturally on the leader below.

    When a fish takes the bait and swims away, the line pulls freely through the sinker. The fish feels only the weight of the bait and hook — no sinker resistance. This free-spool effect is why the slider rig gets more committed takes than fixed-weight rigs. By the time you engage the reel and come tight, the fish has the bait fully in its mouth and the circle hook rotates into the jaw corner.

    When to Use a Slider Rig

    Yellowtail on Structure

    When yellowtail are holding at a specific depth on a reef or kelp edge — say 40 feet down over 80 feet of water — a slider lets you put your bait right in their face. Set the stop at 40 feet, drop the rig, and your sardine swims at exactly the depth the fish are at. This is far more precise than fly-lining (where the bait goes wherever it wants) and more natural than a heavy dropper loop rig. When fish are off the bite on live bait, it’s also worth having a jig ready to drop — the slider and the iron cover the same fish from two angles. Check the yellowtail temperature guide for when they’re in range.

    White Seabass in the Kelp

    White seabass often suspend at mid-depth in the kelp canopy, feeding on squid. A slider rig with a live squid at 20–30 feet is the classic technique. The squid swims naturally in the kelp, the sinker keeps it at the right depth, and the free-slide lets the seabass eat without feeling resistance. This is how most trophy white seabass are caught from party boats and private boats during the spring spawning run.

    Tuna Under Kelp Paddies

    When tuna are holding 30–80 feet under a kelp paddy and won’t come to the surface, a slider rig gets your bait to their depth. Set the stop based on what the sonar shows, and let a live sardine or mackerel swim at the target depth. This is more effective than a fly-line (which won’t get deep enough) and more natural than a heavy sinker rig. On the same stop, keep a slow-pitch jig rigged and ready — when the slider bite slows, dropping a jig to the same depth often restarts it.

    Halibut Along Structure Edges

    When drifting along sandy bottom near structure, a slider rig set just above the bottom lets your bait swim naturally along the sand where halibut lie in wait. The free-slide ensures a halibut can pick up the bait and move without feeling the sinker.

    Dialing in the Details

    Sinker Weight

    Use the lightest weight that gets your bait to depth. In minimal current, 1 ounce is often enough. In moderate current, 2 ounces. In strong current or deep water (100+ feet), 3 ounces or more. Too much weight kills the bait faster and makes the presentation less natural. Too little and the bait never reaches the target depth.

    Leader Length

    3–5 feet is standard. Longer leaders give the bait more freedom to swim naturally but make the rig harder to manage on the boat. Shorter leaders keep better control but reduce the bait’s range of motion. For tuna in clear water, err longer (5 feet). For yellowtail on structure, 3 feet prevents the bait from swimming into the rocks.

    Adjusting Depth

    The biggest advantage of the slider rig is real-time depth adjustment. If the fish move shallower, slide the bobber stop down. If they drop deeper, slide it up. No retying, no re-rigging — just move the stop and drop again. This is where purpose-made bobber stops Buy on Amazon — really earn their keep over a knot: you can reposition them in seconds with two fingers while keeping your bait in the water. On a boat where conditions change throughout the day, that flexibility is invaluable.

    Slider Rig vs Other Live Bait Rigs

    RigBest ForLimitation
    Fly-lineSurface tuna, free-swimming baitNo depth control — bait goes where it wants
    Slider (this guide)Specific depth targeting, structure fishingSlightly more complex setup
    Carolina rigBottom fishing (halibut, surf)Bait stays on bottom only
    Dropper loopDeep bottom fish (rockfish)Fixed depth, less natural movement

    Gear Recommendations

    A 30lb conventional reel with a medium-heavy rod is the standard slider rig setup for yellowtail and white seabass. For tuna, step up to a 40lb+ setup. Braided main line is preferred because it’s thinner, allowing the line to slide more freely through the sinker, and the zero stretch gives you better sensitivity to feel the bite.

    Plan Your Trip

    Related Guides

    Tight lines!

  • How Swell and Wind Affect Fishing in Southern California

    How Swell and Wind Affect Fishing in Southern California

    Water temperature gets all the attention in fishing planning, but swell and wind are just as important — sometimes more. A perfect SST chart with 65°F water and bait everywhere means nothing if there’s a 10-foot south swell blowing out the surf zone or 25-knot winds making the offshore run miserable. Knowing how to read swell and wind data — and what conditions are actually fishable for your target — is a skill that separates consistently successful anglers from the ones who “should have checked the forecast.”

    This guide breaks down how swell and wind affect every major type of SoCal fishing, plus what to look for on the marine weather page before you commit to a trip.

    Understanding Swell

    Swell is the organized wave energy moving through the ocean. It’s measured by three numbers: height (how tall the waves are), period (the time in seconds between wave crests), and direction (where the swell is coming from). All three matter for fishing.

    Swell Height

    Swell height is reported in feet and is the most obvious factor. But raw height doesn’t tell the whole story — a 4-foot swell at 15-second intervals is a completely different animal than a 4-foot swell at 8-second intervals. The longer period swell is smooth, powerful, and manageable. The short period swell is steep, choppy, and miserable.

    General guidelines for SoCal: under 3 feet is calm and fishable for everything. 3–5 feet is moderate — fine for offshore boats, manageable for surf fishing, and worth checking the period before committing. 5–8 feet starts limiting options — surf fishing gets dangerous, smaller boats should stay in, and even larger boats will have a rough ride. Over 8 feet is serious — big boat trips only, and even those can be uncomfortable.

    Swell Period

    Period is the sleeper stat that most anglers ignore. A long period (14+ seconds) means the swell was generated far away — these are deep-water swells that are well-organized and predictable. A short period (under 10 seconds) means the swell was generated locally by wind — these are steep, choppy, and uncomfortable.

    The magic number for SoCal: 12+ second period generally means clean, fishable conditions even if the height looks intimidating. Under 8 seconds means messy, windy conditions regardless of height. Between 8–12 seconds is the gray zone — check the wind.

    Swell Direction

    SoCal’s coastline runs roughly northwest-to-southeast, which means different swell directions hit differently. South swells (180–210°) wrap into most SoCal beaches and harbors, creating challenging surf and surge even at moderate heights. West swells (260–280°) are the most common and hit the coast head-on — standard conditions most of the year. Northwest swells (300–330°) are partially blocked by Point Conception and the Channel Islands, so the same height NW swell produces smaller surf in San Diego than Santa Barbara.

    For surf fishing specifically, the best conditions are a moderate west swell (2–4 feet, 12+ second period) with light wind. This creates clean, defined sandbars with clear troughs where fish patrol.

    Understanding Wind

    Wind affects fishing in two ways: it creates surface chop and current (making boat control harder and lure presentation more difficult) and it stirs up the water column (reducing visibility and changing where fish hold).

    Wind Speed

    Under 10 knots is ideal for nearly all SoCal fishing. 10–15 knots is manageable but starts affecting casting accuracy and boat drift speed. 15–20 knots makes offshore fishing uncomfortable and surf fishing difficult — white caps start forming and line management becomes a challenge. Over 20 knots cancels most fishing plans — stay home or fish a protected bay.

    Wind Direction

    Offshore wind (blowing from land toward the ocean — typically east or northeast in SoCal) is generally the best for fishing. It flattens the ocean surface, creates calm nearshore conditions, and pushes bait against the kelp line. Santa Ana winds are extreme offshore winds that can create glass-calm ocean conditions — some of the best fishing days of the year happen during mild Santa Anas.

    Onshore wind (blowing from ocean toward land — typically west or southwest) is the most common and the most problematic. It builds chop, creates messy surf, reduces visibility in shallow water, and makes casting into the wind a battle. Afternoon onshore winds are almost guaranteed in SoCal from spring through fall — plan to fish early.

    How Conditions Affect Each Type of Fishing

    Surf Fishing

    Surf fishing is the most swell-sensitive type of fishing. You need enough wave action to create troughs and move sand (which concentrates fish) but not so much that you can’t fish safely or keep your bait in place.

    Ideal conditions: 2–4 foot swell, 12+ second period, under 10 knot wind, west or northwest swell direction. These conditions create clean sandbars with defined troughs where halibut, corbina, and perch feed actively. A 9–10 foot surf casting rod paired with a smooth 4000–6000 class surf reel gives you the casting distance to reach the outer trough edge where fish hold on moderate swell days. For halibut specifically, a 4–6 inch paddle tail swimbait ticked slowly along the bottom is the most reliable artificial in clean surf conditions. See our videos on Doheny surf fishing and finding halibut from shore for tips on reading the beach and working the troughs.

    Avoid: Rising south swell (creates dangerous shorebreak), short period wind swell (messy, churned-up water), or anything over 5 feet without significant experience. When the surf exceeds 5 feet, corvina and halibut move off the exposed beaches entirely — wait for the swell to drop or target a protected pocket beach instead.

    Inshore Boat Fishing (Kelp, Bays, Islands)

    Inshore fishing is moderately affected by swell and wind. The kelp beds and island lee sides provide some protection, but wind-driven current changes where fish hold and affects bait presentation.

    Ideal conditions: Under 4-foot swell, under 12 knots wind. Light wind days produce the best kelp fishing because your boat holds position naturally and your bait presentation stays clean. The islands (Catalina, San Clemente, Coronado) have lee sides that are protected from the prevailing swell — fish the sheltered side on bigger swell days.

    What changes in wind: Yellowtail and calico bass often feed more aggressively on the current edges created by moderate wind. A light chop can actually improve the bite by breaking up the surface and making fish less wary. Dead calm isn’t always best — a little texture on the water helps. When yellows are actively feeding in a chop, a fast-retrieved surface iron or flat-fall jig on a 40lb setup outproduces live bait because you can cover more water along the current edge.

    Offshore Fishing (Banks, Open Ocean, Paddies)

    Offshore fishing is primarily affected by wind because you’re far from the coast with no protection. Swell matters less for boat comfort (long-period swell just rolls under you) and more for how it affects surface feeding activity.

    Ideal conditions: Under 15 knots wind, long-period swell. Calm days are best for surface iron fishing and popper fishing because you can see surface activity and cast accurately. Kelp paddy hunting requires calm enough conditions to spot paddies at distance — when it’s glassy, you can see a paddy from a quarter mile; in 15-knot chop, you’ll drive right past it.

    Choosing your lure by conditions: Calm days are the time to throw surface poppers and work flat-fall jigs in the upper column where you can watch the bite develop. When wind picks up and the surface goes messy, drop down — a slow-pitch jig fished at depth keeps producing when surface presentations fall apart. For dorado hunting at the paddies, calm conditions also let you get the most out of surface-oriented dorado lures like poppers and stick baits that don’t work well in chop. On calmer days when the boat is trolling between spots, it’s worth having a set of trolling feathers or cedar plugs running — you can pick up tuna and dorado between bites without stopping.

    Wind’s effect on tuna: Moderate wind (10–15 knots) can actually push bait into concentrated areas, creating feeding opportunities. Some of the best tuna bites happen on days with moderate wind and messy conditions — the fish are focused on feeding, not on your boat. But iron fishing becomes much harder in wind because casting distance and accuracy suffer significantly.

    Surf Species by Conditions

    SpeciesPreferred SwellPreferred WindNotes
    Halibut2–4 ft, long periodLight, any directionNeeds clean water, defined troughs. Check temp guide for seasonal timing.
    Corbina1–3 ft, cleanCalm to light offshoreBest in very clear water, small surf
    Barred perch2–5 ft, any periodNot pickyFeeds in the wash, handles rough conditions
    Spotfin croaker1–3 ftLightSand crab exposed by small waves
    Bat rays / sharksAny, up to 6 ftAnyTolerant of rough conditions

    Reading the Forecast

    Check the marine weather page before every trip. Here’s a quick decision framework:

    Go fishing: Swell under 4 feet, period over 12 seconds, wind under 12 knots. These conditions are good for almost everything.

    Fish with caution: Swell 4–6 feet or wind 12–18 knots. Stick to protected areas — island lee sides, bays, or calm beaches. Avoid open ocean in smaller boats.

    Stay home (or fish a bay): Swell over 6 feet, wind over 20 knots, or a short period (under 8 seconds) wind swell building. The risk isn’t worth it, and the fishing is usually poor in these conditions anyway.

    Cross-reference the weather with the SST chart and chlorophyll map — sometimes mediocre conditions with great water temperatures and bait presence still produce excellent fishing. And sometimes perfect conditions with poor water produce nothing. Use all the data together.

    Plan Your Trip

    Related Guides

    Tight lines!

  • What to Bring on an Overnight Fishing Trip – Tips from experienced SoCal anglers.

    What to Bring on an Overnight Fishing Trip – Tips from experienced SoCal anglers.

    Your first overnight fishing trip out of San Diego is a rite of passage — 1.5 to 3 days on the water targeting yellowtail, tuna, dorado, and whatever else swims into range at the Coronado Islands, offshore banks, or the Baja coast. The fishing can be incredible, but the experience lives or dies on your preparation. Forget the right gear and you’ll spend the trip borrowing, improvising, or sitting out the best bites. Pack smart and you’ll be the one with a full sack while everyone else scrambles.

    This guide covers everything you need for overnight and multi-day trips out of San Diego landings like H&M, Fisherman’s Landing, and Point Loma Sportfishing.

    Tackle and Gear

    Rods and Reels

    Bring at least two setups — ideally three. Rods break, reels fail, and you don’t want to miss the bite because your only outfit went down. The standard overnight quiver:

    Setup 1 — Bait rod (25–30lb class): Your workhorse. A 7-foot medium-heavy rod paired with a lever drag conventional reel (Penn Squall II, Shimano Talica 12). Spooled with 40lb braid and rigged with 30lb fluorocarbon leader. This handles yellowtail, white seabass, school tuna, and everything else on live bait.

    Setup 2 — Iron / casting rod (30–40lb class): An 8-foot heavy spinning rod with a 6000–8000 spinning reel spooled with 50lb braid. For surface iron, poppers, and casting to breaking fish. Also doubles as a heavy live bait rod.

    Setup 3 (optional but recommended) — Heavy outfit (40lb+ class): If the trip targets bluefin tuna, bring a 40lb+ conventional setup. A 6-foot heavy rod with a two-speed reel (Shimano Talica 16) and 65lb braid. You may not need it, but if a 100-pound bluefin shows up and you don’t have it, you’ll regret it forever.

    Terminal Tackle

    Pack more than you think you need. Overnight trips burn through tackle fast, and the boat’s tackle shop charges premium prices.

    Hooks: The circle vs. J hook decision matters on overnights — circles are standard for live bait on most SoCal boats, J hooks shine for soaking chunk and working certain jig rigs. Bring both: circle hooks in 1/0, 2/0, 3/0, and 4/0 (at least 10 of each), plus a handful of J hooks in 2/0–4/0. Treble hooks to replace worn ones on your surface irons.

    Leader material: Fluorocarbon in 20lb, 25lb, 30lb, and 40lb — at least 25 yards of each. You’ll retie leaders constantly, especially after catching fish or hitting structure. Lighter fluoro for line-shy bluefin; heavier for dorado and yellowtail in kelp.

    Sinkers: Egg sinkers in 1oz, 2oz, and 3oz for slider rigs. A few torpedo sinkers in 6–8oz for dropper loop bottom fishing if the trip includes rockfish stops.

    Swivels: Barrel swivels in size 3 and 5. Snap swivels for quick jig changes.

    Jigs: This is where overnights get expensive fast — build your kit before you leave. For tuna, the Shimano Butterfly Flat-Fall (160g) and Tady 45 are the workhorses; our best tuna jigs and irons guide breaks down exactly what to pack by size and color for SoCal conditions. For dorado at the paddies, lighter irons and feathers shine — see our best dorado lures guide for the specific setups. If the trip includes trolling legs between spots, our tuna trolling lures guide covers the cedar plugs and feathers worth having in your kit. At minimum bring: 2 Tady 45s (blue/white and scrambled egg), 2 Flat-Falls (160g, different colors), and 1 lighter iron (Salas 7X). If you have poppers, bring one. See our jigs vs irons vs poppers guide for the full rundown on when to throw what.

    Yellowtail iron: Don’t neglect the yellows — a Tady 4/0 or Tady Heavy in blue/white is your go-to when the yellows are stacked at the Coronados or 9-Mile Bank. See the best yellowtail jigs guide for the full kit.

    Extras: Bead assortment, bobber stops (for slider rigs), a few pre-tied dropper loop rigs, split rings and solid rings for jig hooks, and a small hook file to sharpen points.

    Tools

    A pair of braided line scissors (regular scissors chew braid poorly), long-nose pliers for hook removal, a knife for cutting bait, and a small screwdriver for reel adjustments. A headlamp is essential — night fishing, early morning rigging, and navigating the dark bunk room all require one. Bring a spare battery.

    Clothing

    The ocean at night is cold, even in summer. Dress in layers and pack for conditions 20°F colder than the daytime forecast.

    Base layer: Moisture-wicking synthetic shirt and pants. Avoid cotton — it gets wet, stays wet, and you’ll freeze.

    Mid layer: Fleece jacket or hoodie. This is your comfort layer for nighttime and early morning.

    Outer layer: A waterproof jacket is non-negotiable. Spray, rain, and wave splash will find you. A quality fishing rain jacket with sealed seams keeps you dry and fishing while everyone else retreats to the cabin. Waterproof pants are optional for summer trips but essential in winter and spring.

    Footwear: Deck boots or waterproof shoes with non-marking soles. The deck is wet, slimy, and slippery — sandals and regular sneakers are a recipe for a fall. Bring a dry pair of socks in a ziplock bag for sleeping.

    Sun protection: Long-sleeve sun shirt (UPF 50), wide-brim hat or cap with neck flap, quality polarized sunglasses (essential for seeing fish and reading the water), and reef-safe sunscreen for face and hands. The sun on the water is brutal — burns happen fast and make the second day miserable.

    Gloves: Fingerless fishing gloves protect your hands when handling fish, tying knots with braid (which cuts bare skin), and fighting fish on the rail. Your hands will thank you on day two.

    Food and Drink

    Most overnight boats provide meals, but they’re basic and the timing doesn’t always align with when you’re hungry. Bring supplemental food:

    Water: At least 2 liters per day. Dehydration sneaks up on you, especially in the sun and wind. The boat has water, but having your own ensures you stay hydrated without leaving the rail during a bite.

    Snacks: Energy bars, trail mix, beef jerky, fruit, crackers — anything that’s easy to eat with one hand while keeping an eye on your rod. Avoid anything that needs refrigeration or creates a mess.

    Caffeine: Coffee is usually available on the boat, but bring your own if you’re particular. Energy drinks or caffeine gummies help on early morning bites when you’ve been up since 2 AM.

    Avoid: Alcohol in excess (dehydration + seasickness + heavy machinery = bad combo), heavy/greasy food if you’re prone to motion sickness, and anything that needs heating.

    Health and Comfort

    Seasickness prevention: If you have any history of motion sickness, take precautions before you leave the dock. Prescription scopolamine patches (applied behind the ear 8+ hours before departure) are the most effective. Over-the-counter options: Bonine (meclizine) taken the night before and morning of, or ginger chews as a supplement. Do not wait until you feel sick — by then it’s too late.

    Sleep: Bring a sleeping bag or warm blanket for the bunk. The bunks are narrow, the boat rocks, and the engine drones — earplugs and an eye mask dramatically improve sleep quality. Even 3–4 hours of solid sleep makes a huge difference on day two.

    Personal items: Toothbrush, any medications, small towel, hand sanitizer, and lip balm with SPF. A small dry bag keeps electronics and valuables safe from water.

    Packing Checklist

    CategoryItems
    Tackle2–3 rod/reel setups, circle & J hooks (multiple sizes), fluorocarbon leader (20–40lb), sinkers, swivels, tuna jigs, yellowtail irons, dorado lures, trolling feathers, poppers, pre-tied rigs, bobber stops, beads, split rings
    ToolsBraid scissors, pliers, knife, headlamp + spare battery, hook file, small screwdriver
    ClothingBase layer, fleece mid layer, waterproof jacket, deck boots, sun shirt, hat, polarized sunglasses, sunscreen, fingerless gloves, dry socks
    Food2+ liters water/day, energy bars, jerky, trail mix, fruit, caffeine source
    HealthSeasickness meds (take early!), prescription medications, lip balm SPF
    ComfortSleeping bag/blanket, earplugs, eye mask, small towel, hand sanitizer
    StorageSoft-sided bag (no hard suitcases — bunk space is tight), dry bag for electronics, ziplock bags for phone and wallet

    Before You Leave

    The night before your trip, check conditions on fishing-reports.ai so you know what to expect and can adjust your tackle accordingly:

    Related Guides

    Talk to the landing when you check in — they’ll tell you what’s been biting and recommend tackle. The deckhands on SoCal boats are some of the most knowledgeable fishing guides anywhere. Listen to them, tip them well, and you’ll have a trip to remember.

    Tight lines!

  • Jigs vs Irons vs Poppers for Saltwater Fishing

    Jigs vs Irons vs Poppers for Saltwater Fishing

    Walk into any SoCal tackle shop and you’ll find walls of metal — surface irons, vertical jigs, flat-falls, slow-pitch jigs, poppers, stick baits, and more. If you’re not sure what the difference is or when to throw each one, you’re not alone. The categories overlap, the marketing gets confusing, and different anglers use different names for the same thing.

    This guide breaks it all down. What each type of artificial does, how it works, and — most importantly — when to reach for it on the water.

    The Three Main Categories

    Surface Irons

    Surface irons are heavy metal jigs (3–7 oz) designed to be cast long distances and retrieved rapidly across the surface. They skip, wobble, and dart, imitating a fleeing baitfish. The original SoCal technique — brands like Tady, Salas, and Jri built the tradition. For a complete breakdown of technique and specific models, read our surface iron fishing guide.

    How they work: Cast into or past breaking fish. Retrieve fast — the speed creates the action. The iron’s flat or contoured body generates its own wobble and flash as it moves through the water. No rod-tip action needed, just reel speed.

    Best for: Yellowtail, bonito, and bluefin tuna feeding on the surface. Any situation where fish are actively crashing bait in the top 10 feet of the water column.

    Limitations: Requires fish on the surface. Ineffective when fish are deep. Heavy — demanding to cast and retrieve all day. Requires a spinning reel for maximum casting distance.

    Vertical Jigs (Yo-Yo / Flat-Fall / Slow-Pitch)

    Vertical jigs are designed to be dropped straight down and worked with rod action rather than reel speed. This category includes several sub-types.

    Yo-yo (knife) jigs are narrow, heavy jigs that sink fast and are worked with aggressive, sharp rod pumps. Drop to the bottom or to the depth fish are marking, then rip the rod up and let the jig flutter back down. The erratic darting action triggers reaction strikes. Classic models include the Salas CX and Shimano Coltsniper.

    Flat-fall jigs are wide, flat jigs designed to flutter and spiral on the fall. The Shimano Butterfly Flat-Fall changed SoCal fishing when it came out — most of the bites come on the drop as the jig slowly spirals down, imitating a dying baitfish. Less physically demanding than yo-yo jigging because the jig does the work on the fall.

    Slow-pitch jigs are center-weighted jigs designed for a specific rod technique where short, rhythmic rod movements create a slow, hypnotic action. Deadly on finicky fish that won’t commit to aggressive presentations. The Nomad Streaker and Shimano Ocea are popular slow-pitch options.

    Best for: Fish holding on structure or suspended at specific depths. Yellowtail on reefs, rockfish on pinnacles, tuna under kelp paddies. Any time fish aren’t showing on the surface. See our yellowtail jigs guide for specific models.

    Limitations: Limited casting range — primarily a vertical technique. Requires knowing the depth fish are at (electronics help). Slow-pitch and flat-fall need specific rod actions to work properly.

    Poppers & Stick Baits

    Poppers are floating or slow-sinking lures with a cupped or angled face that creates a splash, bubble trail, and popping sound when worked with sharp rod twitches. Stick baits (also called pencil poppers or walk-the-dog lures) are similar but create a side-to-side walking action rather than a pop.

    How they work: Cast to or near feeding fish. Work with sharp rod twitches — each twitch pulls the popper forward and creates a commotion on the surface. The splash and noise imitates a baitfish being attacked, which draws predators in from a distance. Stick baits use a rhythmic twitch-pause-twitch to create a zigzag surface walk.

    Best for: Tuna that are following surface iron but not committing. Bluefin that have seen too many irons and need something different. Fish feeding just below the surface where a popper’s commotion draws them up. See our best poppers for tuna guide for specific models.

    Limitations: Shorter casting range than heavy surface irons. Requires more rod technique than iron. Can fatigue your wrist on long sessions. Not effective when fish are deep.

    When to Use What

    ScenarioBest ChoiceWhy
    Fish boiling on surface, wide openSurface ironMaximum casting distance, speed matches frantic bait
    Fish boiling but ignoring ironPopper or stick baitDifferent presentation breaks their pattern
    Fish showing but not breaking surfaceFlat-fall jigFlutter on the fall reaches fish just below surface
    Fish deep on structure/reefYo-yo knife jigFast sink rate, aggressive action at depth
    Fish deep but finickySlow-pitch jigSubtle action triggers cautious fish
    Kelp paddy fishingSurface iron or flat-fallCast iron past paddy; or drop flat-fall under it
    Blind casting with no visible fishSurface iron or popperCovers water, noise draws fish from distance
    Fish on sonar at specific depthFlat-fall to that depthPrecise depth targeting with fluttering action

    Gear Crossover

    One of the nice things about these categories is the gear overlaps. A spinning reel in the 6000–8000 class with a 7-foot medium-heavy fast rod handles both surface irons and poppers. A conventional reel in the 20–30lb class with a medium-heavy rod handles all three vertical jig types. You don’t need a separate setup for each category — two well-chosen outfits cover everything.

    For line, 40–65lb braid is standard across all categories. For surface iron, most anglers skip the leader for maximum casting distance. For vertical jigging, a short 40lb fluorocarbon leader protects against abrasion on structure. For poppers, a 4-foot 50–60lb fluorocarbon leader is standard to prevent bite-offs from toothy tuna.

    Building Your Arsenal

    If you’re starting from zero, here’s the order to buy:

    First purchase: Tady 45 in blue/white and scrambled egg (2 irons). This handles the most common SoCal scenario — fish on the surface — and the Tady 45 is the most versatile iron ever made.

    Second purchase: Shimano Butterfly Flat-Fall in 160g (2 colors — blue sardine and pink). This covers the second most common scenario — fish on structure or suspended — and the flat-fall is the easiest vertical technique to learn.

    Third purchase: A popper in the 60–80g range (1 popper). Nomad Design Chug Norris or Shimano Ocea Bomb Dip are both excellent. This gives you a third option when fish are rejecting irons.

    Fourth purchase: Fill in gaps. A lighter surface iron (Salas 7X), a heavy iron (Tady A1), a slow-pitch jig, and more colors in your flat-falls. At this point you’re covering 95% of situations.

    Reading the Conditions

    The ocean tells you what to throw if you know how to read it. Check the SST chart for temperature breaks where bait and predators concentrate. Warm water pushing against cooler coastal water creates feeding zones. The chlorophyll map shows where bait is thickest — green water near blue water edges is prime territory. Our species-specific temperature guides for yellowtail, bluefin, and yellowfin tell you what temperatures each species prefers.

    Plan Your Trip

    Check conditions before you go — the right artificial technique depends on what the fish are doing that day:

    Tight lines!

  • Surface Iron Fishing Guide for Southern California

    Surface Iron Fishing Guide for Southern California

    Surface iron fishing is one of the most exciting and uniquely Southern California techniques in all of saltwater fishing. There’s nothing quite like watching a boil of yellowtail or bluefin erupt on the surface, whipping a heavy chrome jig into the chaos, and feeling a fish hammer it on the retrieve. It’s raw, visual, and demands skill — which is why it’s become a badge of honor among SoCal anglers.

    This guide covers everything you need to know: the right irons, how to cast them, retrieval techniques, gear setup, and when conditions are right for throwing iron.

    What Is Surface Iron Fishing?

    Surface iron refers to heavy metal jigs — typically 3 to 7 ounces of chrome, lead, or zinc — cast to breaking fish and retrieved rapidly across the surface. The iron skips, wobbles, and darts, imitating a panicked baitfish fleeing a school of predators. The visual nature of the strikes is what hooks anglers for life — fish explode on the iron at the surface in full view.

    The technique originated in SoCal in the mid-20th century, and brands like Tady, Salas, and Jri are local legends. While jig fishing exists everywhere, the surface iron tradition — heavy jigs, fast retrieves, brutal strikes — is a distinctly Southern California thing.

    Essential Surface Irons

    You don’t need 50 different irons. A handful of proven models in the right sizes covers every situation. See our best yellowtail jigs guide and best tuna jigs guide for more detail on each model.

    Tady 45 (4.5 oz): The all-around standard. Casts well, has a wide wobble, and catches everything. If you own one iron, own this one. Blue/white, scrambled egg, and mint are the essential colors.

    Salas 7X (3 oz): The finesse option. Lighter weight matches smaller bait profiles. Great when fish are picky or the bait is small. Chrome and blue/white are reliable.

    Tady A1 (6 oz): The distance iron. When you need to reach fish that are boiling far from the boat, the extra weight gets it there. Also produces a deeper, wider action that big fish prefer. Doubles as a tuna iron.

    Salas 6X (4 oz): A narrower profile than the Tady 45, the 6X has a tighter, faster wobble. Excellent when fish want a slimmer bait profile. Many anglers keep both the 45 and 6X and switch between them until the fish tell them which one they want.

    Tady 9 (3.5 oz): A compact, heavy-for-its-size jig that sinks fast and casts like a bullet. Great for wind and when you need to get the iron down quickly before retrieving on the surface.

    Hooks: Replace the factory trebles on every iron you buy with Owner ST-66 trebles in 2/0–3/0. Factory hooks are made from soft wire that straightens on yellowtail and tuna. The ST-66 is 4X strong — it’s the single most important upgrade you can make. See our hooks by species guide for the right treble size for each iron.

    Gear Setup for Surface Iron

    Iron fishing demands specific gear. A spinning reel is preferred for casting distance — the open spool design lets you launch irons much farther than a conventional reel, which matters when fish are boiling 80+ yards away.

    Reel: Spinning reel in the 6000–10000 size class with a fast retrieve ratio (6.0:1 or higher). You need to burn the iron back fast, and a high-speed reel does the work. The reel also needs a strong, smooth drag — yellowtail will smoke you in the kelp if your drag hesitates. See our yellowtail reel guide and bluefin reel guide for specific models.

    Rod: 7–8 foot medium-heavy to heavy power with a fast action. You need the backbone to launch heavy irons and the stiffness to work them aggressively on the retrieve. A soft rod kills the iron’s action. A good iron rod has a moderate butt section for leverage and a fast tip for working the jig. See our 7-foot and 8-foot rod guides for specific models.

    Line: 40–65lb braided line. Braid’s thin diameter maximizes casting distance, and the zero stretch transmits every jig movement and every bite directly. No leader needed for most iron fishing — the speed of the retrieve and the flash of the iron means fish commit before they can inspect the connection. Some anglers add a short (3-foot) 40lb fluorocarbon leader for extra-clear water or line-shy bluefin. See our fishing line guide for specific braid recommendations and our knots guide for the FG knot connection.

    For complete rod and reel pairing advice, see our best rod and reel combo guide.

    How to Cast Surface Iron

    Casting a 4.5-ounce jig is different from casting a lure. The weight is substantial, and a bad cast can be dangerous to everyone on the boat.

    The overhead cast: Point the rod at the fish, open the bail, and load the rod behind you with a smooth, controlled backswing. Drive forward with your body and arms together — the power comes from your hips and core, not just your arms. Release the line at about 45 degrees above the horizon. The jig should fly in a tight arc, not wobble or helicopter. If it helicopters, you’re not loading the rod smoothly enough.

    The sidearm cast: Used when the wind is at your back or when you need a low trajectory to reach fish just beyond casting range. Same mechanics but on a horizontal plane. Keep the rod tip low and the arc tight.

    The lob: For shorter distances, a simple underhand lob gets the iron out without the drama of a full cast. Useful when fish pop up close to the boat unexpectedly.

    Safety: Always look behind you before casting. A 4.5-ounce chunk of metal traveling at high speed will seriously injure anyone in its path. Call out “casting!” so people around you know to duck. Keep your swing controlled — wild, uncontrolled casts are dangerous and inaccurate.

    Retrieval Techniques

    The speed burn: The most common surface iron retrieve. Crank the reel as fast as you can, keeping the rod tip low and the iron skipping on or just below the surface. The speed triggers a reaction strike from competitive fish. This is exhausting — your forearm will burn after a few casts — but it’s what catches fish in a frenzy.

    The yo-yo burn: Retrieve fast, but periodically drop the rod tip and let the iron sink 5–10 feet before burning it back to the surface. This mimics a baitfish trying to dive for safety and then being forced back up. The change of direction often triggers a strike from following fish that won’t commit to a straight retrieve.

    The slow roll: A moderate-speed retrieve that keeps the iron wobbling just below the surface. Used when fish are boiling lazily or when the bite is slow. Less dramatic but can be more effective when fish aren’t in full attack mode.

    The dead stick: Cast the iron past the boil, let it sink to the depth you think the fish are at, and then begin a medium-speed retrieve. Effective when fish are feeding subsurface and not breaking the top. Watch for subtle taps.

    When to Throw Iron

    Surface iron is at its best when fish are actively feeding on the surface. Look for these signs: boiling water (fish crashing bait on the surface), birds diving and circling, bait balls getting pushed to the surface, and meter marks showing fish high in the water column.

    In SoCal, the best iron fishing happens from late spring through fall when yellowtail and bluefin tuna push into the warm water that moves in. The Coronado Islands, La Jolla kelp, Catalina, and San Clemente Island are legendary iron grounds. Check the SST chart for warm water edges where bait concentrates and predators follow.

    Surface Iron vs Other Techniques

    SituationBest Approach
    Fish actively boiling on surfaceSurface iron (speed burn)
    Fish showing but not committingSwitch to lighter iron or poppers
    Fish deep on structureYo-yo jig or flat-fall
    No surface activity, fish on meterLive bait (fly-line or slider)
    Wind killing your cast distanceHeavy iron (Tady A1) or switch to bait

    For a complete comparison of all the artificial techniques, see our jigs vs irons vs poppers guide.

    When iron isn’t working: If fish are boiling but refusing iron, try poppers — the surface commotion triggers a different response than the flash-and-speed of iron, and fish that have been seeing the same Tady 45 from every angler on the boat will sometimes eat a popper without hesitation. See our dorado lures guide and tuna lures guide for other casting options including swimbaits and spoons.

    Plan Your Trip

    The best iron bite requires warm water, bait, and active fish. Check conditions:

    Related Guides

    Tight lines!

  • Circle Hooks vs J Hooks for Saltwater Fishing

    Circle Hooks vs J Hooks for Saltwater Fishing

    The circle hook vs J hook debate is one of the most common questions in saltwater fishing, and the answer isn’t as simple as “one is better.” Each hook design works fundamentally differently, and choosing wrong for the situation means missed fish, gut-hooked fish, or both. Understanding when to use each one will immediately improve your hookup rate. For specific hook models and sizes by species, see our best hooks by species guide.

    How They Work

    Circle hooks have a point that curves inward toward the shank, forming a circular shape. When a fish eats the bait and swims away, the hook slides through the throat and rotates to catch in the corner of the mouth. The fish essentially hooks itself. The angler’s job is to reel tight — not set the hook. A traditional hookset with a circle hook actually pulls it out of the fish’s mouth.

    J hooks have a point that runs parallel to the shank, forming a J shape. They require the angler to set the hook — when you feel the bite, you swing the rod to drive the point into whatever it touches. J hooks can penetrate anywhere in the fish’s mouth, throat, or gut, which means they hook up in more locations but also cause more deep-hooking.

    When to Use Circle Hooks

    Circle hooks excel in situations where the fish takes the bait and runs, giving time for the hook to rotate into position.

    Tuna on live bait. This is the #1 application for circle hooks in SoCal. When fly-lining sardines or mackerel for bluefin and yellowfin, a circle hook lands in the jaw corner almost every time. The tuna eats and turns, you reel tight, and the hook sets itself. This is critical when fishing lighter leader for picky tuna — a circle hook gives you a solid jaw hookup even on 25lb fluorocarbon, whereas a J hook might bury in the gut and get cut off by the tuna’s teeth. The Owner Mutu Light Circle (5114) in 2/0–4/0 is the go-to for tuna fly-lining — see our hooks guide for the full breakdown. Check our bluefin temperature guide for when to target them.

    Soaking bait from a boat or pier. Any time you’re fishing bait and waiting for a bite — bottom fishing with a dropper loop rig, soaking squid for white seabass, or chunking on anchor — circle hooks dramatically reduce gut-hooking. If you’re not holding the rod and actively watching for bites, circle hooks are the safer choice. The Owner Mutu Circle (5163) is the best all-around option for bait soaking.

    Surf fishing with bait. On a Carolina rig, circle hooks work perfectly. When a halibut picks up the bait and moves off, the circle rotates into the jaw. You don’t need lightning reflexes — just reel down and come tight.

    Catch and release fishing. The jaw-corner hookup of circle hooks means easier, less harmful releases. For undersized fish or species you want to release, circles significantly improve survival rates.

    When to Use J Hooks

    J hooks are better when you need to set the hook yourself and timing is critical.

    Live bait with active rod in hand. When you’re holding the rod, watching the bait, and ready to react instantly — like fishing live bait off the stern for yellowtail — a J hook gives you a direct, immediate hookset. You feel the bite, you swing, and the hook drives home. Some experienced anglers prefer this control over the passive hookup of a circle.

    Trolling. When lures or bait are moving behind the boat, J hooks set on the strike — the fish’s own momentum combined with the boat’s movement drives the point. Most trolling jigs, feathers, and cedar plugs come pre-rigged with J hooks for this reason.

    Artificial lures and jigs. Surface irons, swimbaits, and casting jigs almost exclusively use J-style hooks (or trebles, which are essentially three J hooks joined together). The instant a fish hits the lure, the hookset needs to happen — there’s no bait for the fish to hold onto while a circle hook rotates into position. Replace factory trebles on all your iron with Owner ST-66 trebles — factory hooks straighten on tuna and big yellowtail. See our hooks guide for the right treble size for each jig.

    Short-striking fish. When fish are nipping at baits without committing — common with calico bass in the kelp or sheephead on structure — a J hook lets you drive the point on even a brief contact. A circle hook requires the fish to take the whole bait and turn, which doesn’t happen with short bites.

    Direct Comparison

    FactorCircle HookJ Hook
    Hookset techniqueReel tight, no swingTraditional rod swing
    Hook locationJaw corner (90%+)Varies — jaw, throat, gut
    Gut-hook rateVery lowHigher, especially with bait
    Release survivalExcellentLower if gut-hooked
    Best for bait soakingYesOnly if actively watching
    Best for lures/jigsNoYes
    Learning curveMust resist hookset instinctNatural, intuitive
    Hookup rate (bait)High with proper techniqueHigh with good timing

    Hook Size Guide by Species

    Matching hook size to your target species and bait is just as important as choosing circle vs J. Too big and the fish won’t eat it. Too small and it won’t hold. For specific hook models, wire weights, and point styles, see our complete hooks by species guide.

    SpeciesCircle Hook SizeJ Hook SizeNotes
    Bluefin tuna3/0–5/04/0–6/0Match to bait size, lighter wire for picky fish
    Yellowfin tuna2/0–4/03/0–5/0Circle preferred for live bait fly-lining
    Yellowtail2/0–4/02/0–4/0J-hook for iron, circle for bait
    White seabass4/0–6/04/0–6/0Circle with squid, J with lures
    Halibut2/0–4/01/0–3/0Circle on Carolina rig is deadly
    Calico bass1/0–2/01/0–2/0J-hook for swimbaits and reactionary
    Rockfish2/0–4/02/0–4/0Either works on dropper loops
    Corbina/perch2–1/04–1/0Small circle on light Carolina rigs

    The Bottom Line

    Use circle hooks when bait fishing and you want consistent jaw hookups with minimal gut-hooking — especially for tuna, halibut, and any catch-and-release scenario. Use J hooks when fishing artificial lures, when you need an immediate hookset, or when fish are short-striking. Many SoCal anglers carry both and switch based on the situation, which is the smart play.

    For more on rigging with these hooks, check our guides on Carolina rigs, dropper loop rigs, fly-line rigs for tuna, and slider rigs for live bait. For the specific hook models we recommend — including Owner circle hooks, Owner J hooks, and Owner ST-66 trebles — see our best hooks by species guide.

    Plan Your Trip

    Check conditions before heading out:

    Related Guides

    Tight lines!

  • Fly-Line Rig for Tuna Fishing

    Fly-Line Rig for Tuna Fishing

    The fly-line rig is the most natural live bait presentation in saltwater fishing. No weight, no float, no hardware — just a hook tied to fluorocarbon leader connected to your main line, with a live bait swimming freely. When tuna are finicky and rejecting weighted rigs, the fly-line is usually what gets bit.

    If you’ve fished a SoCal tuna trip, you’ve heard the deckhand yell “fly-line it!” during a bait stop. This is what they mean, and knowing how to do it right can be the difference between going home with fish or going home with a story about the one that got away.

    What Is a Fly-Line Rig?

    A fly-line rig is as simple as it gets: your braided main line connects to a fluorocarbon leader via an FG or Alberto knot, and the leader terminates in a single hook. No sinker, no swivel, nothing else. You hook a live bait — sardine, anchovy, or small mackerel — and let it swim away from the boat naturally.

    The bait determines the depth and direction. A healthy sardine will swim away from the boat and gradually work its way down. Tuna see a baitfish behaving normally, not dragged down by weight or impeded by hardware, and they eat it. It’s the most natural presentation possible.

    How to Set Up a Fly-Line Rig

    Main Line

    40–65lb braided line, depending on whether you’re targeting school-sized fish (40lb) or larger bluefin (65lb). Braid’s thin diameter lets the bait swim more freely than mono, and zero stretch means you feel the bite instantly. See our fishing line guide for specific braid recommendations by target size. For a full breakdown of why braid mainline is the standard, see our braid vs mono vs fluorocarbon guide.

    Leader

    25–40lb fluorocarbon, 6–10 feet long. Fluorocarbon is essential — tuna have excellent eyesight, and the near-invisibility of fluoro in clear water makes a huge difference. For bluefin specifically, longer leaders (8–10 feet) in lighter test (25–30lb) get more bites but increase the risk of break-offs. For school tuna and yellowfin, 6 feet of 40lb fluoro is fine. Use an FG knot for the braid-to-fluoro connection — it passes through the guides smoothly when a tuna runs. See our line guide for specific fluorocarbon brand recommendations.

    Hook

    Circle hooks are the standard for fly-lining tuna. A 2/0–4/0 circle hook — match the size to your bait (2/0 for sardines, 3/0–4/0 for mackerel) — allows you to just reel tight when you feel the bite. The circle hook rotates and lodges in the corner of the tuna’s jaw. No hookset required — in fact, setting the hook with a circle hook usually pulls it out.

    The Owner Mutu Light Circle (5114) is the go-to fly-line hook for tuna. The light wire penetrates easily on a reel-tight hookset, and the Mutu point design finds the jaw corner consistently. Use 2/0 for sardines and small anchovies, 3/0 for large sardines and small mackerel, and 4/0 for full-sized mackerel. Ringed hooks (where the eye has a ring rather than being bent) are preferred because they allow freer bait movement.

    For picky bluefin that are refusing the Mutu Light, drop down to an even lighter wire hook — less hardware means a more natural bait presentation. When fish are eating aggressively and you need holding power, step up to the Owner Mutu Circle (5163) in the same sizes — the heavier wire handles big bluefin without straightening. See our hooks by species guide for the complete breakdown of which hook model to use for each situation.

    Tie your hook to the leader with a Palomar knot — it retains 90–95% strength on fluorocarbon and is fast to tie on a rocking boat.

    How to Hook the Bait

    Bait presentation matters enormously when fly-lining for tuna. A poorly hooked bait dies quickly, swims erratically, and gets ignored.

    Nose hook (best for sardines): Pass the hook through the nose or upper lip of the bait. This lets the bait swim forward naturally and is the most common hooking method for fly-lining. The bait stays lively the longest with a nose hook because you’re not damaging any vital areas.

    Collar hook (best for mackerel): Pass the hook through the collarbone area — the hard bony plate just behind and below the gill plate. This is a strong hold that works well with larger baits. The bait swims slightly angled, which can actually attract attention from tuna.

    Thread the bait (finicky fish): For ultra-picky tuna, some anglers thread the hook through the bait’s nostril or lower jaw and out through the top of the head. This completely hides the hook in the bait’s body. More advanced technique, but deadly when fish are being selective.

    How to Fish the Fly-Line

    Step 1: Grab a lively bait from the tank. Pin it quickly and gently — handling time kills bait. Hook it and get it in the water immediately.

    Step 2: Open your bail (spinning) or put your reel in freespool (conventional). Let the bait swim away from the boat freely. Don’t thumb the spool or impede the line — let the bait take line at its own pace.

    Step 3: Watch your line. As the bait swims out, your line will peel off steadily. If it suddenly accelerates or changes direction, a tuna has picked up the bait.

    Step 4: When you see the bite, close the bail or engage the reel and reel tight. Don’t swing. Just come tight and the circle hook does its job. If you’re using a J-hook, wait until you feel heavy weight, then set with a firm lift.

    Step 5: Fight the fish. With no weight on the line, it’s a pure connection between you and the tuna. Keep steady pressure and let the drag work.

    Rod and Reel for Fly-Lining

    The fly-line rig works on any tuna setup, but the right rod and reel make it significantly more effective:

    School bluefin and yellowfin (15–40 lbs): A 30–40lb class setupShimano Talica 12 or Penn Squall II 25N — on a 7-foot medium-heavy rod. Spool with 40–50lb braid.

    Big bluefin (50–150+ lbs): Step up to a 40lb+ class conventional on an 8-foot rod with 65lb braid. You need stopping power for a fish that wants to take 300 yards on the first run.

    Spinning option: A spinning reel in the 6000–8000 class — Shimano Saragosa 6000 — works well for fly-lining because the open bail lets line flow freely as the bait swims out. Many anglers prefer spinning for fly-lining specifically because of how naturally the line peels off.

    See our bluefin reel guide and rod and reel combo guide for complete recommendations.

    When Fly-Lining Works Best

    Fly-lining is most effective when the water is clear and the tuna are near the surface. In SoCal, this typically means fishing the clean blue water offshore where bluefin and yellowfin cruise. Check the SST chart for warm water edges — tuna follow temperature breaks where bait concentrates. The chlorophyll map shows you where bait is stacking up along these edges.

    Fly-lining is less effective in dirty or green water (the visual advantage of no hardware is reduced), in deep water where fish are holding below 100 feet (the unweighted bait won’t get down there), and in strong current that pushes the bait in the wrong direction. For those situations, switch to:

    • Sinker rig — add a rubber-core sinker 3–4 feet above the hook to get the bait down
    • Slider rig — adjustable depth, works in current
    • Flat-fall jig — when fish are deep on the meter and won’t come up for bait
    • Surface iron or poppers — when fish are boiling on top and you need to cover water fast

    Common Fly-Line Mistakes

    Thumbing the spool too much. Let the bait swim. Impeding the line kills the natural presentation that makes fly-lining work.

    Leader too heavy. 60lb fluoro on a sardine looks like a rope to a tuna. Match your leader weight to the situation — lighter gets more bites, heavier gives more insurance.

    Leader too light for big bluefin. 25lb fluoro on a 150-pound fish is a gamble. But sometimes it’s the only way to get bit. Know the trade-off.

    Killing the bait. Hook it quickly and gently. Don’t squeeze it, don’t drop it, don’t hold it out of the water longer than necessary. A dead bait on a fly-line rig is just a chunk of fish sinking slowly — and tuna can tell the difference.

    Setting the hook with circle hooks. The biggest mistake. With circle hooks, just reel tight. A big swing pulls the hook straight out of the fish’s mouth. Reel, come tight, and the hook finds the jaw corner on its own.

    Fly-Line Quick Reference

    TargetMain LineLeaderHook
    School bluefin (15–40 lb)40lb braid25–30lb fluoro, 8 ft2/0 Mutu Light Circle
    Big bluefin (50–150+ lb)65lb braid30–40lb fluoro, 10 ft3/0–4/0 Mutu Circle
    Yellowfin tuna50lb braid30lb fluoro, 6 ft2/0–3/0 Mutu Light
    Yellowtail (bonus)40lb braid25lb fluoro, 6 ft2/0 circle

    Plan Your Trip

    Tuna follow warm water and bait. Check conditions before you go:

    Related Guides

    Tight lines!

  • Best Fishing Knots Every Angler Should Know

    You can have the best rod, reel, and line money can buy, but if your knot fails, none of it matters. A good knot is the weakest link you can control — and in saltwater fishing where fish are bigger, runs are longer, and abrasion is constant, the wrong knot will cost you fish.

    You don’t need to know 50 knots. You need to know five or six really well and tie them consistently under pressure — on a rocking boat, in the dark, with a bite going off. Here are the knots that cover every saltwater connection you’ll need in SoCal.

    The Essential Knots

    1. Palomar Knot — Best for Hooks and Jigs

    The Palomar is the single most important knot in fishing. It’s incredibly strong (near 100% line strength when tied correctly), easy to tie, and works with braid, mono, and fluorocarbon. Use it every time you tie a hook, jig, or swivel to your line.

    How to tie it: Double 6 inches of line and pass the loop through the hook eye. Tie a simple overhand knot with the doubled line, leaving the loop large enough to pass the hook through. Pass the hook through the loop. Moisten and pull both the standing line and tag end to cinch tight against the hook eye. Trim the tag.

    The key mistakes people make: not wetting the knot before cinching (causes friction damage), not passing the loop completely over the hook (the knot will slip), and leaving the tag too short (it can pull through under load). See our step-by-step Palomar guide with pictures for the full breakdown.

    2. FG Knot — Best for Braid-to-Leader Connections

    The FG knot is the gold standard for connecting braided main line to a fluorocarbon or mono leader. It creates a slim, streamlined connection that passes through rod guides smoothly — critical when a fish runs and your knot has to fly through the tip. It’s harder to learn than other knots, but once you have it down, nothing else compares for braid-to-leader connections.

    How to tie it: Hold the leader under tension (many anglers hold it in their teeth or use a knot tool). Wrap the braid around the leader in alternating directions — over from the right, then over from the left — creating a series of tight wraps. Do 15–20 wraps. Then finish with a series of half hitches on the braid side only, cinching each one tight. Trim the leader tag flush and the braid tag close.

    The FG knot has a learning curve — expect to tie it 20–30 times at home before it becomes second nature. Watch a YouTube tutorial to see the hand motions. Once you get it, you’ll tie it every time. This is the knot connecting your 50–65lb braid to your fluoro leader on every tuna setup, yellowtail rig, and dorado outfit. An alternative that’s easier but bulkier is the Alberto knot (see below).

    3. Uni Knot — Best Versatile Knot

    The uni knot is the Swiss army knife of fishing knots. It works for tying hooks, joining two lines together (double uni), connecting to swivels, and even making a loop knot with a slight modification. It’s not quite as strong as the Palomar for hooks, but it’s incredibly versatile and fast to tie.

    How to tie it: Pass the line through the hook eye. Double back to form a loop alongside the standing line. Wrap the tag end around both lines and through the loop 5–6 times (use 8 wraps for braid). Moisten and pull the tag end to tighten the wraps. Slide the knot down to the hook eye by pulling the standing line. Trim the tag.

    The uni knot also works as a line-to-line connection: tie a uni knot on each line around the other line, then pull both standing lines to slide the knots together. This double uni is a reliable braid-to-leader connection that’s easier than the FG — just bulkier.

    4. Alberto Knot — Easiest Braid-to-Leader Knot

    If the FG knot is too fiddly for you, the Alberto knot is the next best option for braid-to-leader connections. It’s essentially a modified uni knot that handles the diameter difference between braid and fluorocarbon well. Not as slim as the FG, but significantly easier to tie — especially on a moving boat.

    How to tie it: Double over 6 inches of the leader to form a loop. Pass the braid through the loop. Wrap the braid around the doubled leader 7 times going away from the loop, then 7 times coming back toward it. Pass the braid back through the leader loop (same direction you entered). Moisten and slowly pull tight. Trim both tags.

    5. San Diego Jam Knot — Best for Heavy Hooks and Jigs

    When you’re tying heavy circle hooks or big yellowtail jigs to thick fluorocarbon leader, the San Diego jam knot is hard to beat. It cinches tight against heavy wire hooks better than a Palomar (which can slip on thick hook eyes) and maintains near-100% knot strength with heavy fluoro. This is the knot for your 4/0–6/0 Owner circles on tuna fly-line rigs and big bait setups.

    How to tie it: Pass the line through the hook eye. Wrap the tag end around the standing line 5–7 times, moving away from the hook. Pass the tag end through the loop closest to the hook eye, then back through the large loop you just created. Moisten and pull tight. It looks complicated written out, but it’s fast once you’ve done it a few times.

    6. Improved Clinch Knot — The Backup

    The improved clinch knot is probably the first knot most anglers learn. It’s reliable enough for mono and fluorocarbon up to about 30lb test, but it starts to lose strength with thicker diameters and doesn’t hold well with braid. Think of it as your backup — perfectly fine for basic applications but replaced by the Palomar and uni for most serious use.

    Which Knot for Which Connection

    ConnectionBest KnotAlternate
    Hook to mono/fluoroPalomarSan Diego jam, uni
    Hook to braid (no leader)PalomarUni (8 wraps)
    Jig or iron to leaderSan Diego jamPalomar
    Braid to fluoro leaderFG knotAlberto, double uni
    Swivel connection (Carolina rig)PalomarUni
    Loop knot (for lure action)Non-slip loop (Kreh)Uni loop
    Quick dropper loopDropper loopSurgeon’s loop

    Knot-Tying Tips

    Always wet your knots. Friction from cinching a dry knot generates heat that weakens line — especially fluorocarbon. A quick lick or dip in the water before pulling tight preserves full knot strength.

    Pull knots tight slowly. Jerking a knot tight causes uneven wraps and weak spots. Steady, firm pressure seats everything properly.

    Test every knot. After tying, give the line a firm pull. Better to find a bad knot before you cast than after a fish breaks you off.

    Retie regularly. Fluorocarbon develops memory and micro-abrasions after catching fish. Retie after every few fish or any time you feel roughness near the knot.

    Practice at home. Tying an FG knot for the first time while the tuna are biting is a recipe for frustration. Practice until muscle memory takes over.

    Hooks and Line Guides

    A strong knot only matters if it’s tied to the right hook with the right line. Here are our complete guides:

    Plan Your Trip

    Knots tied? Check conditions before heading out:

    Related Guides

    Tight lines!

  • Carolina Rig Setup for Saltwater Fishing

    Carolina Rig Setup for Saltwater Fishing

    The Carolina rig is one of the most effective bottom-fishing rigs for Southern California saltwater. It keeps your bait pinned to the bottom where halibut, corbina, and croaker feed, while giving the bait just enough freedom to look natural. If you surf fish or target halibut from a boat, you need this rig in your playbook.

    Setting up a Carolina rig is straightforward, but the details matter — the wrong weight, hook, or leader length can mean the difference between limits and getting skunked. Here’s exactly how to tie one and when to use it.

    What Is a Carolina Rig?

    A Carolina rig separates your weight from your bait using a leader. The weight sits on the main line above a swivel, and the bait hangs below on a separate length of leader. This design lets the weight anchor to the bottom while the bait floats or drifts naturally in the current — exactly how a real baitfish or sand crab moves.

    Compare this to a dropper loop rig where the weight hangs below and the bait sits higher in the water column. The Carolina rig excels when fish are feeding right on the bottom — which is most of the time for halibut, corbina, and California croaker.

    Carolina rig diagram showing egg sinker, bead, swivel, fluorocarbon leader, and circle hook setup for halibut fishing

    How to Tie a Carolina Rig (Step by Step)

    What you need: An egg sinker (1–4 oz depending on current and surf), a plastic bead, a barrel swivel (size 3–5), fluorocarbon leader line (15–20lb), and a hook (circle or kahle style, size 1/0–4/0).

    Step 1: Slide the egg sinker onto your main line. The line passes through the hole in the center of the sinker, allowing it to slide freely.

    Step 2: Slide a small plastic bead onto the main line after the sinker. This bead protects your knot from being damaged by the sinker banging against it. Don’t skip this step — without the bead, your knot will fail at the worst possible moment.

    Step 3: Tie your main line to one end of the barrel swivel using a Palomar knot or improved clinch knot. The swivel acts as a stopper — the sinker and bead sit above it on the main line, free to slide. See our knot guide for step-by-step tying instructions.

    Step 4: Cut a length of fluorocarbon leader — typically 18 to 36 inches. Tie one end to the other eye of the barrel swivel.

    Step 5: Tie your hook to the free end of the leader. A Palomar knot works perfectly here.

    That’s it. Bait the hook, cast it out, and let the sinker pull everything to the bottom. The sinker sits on the sand, the leader extends out with the current, and your bait drifts naturally right in the strike zone.

    Dialing in the Details

    Sinker Weight

    Use the lightest weight that holds bottom. In calm surf or from a boat in minimal current, 1–2 ounces is plenty. In moderate surf, go to 3 ounces. In heavy surf or strong current, 4 ounces or even a pyramid sinker (which grips the sand) keeps you in place. Too much weight kills the natural presentation. Too little and you’re rolling down the beach.

    Leader Length

    This is the most important variable. A longer leader gives the bait more freedom to move but makes casting harder and reduces sensitivity. A shorter leader keeps better contact but looks less natural.

    For halibut in the surf, 24–36 inches is ideal — halibut are ambush predators and won’t chase a bait far, but they do like it to look natural. For corbina, 18–24 inches works better because they pick up baits delicately and a shorter leader means you feel the bite sooner. From a boat targeting halibut in bays or along the coast, 18–24 inches keeps good control.

    Hook Selection

    Circle hooks in 2/0–4/0 are the best all-around choice for Carolina rigs. They hook in the corner of the mouth almost every time, which means better hookup rates and easier releases. When a halibut picks up your bait, just reel tight and the circle hook does the work — no big hookset needed. The Owner Mutu Light Circle (5114) in 2/0–3/0 is ideal for halibut Carolina rigs — light wire for better penetration on a soft-mouthed fish. For a complete breakdown of hook models and sizes, see our hooks by species guide.

    Line and Leader

    Main line should be braided line in the 15–30lb range. Braid’s sensitivity lets you feel the slightest bump — critical for detecting halibut bites, which are often just a subtle “tick.” The fluorocarbon leader (15–20lb) provides abrasion resistance against sand and rocks plus near-invisibility in clear SoCal water. The swivel prevents the braid from twisting as the sinker slides. Connect your braid to the swivel with a Palomar knot, and for braid-to-leader connections elsewhere in your setup, see our complete knot guide.

    Best Baits for a Carolina Rig

    The beauty of the Carolina rig is that it works with almost any bait. For halibut, live or frozen sardines, smelt, and squid strips are all productive. Cut squid is especially effective because it stays on the hook well and halibut love it. For corbina and perch in the surf, sand crabs (soft-shell when possible), bloodworms, and mussels are the top producers. Swimbaits and grubs also work on a Carolina rig — thread a 3–4 inch soft plastic on a jig head or weedless hook and fish it exactly the same way.

    When and Where to Use It

    The Carolina rig shines in these SoCal situations: surf fishing sandy beaches for halibut, corbina, and perch — particularly in the troughs between sandbars. Bay fishing from shore or kayak for halibut and spotted bay bass. Slow drifts along sandy bottom from a boat. And fishing structure edges where halibut stage to ambush bait moving along the sand-to-rock transition.

    Check the SST chart before heading out — halibut start feeding aggressively when nearshore water hits the upper 50s to low 60s. Read our halibut temperature guide for seasonal patterns. For beach-specific advice, our Doheny surf fishing guide and halibut surf fishing guide walk you through reading the sand and finding productive troughs.

    Tackle Setup

    The right rod and reel make a big difference on Carolina rigs — you need sensitivity to feel light bites and enough backbone to cast weighted rigs:

    Surf: A 9–11 foot surf rod paired with a 4000–5000 spinning reel. The longer rod gives you casting distance to reach the sandbars, and the spinning reel handles the lighter weights well.

    Boat: A 7-foot medium rod paired with a 20lb class reel — either spinning or conventional. Shorter rod for working the rig vertically on a drift.

    Line: 15–20lb braid with 15–20lb fluorocarbon leader. See our line guide for specific brand recommendations.

    For complete rod and reel pairing advice, see our best rod and reel combo guide.

    Plan Your Trip

    Check conditions before you head out:

    Related Guides

    Tight lines!

  • Braid vs Mono vs Fluorocarbon — Which Fishing Line Should You Use?

    Braid vs Mono vs Fluorocarbon — Which Fishing Line Should You Use?

    Your fishing line is the only connection between you and the fish. Choose the wrong one and you’ll lose fish, miss bites, and waste money. Choose the right one — and match it to the right situation — and your catch rate goes up immediately.

    Here’s the short answer most SoCal anglers land on: braided mainline + fluorocarbon leader. It’s the standard setup for 90% of saltwater applications from surf to tuna. But understanding why — and when to break from this standard — will make you a better angler. For specific line weight recommendations by species, see our best fishing line by pound test guide.

    Quick Comparison

    Property Braided Monofilament Fluorocarbon
    Diameter Thinnest (per lb test) Thickest Medium
    Stretch Near zero High (25–30%) Low (5–10%)
    Visibility Visible (colored) Low (clear) Nearly invisible underwater
    Abrasion resistance Low Good Excellent
    Sensitivity Excellent Low Good
    Sinks or floats Floats Slow sink Sinks
    UV resistance Excellent Poor (degrades) Excellent
    Cost High upfront, lasts long Cheap Most expensive per yard
    Knot strength Needs specific knots Easy to knot Needs wet knots, can be stiff

    Braided Line: Your Mainline

    Braid is the standard mainline for SoCal saltwater fishing. Here’s why:

    Thinner diameter = more capacity. 30lb braid has the same diameter as 8lb mono. This means you can fit 300+ yards of heavy line on a reel that would only hold 150 yards of equivalent mono. When a yellowtail or tuna takes a 200-yard run, that extra capacity is the difference between landing the fish and getting spooled.

    Zero stretch = instant sensitivity. Braid doesn’t stretch, so every movement of your lure and every bite transmits directly to your rod tip. You feel structure, detect subtle bites (critical for halibut on swimbaits), and get faster hooksets.

    Longevity. Braid doesn’t degrade from UV exposure or develop “memory” (coils from being spooled). A quality braid can last a year or more before needing replacement, while mono should be replaced every few months.

    When NOT to use braid as mainline: Braid is visible in the water and has zero abrasion resistance against rocks and structure. This is why you always use a leader — never tie braid directly to your hook or lure (except for some topwater applications like surface iron where visibility doesn’t matter and maximum casting distance is the priority).

    Fluorocarbon: Your Leader Material

    Fluorocarbon is the standard leader material for saltwater fishing. It bridges the gap between braid’s sensitivity and the fish’s wariness:

    Nearly invisible underwater. Fluorocarbon has a refractive index close to water, making it almost invisible to fish. In clear SoCal water, this is a major advantage — line-shy fish like halibut and white seabass can see mono but struggle to detect fluoro.

    Abrasion resistant. Fluorocarbon holds up against rocks, kelp, and sharp gill plates better than braid or mono. When your leader is rubbing against a yellowtail’s body during the fight, fluoro survives. Braid would be cut in seconds.

    Sinks. Fluorocarbon sinks naturally, which keeps your bait or lure down in the water column. This is important for Carolina rigs, fly-line rigs, and any bottom-fishing application.

    Low stretch. Not quite zero like braid, but much less than mono. You maintain good sensitivity through the leader while getting the shock absorption that braid can’t provide.

    Tips for fluorocarbon: Always wet your knots before cinching — dry fluoro generates heat that weakens the line. Use a Palomar knot for terminal connections and an FG knot for braid-to-leader connections. Fluoro is stiffer than mono, so leave a slightly longer tag end to prevent slippage.

    Monofilament: Still Has Its Place

    Mono gets overlooked in the braid era, but it still has legitimate applications:

    Trolling. Mono’s stretch acts as a shock absorber when a fish strikes a trolled lure at speed. This prevents pulled hooks and broken leaders. Many experienced trollers run mono mainline specifically for this cushion effect — it’s especially valuable for dorado and tuna trolling spreads with cedar plugs and feathers.

    Live bait soaking. When fishing live bait for tuna or white seabass, mono’s stretch gives the fish time to eat the bait without feeling hard resistance. This is why some captains recommend mono topshots on tuna rigs.

    Budget option. Mono is dramatically cheaper than braid or fluoro. If you’re filling multiple reels and budget is a concern, mono mainline with a short fluoro leader still catches plenty of fish. It won’t perform as well, but it works.

    Surf fishing (in certain conditions). Some surf anglers prefer mono because it’s less likely to catch wind and create tangles on long casts. The stretch can also help absorb wave surge when fighting fish in the surf.

    Leader material (budget). Mono leaders work fine in murky water or when targeting less line-shy species. A 20lb mono leader is significantly cheaper than 20lb fluoro and will get the job done when conditions aren’t finesse-demanding.

    The SoCal Standard: Braid + Fluoro Leader

    Here’s how to set up the standard rig for different SoCal scenarios. For specific line weight and brand recommendations, see our fishing line by pound test guide.

    Surf fishing: 20lb braid mainline → 15–20lb fluorocarbon leader (3–4 feet) → Palomar knot to hook. Connect braid to leader with an FG knot or double uni. Pair with a 4000–5000 spinning reel on a 9–10 foot rod.

    Party boat (yellowtail/calico): 30lb braid → 25–30lb fluoro leader (4–6 feet) → Palomar knot to jig or hook. Pair with a 20lb conventional reel or 30lb reel on a 7-foot rod. See our yellowtail reel guide for specific models.

    Tuna (bluefin/yellowfin): 50–65lb braid → 40–60lb fluoro leader (6–15 feet depending on water clarity) → circle hook or jig. The leader length matters more for tuna — clear water = longer leader. Pair with a 40lb+ conventional reel on an 8-foot rod. See our bluefin reel guide for complete recommendations.

    Halibut (boat or shore): 15–20lb braid → 12–20lb fluoro leader (2–3 feet) → Carolina rig or swimbait. Light leader is important — halibut can be line-shy in clear water.

    Braid-to-Leader Knots

    The connection between your braid mainline and fluorocarbon leader is the weakest point in your system. Use the right knot:

    FG Knot: The strongest braid-to-leader connection. Retains nearly 100% of line strength and creates a slim, low-profile knot that slides through guides easily. It takes practice to tie, but it’s worth learning for any application over 20lb. See our complete knot guide.

    Double Uni Knot: Easier to tie than the FG and still retains 85–90% strength. Good for lighter applications (under 30lb) or when you need to retie quickly on the water.

    Alberto Knot: A modified version of the Uni that works well for connecting braid to heavier fluoro (30lb+). Good compromise between strength and ease of tying.

    For terminal connections (line to hook/lure), the Palomar knot retains 90–95% strength on all three line types and should be your go-to. See our hooks by species guide for the right hook to tie it to.

    Choosing Pound Test

    Target Species Braid Mainline Fluoro Leader
    Surf perch, croaker 10–15lb 8–12lb
    Halibut 15–20lb 12–20lb
    Calico bass 20–30lb 15–25lb
    Yellowtail 30–40lb 25–40lb
    White seabass 30–40lb 25–30lb
    Dorado 30–40lb 25–30lb
    Bluefin tuna 50–80lb 40–60lb
    Yellowfin tuna 40–65lb 30–50lb

    For a deeper dive on matching line weight to species — including specific braid and fluorocarbon brand recommendations — see our best fishing line by pound test guide.

    Common Mistakes

    Not using a leader. Running straight braid to your hook is the number one mistake beginners make. Fish can see braid, and it has zero abrasion resistance. Always use a fluorocarbon (or at minimum mono) leader.

    Leader too short. A 12-inch leader defeats the purpose. Use at least 3 feet for inshore and 6+ feet for offshore in clear water. The fish need enough distance from the visible braid to not be spooked.

    Not replacing mono. Monofilament degrades from UV exposure and develops memory. If you’re using mono mainline, re-spool every 2–3 months or after heavy use. Braid and fluoro last much longer.

    Dry knots on fluoro. Cinching a fluorocarbon knot without wetting it first can weaken the line by up to 20%. Always wet your knots — saliva or water, every single time.

    Using fluoro as mainline. Fluoro is expensive and has more memory than braid. Using it as mainline fills your reel with costly line that doesn’t cast as well. Use it for leaders and use braid or mono as mainline.

    Plan Your Trip

    Related Guides

    Tight lines!