• Walleye Jigging Guide: Vertical, Casting & Snap Jigging

    Jigging is the most-used walleye technique because it works in more situations than any alternative. Trolling needs a boat at speed; live-bait rigging needs perfect conditions; crankbait casting needs cover or current. Jigging works on the boat, from shore, through the ice, in calm or wind, at any depth from 3 feet to 40 feet. Every Minnesota walleye opener is fundamentally a jigging event. Every Mille Lacs spring weekend produces thousands of fish on the same fundamental technique — drop a jig, work it correctly, set the hook on the tap.

    This guide ties together the gear and technique for walleye jigging. Pair with the walleye jigs guide for lure selection, the walleye rods guide for rod setup, and the walleye reels guide for matched reels.


    Let’s go Fishing!
    Search for the Perfect Fishing Trip or Charter
    Upper Midwest & Great Lakes
    Verified reviews · Free cancellation · 90-day price match
    Powered by FishingBooker · Affiliate partner

    The Three Jigging Techniques

    Walleye jigging is three distinct techniques used in different situations:

    Technique Best For Boat Position
    Vertical Jigging Holding fish on specific structure, deep water, ice fishing Directly over target
    Drag and Lift Scattered fish on flats, weed edges, finding fish Drifting or slow troll motor
    Snap Jigging Reactive strikes, neutral fish, covering water Slow drift or anchored

    Vertical Jigging

    Vertical jigging is the technique most associated with walleye fishing. The boat sits directly over the target — usually a piece of structure with fish marked on electronics — and the angler works a jig straight down through the strike zone.

    Setup:

    Presentation:

    1. Position boat directly over target. Use trolling motor or anchor to maintain position.
    2. Lower jig to bottom. Watch the line — the moment the jig hits bottom, you should see the line go slack.
    3. Lift rod tip 12-18 inches with smooth motion. Slow lift, not a snap.
    4. Let the jig fall on a controlled slack line. Most strikes happen on the fall.
    5. Watch the line for any tick, twitch, or unusual movement. Most walleye bites feel like a slight tap or a momentary weight change.
    6. Set the hook with a sharp upward sweep on any unusual feel. Walleye have bony mouths — set firmly.
    7. Repeat. Cycle: bottom, lift, fall, watch, lift again.

    The rhythm matters. A consistent slow rhythm produces strikes; erratic motion often spooks fish. Most experienced walleye anglers work the jig 4-6 times per minute, not 20.

    Drag and Lift

    Drag and lift is the casting variation of jigging. Instead of holding the boat over structure, you drift across an area while dragging the jig along the bottom with intermittent lifts. The technique covers water systematically and finds scattered walleye.

    Setup: Same as vertical jigging, but with longer rod (6’10”-7’2″) for better casting distance.

    Presentation:

    1. Cast at a 30-45 degree angle from the drift direction.
    2. Let the jig sink to bottom.
    3. Slowly drag the jig back along bottom — rod tip moving at about 1 foot per second.
    4. Periodically lift the rod tip 6-12 inches and let the jig fall back to bottom.
    5. Continue until the jig is straight below the boat, then retrieve and recast.

    The drag-and-lift technique works particularly well on flat sandy or gravelly bottoms where walleye scatter rather than concentrating on specific structure. Lake of the Woods flats and the shallow bays of Mille Lacs produce well with this approach.

    Snap Jigging

    Snap jigging is the aggressive variation that uses sharper, faster rod motions to trigger reaction strikes. Most effective with vertical jigs like the Rapala Jigging Rap that swim out and circle on the fall.

    Setup: Slightly heavier rod (medium power with fast or extra-fast action) for the sharper motions.

    Presentation:

    1. Drop the jig to the depth where fish are marked on electronics (or just above bottom).
    2. Snap the rod tip up sharply 18-24 inches. The motion is more aggressive than vertical jigging.
    3. Let the jig fall on slight slack line. The Jigging Rap swims out to one side and circles back.
    4. Watch the line during the fall — strikes happen here.
    5. Lift the rod to feel for weight or tension change. If something doesn’t feel right, set the hook.
    6. Repeat. Rhythm is faster than vertical jigging — 8-12 snaps per minute.

    Snap jigging produces when walleye are neutral and not actively chasing baitfish. The reaction-strike trigger overcomes their reluctance. Particularly effective in deep summer water and through the ice.

    Reading the Bite

    Walleye bites are notoriously subtle. Recognizing them is a skill that develops with experience:

    The classic tap. A sharp, brief sensation on the line — feels like the jig briefly bumped something hard. This is the most common walleye bite indicator.

    Weight change. The line suddenly feels heavier than it should. The fish has the jig but isn’t moving yet — set the hook before they spit it.

    Line jump. The line moves to the side or jumps in a way it shouldn’t. The fish has taken the jig and turned.

    Slack line. The line suddenly goes slack when it shouldn’t. The fish has the jig and is swimming toward you — reel up the slack and set the hook.

    “Mushy” feel. The jig feels different than it should during a lift — not snapping back the way an unencumbered jig would. Set the hook on any unusual feel; you can always re-bait if you’re wrong.

    Hookset. Walleye have bony mouths. Set the hook firmly with an upward sweep — not a violent yank, but a strong, smooth motion. Light hooksets bury in tissue but don’t penetrate bone reliably. The walleye jigs guide covers hook sharpness considerations.

    Tipping the Jig with Live Bait

    Live bait on a leadhead jig produces walleye when artificial-only presentations don’t. Three options:

    Fathead minnow. The opener standard. Hook the minnow lightly through both lips or just below the dorsal fin. The minnow should swim naturally when the jig is suspended.

    Shiner. Slightly larger and flashier than fatheads. Hook through the lips for vertical jigging; through the back for casting/dragging.

    Leech. Excellent summer bait. Hook through the suction-cup end. Leech action triggers strikes when minnows don’t.

    Nightcrawler. Halved or threaded on the hook. Particularly effective for evening walleye and in stained water.

    Cycle bait every 5-10 drops, even if the previous bait still looks intact. Fresh bait produces more strikes than tired bait. The relationship is direct.

    Live Bait Rigging Variations

    Beyond simple jig-and-minnow, several rigging variations expand the walleye angler’s toolkit:

    Slip bobber rig. Bobber stop, sliding bobber, small swivel, leader, hook with live bait. Cast and let drift. Particularly effective at specific depths in shallow water.

    Lindy rig (live bait rig). Walking sinker, swivel, leader (3-6 feet), small hook with live bait. Best for trolling slowly or drifting across structure.

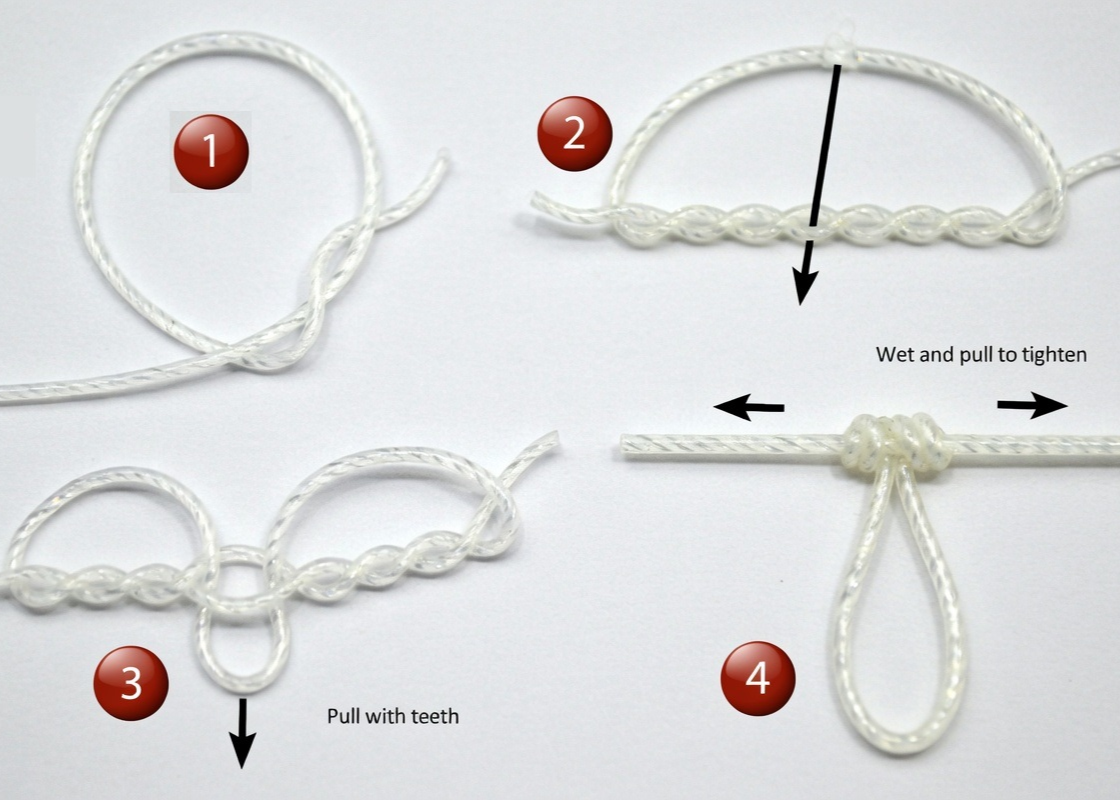
    Dropper loop rig. The dropper loop rig guide covers this technique in saltwater context — the same approach works for walleye, with a smaller sinker at the bottom and a hook 18-24 inches above.

    Bottom bouncer. Wire-frame sinker with a leader trailing behind. Drag along structure with live bait or spinner harness. Excellent for finding scattered fish.

    Seasonal Jigging Patterns

    Season Water Temp Primary Technique Best Jig
    Opener (May) 50-58°F Vertical jigging 1/4 oz Fireball + minnow
    Late spring 58-65°F Drag and lift 1/8 oz Mooneye + leech
    Summer (deep) 65-75°F Snap jigging Jigging Rap W5/W7
    Fall (trophy) 50-65°F Vertical with bigger jigs 3/8 oz Fireball + large minnow
    Ice fishing 32°F (ice) Vertical, slower rhythm 1/16-1/8 oz with maggot or shiner

    Reading Electronics for Jigging

    Modern fish finders show walleye-relevant information at a glance:

    • Hard bottom returns — bright color or strong red on the screen indicates rock, gravel, or hard sand. Walleye relate to hard structure.
    • Fish arches at depth — your targets. Set jig depth to match.
    • Bait balls — scattered marks above bottom. Walleye position adjacent.
    • Thermocline — visible as a color change band in summer. Walleye hold at the upper edge.
    • Your jig — appears as a small mark dropping through the water column. Confirm the jig is at the right depth.

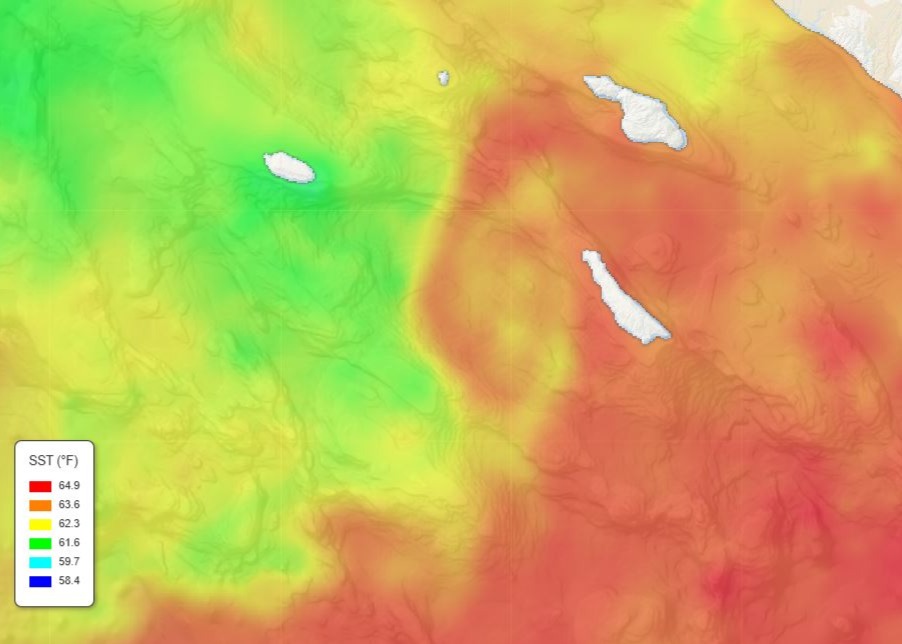
    Combine electronics with the SST charts to identify the prime walleye temperature band and the structure that intersects with it. The how to read SST charts guide covers the technique that applies to inland lakes as it does saltwater.

    Common Mistakes

    Rod too stiff. A bass rod doesn’t transmit walleye bites. Extra-fast action with medium-light to medium power is the right walleye configuration.

    Line too heavy. 12lb mono looks reasonable but it’s twice as visible as 6lb fluorocarbon. Use the lightest line that can land the target fish.

    Too aggressive a jigging motion. Many anglers jig too hard. Smooth lifts produce strikes; violent snaps spook fish. (Exception: snap jigging with Jigging Raps, where aggressive motion is the technique.)

    Wrong jig weight. A 3/8 oz jig in 10 feet of water sinks too fast. Match the weight to the conditions — lighter when possible. The walleye jigs guide covers the sizing table.

    Not setting hard enough. Walleye’s bony mouth requires a firm hookset. Soft pulls leave the hook in tissue but not bone — fish often shake loose during the fight. Set firmly.

    Ignoring electronics. Jigging in random water produces random results. Use the fish finder to identify productive structure before dropping the jig.

    Spinning vs Conventional for Jigging

    Spinning reels dominate walleye jigging. The spinning vs conventional guide covers the principles — spinning excels at finesse, light lures, and casting accuracy. For walleye jigging:

    • Spinning advantages: Better for light lures, easier line management on vertical drops, more accurate casts
    • Conventional advantages: Better for heavier lures (rarely needed for walleye), better drag for big fish (also rarely a factor)

    For 95% of walleye jigging, spinning is the correct choice.

    Gear Required for Walleye Jigging

    Frequently Asked Questions

    How do I jig for walleye?

    Three techniques: vertical jigging (lift-and-drop straight down), drag and lift (cast and slowly retrieve with intermittent lifts), and snap jigging (sharp upward snaps with a Jigging Rap). Choose based on the situation — vertical for known structure, drag-and-lift for scattered fish, snap for reactive strikes.

    What’s the best jig for walleye opener?

    The Northland Fireball in 1/4 oz, chartreuse or orange/chartreuse, tipped with a fathead minnow. This is the Minnesota opener standard — what every bait shop sells and what produces fish on opening weekend.

    How fast should I jig for walleye?

    Slower than instinct says. 4-6 lifts per minute for vertical jigging. The pause between lifts is when most strikes happen — don’t rush it. Snap jigging is faster (8-12 snaps per minute) but still controlled.

    What depth for walleye jigging?

    Depends on season and structure. Spring opener: 8-15 feet. Summer: thermocline edge (18-30 feet depending on lake). Fall: 8-20 feet as fish move shallower. See the walleye temperature guide for seasonal depth patterns.

    Should I use live bait or just artificial?

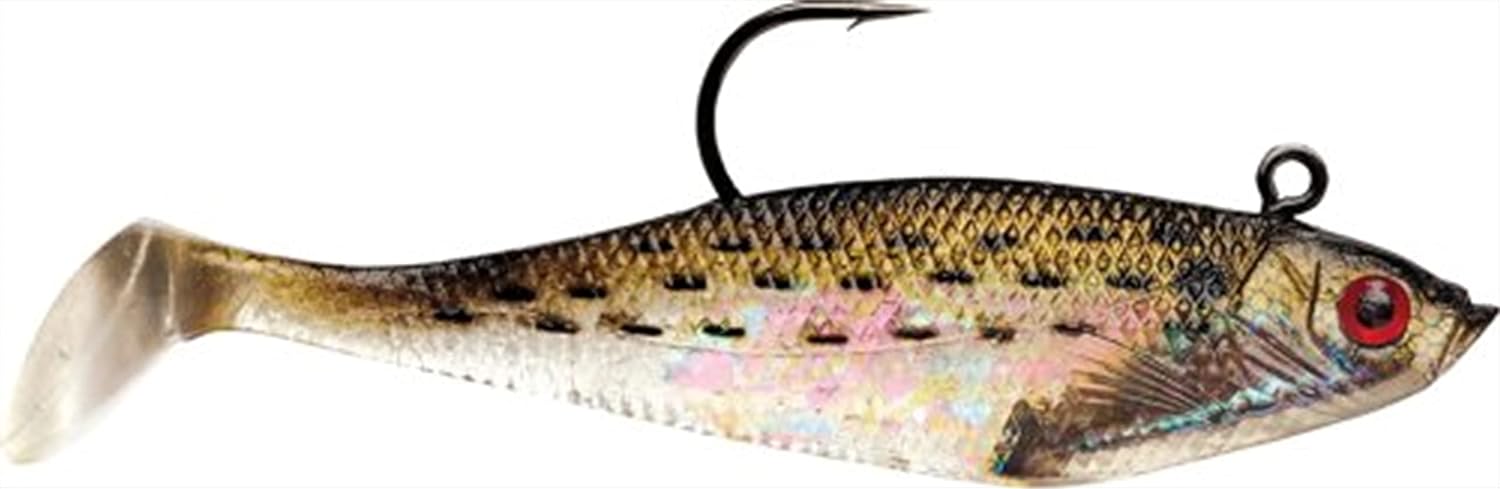
    Live bait (minnows, leeches, nightcrawlers) on leadhead jigs produces more walleye in most conditions than artificial-only presentations. Pure artificial jigs (Jigging Raps, Storm WildEyes) work well for reaction strikes and when live bait isn’t available. Most serious walleye anglers carry both.

    How do I feel a walleye bite?

    Walleye bites are subtle — usually a brief tap, weight change, or “mushy” feel during a lift. Set the hook on any unusual feel; better to set on nothing than miss a fish. The hookset itself is critical because walleye have bony mouths — set firmly.

    Plan Your Trip

    Related Guides

    Tight lines!

  • Mille Lacs Fishing Guide: Walleye, Smallmouth & Musky

    Mille Lacs is Minnesota’s most-discussed lake. The walleye fishery has been the subject of decades of management debate, scientific study, and angler passion. The smallmouth bass population has emerged as among the best in North America. The musky fishery has grown into a serious destination. The lake’s combination of size (132,500 acres), structure variety, and angler infrastructure makes it the iconic Minnesota fishing destination.

    This guide covers what makes Mille Lacs fishing work — when to go, where to fish, what species to target, and how to plan. Pair with the Minnesota fishing calendar for state-wide context and the species-specific water temperature guides for technique.


    Let’s go Fishing!
    Search for the Perfect Fishing Trip or Charter
    Mille Lacs & Central Minnesota
    Verified reviews · Free cancellation · 90-day price match
    Powered by FishingBooker · Affiliate partner

    The Lake

    Mille Lacs (“Lake Mille Lacs” in older terminology) covers 132,500 acres of central Minnesota, roughly 20 miles long and 14 miles wide. The lake is relatively shallow — most of it under 40 feet deep — but with significant structure variety. The famous mudflats in the lake’s center, the rocky shoreline reefs, the gradual breaks dropping from shallow shoals — these create the structure-rich environment that supports the multi-species fishery.

    Lake characteristics that shape the fishing:

    • Shallow but variable. Deep enough for thermocline development in summer (typically 20-25 feet on Mille Lacs), but shallow enough that structure-oriented fishing dominates over open-water trolling.
    • Hard bottom. Rocky shoreline and reef structure throughout the lake. Walleye and smallmouth relate to the rock.
    • Mudflats. The “mudflats” in the lake’s center are gradual mid-lake structure that drops to slightly deeper water. Famous walleye structure.
    • Multi-species support. Walleye, smallmouth bass, musky, northern pike, and perch all present in significant numbers. Few lakes support all five at this scale.

    Walleye Fishing on Mille Lacs

    Mille Lacs walleye fishing has been the subject of decades of management evolution. Current regulations (which change periodically) often include slot limits and possession restrictions designed to protect the trophy class. Check current Minnesota DNR regulations before keeping fish.

    Seasonal patterns:

    • Ice fishing (Dec-Mar): One of Minnesota’s premier ice fishing destinations. Resort towns (Garrison, Isle, Wahkon) support extensive ice fishing infrastructure. Northland Fireballs and Jigging Raps dominate.
    • Spring opener (May): Minnesota walleye opener weekend brings massive boat traffic. Post-spawn fish on rocky structure. Live bait jigging at 8-15 feet on classic structure.
    • Early summer (June): Walleye establish patterns on the mudflats and structure. Berkley Flicker Shad trolling produces. The walleye trolling guide covers technique.
    • Peak summer (July-Aug): Deep mudflat fishing. Walleye push to the upper edge of the thermocline (18-25 feet). Trolling with planer boards covers the deep flats efficiently.
    • Fall (Sept-Oct): Trophy walleye accessible on structure. Aggressive pre-winter feeding window. One of the best periods of the year.

    Smallmouth Bass on Mille Lacs

    Mille Lacs has emerged as one of North America’s premier smallmouth bass destinations. The combination of clear water, rocky structure, and abundant gobies (an invasive species that smallmouth feed on heavily) produces trophy fish. The 5+ pound class is realistic; the 6-7 pound class exists.

    Best techniques:

    The clear water demands light fluorocarbon line — 6-8lb is standard. See the braid vs mono guide for line selection.

    Musky on Mille Lacs

    Mille Lacs has developed into a serious musky destination over the past decade. The big-water character of the lake produces musky that grow larger than the Hayward chain average — multiple 55-inch fish have been caught in recent years. The musky fishing season has become a significant draw for the resort economy.

    Best techniques:

    • Casting and figure-eight work along weed edges and reefs
    • Mepps Musky Killer and Bull Dawg baits
    • Fall sucker pattern for trophy fish
    • Open-water trolling for suspended fish

    See the musky fishing guide for complete technique.

    Northern Pike on Mille Lacs

    Mille Lacs pike are aggressive and abundant. The lake’s pike population responds to the same baitfish (gobies, perch, ciscoes) that the other predators feed on. Trophy pike (15+ pounds) are caught regularly, particularly in the spring and fall trophy windows.

    Best techniques: See the pike lures guide for full technique and the pike temperature guide for seasonal patterns.

    The Mudflats

    Mille Lacs’ famous “mudflats” are the gradual mid-lake structure between the main basins. These flats — typically 18-24 feet deep at the top, dropping to 30-35 feet at the edges — concentrate walleye in summer when fish push to the thermocline edge. The flats fish similar to offshore reefs in saltwater — locate the right depth band, identify productive sections, work them systematically.

    Most charter operations on Mille Lacs spend significant time on the mudflats from late June through August. Trolling with planer boards covers the flats efficiently; vertical jigging works once you’ve located concentrations of fish.

    Where to Stay on Mille Lacs

    Garrison. Established resort town on the south shore. Multiple full-service resorts. Easy access to the south and east basins.

    Isle. Eastern shore. Mid-sized resort town. Access to the eastern reefs and the mudflats.

    Wahkon. Eastern shore between Isle and Garrison. Smaller resort community.

    Mille Lacs Lodge / Izaty’s. Premium resort facilities. Higher-end accommodations with full guide services.

    Onamia. Closest town to the southern access points. Multiple resort options.

    When to Visit

    Season Best For Notes
    Ice fishing (Jan-Feb) Walleye, perch, pike Premier ice fishing destination. Book months ahead.
    Walleye opener (May) Walleye Highest excitement; biggest crowds. Books early.
    Early summer (June) Multi-species (walleye, smallmouth, musky) Best variety; pleasant weather.
    Peak summer (July-Aug) Trolling walleye, smallmouth Mudflat fishing peak. Family-friendly weather.
    Fall (Sept-Oct) Trophy walleye, musky, smallmouth Best trophy season; smaller crowds.

    How to Plan Your Trip

    1. Decide your primary species — Mille Lacs supports walleye, smallmouth, musky, and pike at world-class levels. Pick your focus before booking.
    2. Check current regulations — Mille Lacs walleye regulations change periodically. Verify slot limits and possession before keeping fish.
    3. Pick the season — Use this guide and the species-specific temperature guides to match your goals to the calendar.
    4. Book lodging early — Mille Lacs resorts book months ahead for prime weeks. Opener and ice fishing seasons book a year ahead.
    5. Plan gear — Walleye-focused: walleye jigs, rods, reels. Multi-species: add smallmouth and musky gear.
    6. Track water conditions — Use the SST charts, chlorophyll maps, and fleet tracker.

    Frequently Asked Questions

    Is Mille Lacs good for walleye fishing?

    Yes — Mille Lacs is one of Minnesota’s premier walleye destinations despite (or because of) decades of management discussion. Current populations are stable; trophy fish (8+ pounds) are caught consistently. Check current regulations for keep slots before traveling.

    What’s the best time for Mille Lacs walleye?

    Spring opener weekend (May), late June through July for mudflat fishing, and September-October for trophy fish. The fall window is increasingly popular as the trophy potential becomes recognized.

    Is Mille Lacs really world-class for smallmouth?

    Yes. The combination of clear water, rocky structure, and an abundant goby population (gobies are heavy in Mille Lacs as an invasive) produces 5+ pound smallmouth consistently. Tournament smallmouth anglers from across North America now travel here.

    Where do I fish on Mille Lacs?

    Depends on the season and species. Walleye: opener on shoreline rocks, mid-summer on the mudflats, fall back to structure. Smallmouth: rocky shorelines and offshore reefs. Musky: weed edges and mid-lake reefs. The lake is big enough to have multiple productive areas.

    Can I fish Mille Lacs without a guide?

    Yes — many self-guided trips happen each year. Resort docks rent boats and provide maps. The lake is big enough that some local knowledge helps, particularly for finding the mudflats and identifying productive shoreline sections, but it’s not required.

    What’s the difference between Mille Lacs and Lake of the Woods?

    Mille Lacs is smaller, more developed, and offers more multi-species opportunities in a smaller area. Lake of the Woods is bigger, more remote, with higher-volume walleye fishing and the international border element. Both are world-class; pick based on travel preference and target species.

    Plan Your Trip

    Related Guides

    Tight lines!

  • Lake of the Woods Fishing Guide: Walleye, Pike & Smallmouth

    Lake of the Woods is the destination Upper Midwest walleye anglers point to when they’re describing big-water fishing. The lake covers nearly 1,700 square miles across Minnesota, Manitoba, and Ontario. The walleye population is among the largest in North America. The pike grow to trophy size. The smallmouth bass fishing on the Canadian side rivals anywhere on the continent. The ice fishing economy supports entire towns. Few destinations offer this combination of size, fish density, multi-species variety, and infrastructure.

    This guide covers what makes Lake of the Woods fishing work — when to go, where to fish, what to throw, and how to plan. Pair with the walleye temperature guide for seasonal context and the Minnesota fishing calendar for state-wide patterns.


    Let’s go Fishing!
    Search for the Perfect Fishing Trip or Charter
    Lake of the Woods & Border Country
    Verified reviews · Free cancellation · 90-day price match
    Powered by FishingBooker · Affiliate partner

    The Lake

    Lake of the Woods is the third-largest lake by area in the contiguous United States (depending on how you measure international waters), with shoreline measured in thousands of miles thanks to the lake’s irregular shape and 14,000+ islands. The Minnesota portion centers on Baudette, Warroad, and the Northwest Angle (the only part of the lower 48 north of the 49th parallel). The Canadian portion connects to Kenora, Ontario, and the larger lake system extending east.

    The lake’s character changes dramatically across its expanse:

    • Big Traverse Bay (south): The classic Minnesota walleye and ice fishing water. Bigger waves, deeper open basins, structure-oriented walleye fishing.
    • Northwest Angle: Smaller bays, more islands, sheltered fishing for multi-species trips.
    • Canadian side: Endless shoreline, smaller bays, premier smallmouth bass water. Less pressure than the Minnesota side.
    • Kenora area: Deeper water, larger walleye on average, premier trophy pike water.

    Walleye Fishing on Lake of the Woods

    Walleye are the headline species. The lake’s walleye population is monitored by both Minnesota DNR and Ontario MNR — both report stable or growing populations across multiple year-classes. Trophy walleye (over 8 pounds) are caught regularly, particularly in the Northwest Angle and Canadian sections.

    Seasonal patterns:

    • Ice fishing (Dec-Mar): Lake of the Woods supports a massive ice fishing economy. Wheelhouses (heated ice fishing trailers) are towed onto Big Traverse Bay and parked for the season. Tip-ups with shiners and jigging with VMC Mooneye jigs produce. Resort towns (Baudette, Warroad, Wheelers Point) book out months in advance for the prime January-February window.
    • Spring opener (May): Minnesota walleye opener weekend brings massive boat traffic. Post-spawn walleye on shoals and rocky structure. Northland Fireball jigs tipped with minnows are the standard.
    • Summer (June-Aug): Trolling crankbaits along structure produces consistently. Berkley Flicker Shad in size 5-7 covers most depths. The walleye trolling guide covers the technique.
    • Fall (Sept-Oct): Aggressive pre-winter feeding. Trophy walleye accessible on structure. One of the best fishing periods of the year.

    Northern Pike Fishing

    Lake of the Woods produces trophy pike. The 20+ pound class is realistic in the Canadian shield portions of the lake. The Northwest Angle and Kenora area both produce trophy fish consistently.

    Best times:

    • Spring (April-May): Post-ice-out trophy window. Big females in shallow bays. Dardevle spoons and large suckers under bobbers.
    • Early summer (June): Aggressive shallow feeding. Mepps Aglia #5 bucktails in silver/red.
    • Fall (September-October): Second trophy window. Big pike feeding before winter.

    See the pike lures guide for complete tackle selection and the pike temperature guide for seasonal patterns.

    Smallmouth Bass Fishing

    The Canadian portion of Lake of the Woods is among the best smallmouth bass water in North America. The combination of clear water, abundant rocky structure, and lower fishing pressure produces 5+ pound smallmouth consistently.

    Best techniques:

    Multi-Species Trips

    Lake of the Woods’s biggest advantage is the multi-species opportunity. A single trip can produce walleye, pike, smallmouth bass, and lake trout (in the deeper sections), with crappie and perch as bonuses. Most charter operations and resorts offer multi-species packages.

    Typical multi-species day:

    • Morning (6-10 AM): Walleye on structure or shoreline rocks
    • Mid-day (10 AM-2 PM): Pike or smallmouth on weed edges
    • Late afternoon (2-6 PM): Walleye trolling on deeper structure
    • Evening (6 PM-dusk): Topwater for any species or jigging for walleye

    Where to Stay

    Baudette/Wheelers Point (Minnesota). The most-developed resort infrastructure. Big Traverse Bay access. Ideal for walleye-focused trips and ice fishing.

    Warroad (Minnesota). Northern Minnesota access. Multiple resort options. Access to both Big Traverse Bay and the Northwest Angle.

    Northwest Angle (Minnesota). The only US town accessible only through Canada (or by boat across the lake). Premier multi-species fishing. Several full-service resorts.

    Kenora (Ontario). The major Canadian gateway. Trophy walleye and pike. Boat rentals and guides widely available. Requires US passport / NEXUS.

    Sioux Narrows / Nestor Falls (Ontario). Canadian shield resorts on the eastern lake portion. Premier smallmouth bass water.

    When to Visit

    Season Best For Notes
    Ice fishing (Jan-Feb) Walleye, sauger, pike Premier ice fishing destination. Book months ahead.
    Walleye opener (May) Walleye, pike Highest excitement; biggest crowds.
    Early summer (June) Multi-species Best variety; least pressure of summer.
    Peak summer (July-Aug) Trolling walleye, smallmouth Family-friendly weather; warmer.
    Fall (Sept-Oct) Trophy walleye, pike Best trophy season; smaller crowds.

    How to Plan Your Trip

    1. Decide which side — Minnesota for walleye-focused budget trips; Canadian for trophy and multi-species at higher cost.
    2. Pick the season — Use this guide and the walleye temperature guide to match your goals to the calendar.
    3. Book lodging — Resorts book months ahead, especially for ice fishing and opener weekend. Kenora outfitters book a year ahead for prime weeks.
    4. Plan gear — See the walleye jigs, crankbaits, rods, and reels guides.
    5. Cross-border requirements — For Canadian side, you need a passport (or NEXUS) and an Ontario fishing license. Check current border requirements before traveling.
    6. Track water conditions — Use the SST charts, chlorophyll maps, and fleet tracker to plan around current fishing conditions.

    Frequently Asked Questions

    What’s the best time to fish Lake of the Woods?

    Two prime windows: ice fishing (January-February) for trophy walleye and the fall trophy season (September-October) for the year’s biggest fish across multiple species. The Minnesota walleye opener weekend in May is the most popular but also the most crowded.

    Do I need a passport for Lake of the Woods?

    Only if you’re fishing the Canadian side or accessing the Northwest Angle (which requires driving through Canada). Minnesota waters of Lake of the Woods (Big Traverse Bay, the Rainy River, parts of the Angle accessible by boat) don’t require crossing the border.

    Best lake for walleye numbers vs trophy?

    For numbers, the Minnesota side (Big Traverse Bay, Rainy River outflow) produces consistent action. For trophy fish, the Canadian side (Kenora area, Sioux Narrows, eastern lake portions) produces larger averages.

    Can I fish without a guide?

    Yes — many self-guided trips happen each year, particularly on the Minnesota side where resort docks provide boat rentals and maps. The lake is big enough that some local knowledge helps, but it’s not required for a productive trip.

    What about pike and smallmouth?

    Both are excellent on the Canadian side. Trophy pike (20+ lbs) and trophy smallmouth (5+ lbs) are realistic targets. Many anglers plan multi-species trips combining all three top species.

    What gear do I need?

    For walleye-focused trips: walleye rods, walleye reels, jigs, and crankbaits. For multi-species: add pike lures with wire leaders and smallmouth lures. The line selection guide applies.

    Plan Your Trip

    Related Guides

    Tight lines!

  • Best Walleye Crankbaits: Trolling & Casting Guide

    Crankbaits are the search-and-cover tool of walleye fishing. Where jigs let you target known fish on specific structure, crankbaits let you cover water systematically and find walleye scattered across larger areas. They’re especially effective during the summer months when walleye spread across deep water and during fall when fish push back toward structure but aren’t yet tight to it. Trolling crankbaits is the dominant Lake Erie walleye technique. Trolling and casting them is essential on Mille Lacs, Lake of the Woods, and the bigger natural lakes.

    This guide covers the three crankbait styles that consistently produce Upper Midwest walleye — shallow-running shad imitations, mid-depth deeper-running cranks, and the magnum-sized big-fish targets. Pair this with the walleye trolling guide for the boat speed and spread setup that maximizes these lures.

    ⚡ Quick Picks by Situation

    Best overall trolling: Berkley Flicker Shad — the modern walleye trolling standard.

    Best classic / casting: Rapala Shad Rap — 40 years of proven walleye production.

    Best deep / magnum: Rapala X-Rap Magnum — for the deepest summer walleye.

    Best shallow / pre-spawn: Rapala Husky Jerk — suspending jerkbait, works for casting too.

    Best small profile: Rapala Original F05 — finesse option for clear water.


    Let’s go Fishing!
    Search for the Perfect Fishing Trip or Charter
    Upper Midwest & Great Lakes
    Verified reviews · Free cancellation · 90-day price match
    Powered by FishingBooker · Affiliate partner

    Standard Walleye Trolling Crankbaits

    Berkley Flicker Shad (Size 5-7)

    Buy it on Amazon

    The Berkley Flicker Shad has earned its place as the dominant walleye trolling crankbait of the modern era. The tighter, more refined wobble compared to traditional crankbaits matches the slower trolling speeds walleye prefer (1.5-2.2 mph). The size 5 covers most depths from 6-12 feet at typical trolling speeds; the size 7 reaches 10-18 feet. Color selection matters more than with most crankbaits — chartreuse, fire tiger, perch, and natural shiner produce in different water conditions. The Flicker Shad’s diving lip is durable enough to handle rocky bottoms without immediate failure, though prolonged bottom contact will eventually wear it. Run on a 10-12 foot fluorocarbon leader connected to braid mainline — the leader’s invisibility matters for clear-water walleye. See the braid vs mono guide for the connection setup.

    Rapala Shad Rap (Size 5-7)

    Buy it on Amazon

    The Rapala Shad Rap is the lure that built modern walleye trolling. Introduced in the mid-1980s, the Shad Rap defined what a walleye crankbait should look like — narrow shad profile, tight rolling action, balsa wood construction (originally). The SR5 (size 5, 2″) covers shallow water from 4-9 feet; the SR7 (2.75″) reaches 7-13 feet. The Shad Rap fishes slightly differently than the Flicker Shad — the slightly wider wobble suits faster trolling speeds (2.0-2.4 mph) and triggers reaction strikes when walleye aren’t actively feeding. Some serious walleye anglers carry both Shad Raps and Flicker Shads and switch between them when one isn’t producing. The Crawfish and Purple Descent colors are reliable across most Upper Midwest conditions. Casts well too — better than the Flicker Shad for shore-based walleye fishing or working specific structure from a boat.

    Rapala Husky Jerk (HJ10/HJ12)

    Buy it on Amazon

    The Husky Jerk is the suspending jerkbait that owns spring walleye fishing. After ice-out and through the early spring period, walleye push shallow to feed on baitfish, and the Husky Jerk’s suspending action — where the lure stops in place during pauses — triggers strikes that constantly-moving lures miss. The HJ10 (4″) covers most spring walleye situations. Cast or troll, with frequent pauses on the retrieve. The Husky Jerk transitions to pier fishing for salmon (covered in the coho lures guide) and works on smallmouth bass too — a versatile lure worth keeping in any Upper Midwest tackle box. Best colors: Glass Perch, Clown, Silver/Black for spring; natural patterns for clear summer water.

    Deep-Water and Magnum Crankbaits

    Rapala X-Rap Magnum

    Buy it on Amazon

    The X-Rap Magnum is the deep-water specialist for summer walleye trolling. Available in multiple sizes designed for specific depth ranges, the Magnum reaches depths that standard Flicker Shads and Shad Raps can’t — 20+ feet down at trolling speeds without needing planer boards or downriggers. The aggressive wobble triggers reactive strikes from walleye holding deep on summer structure. Best applications: Lake Erie summer walleye, deep Mille Lacs structure, Lake of the Woods open-water trolling. Color selection: blue/silver and green/silver natural patterns produce in deep clear water; orange and chartreuse for the stained water of Upper Red Lake or Bay of Green Bay.

    Storm WildEye Live Series

    Buy it on Amazon

    The Storm WildEye Live Series provides the swimbait profile for situations where soft plastic action triggers strikes that hard crankbaits don’t. Pre-rigged with a weighted hook, the WildEye works as a casting lure or vertical jigging tool — not a trolling lure in the traditional sense. Excellent for working specific structure (rocky points, drop-offs) where you want to slow down and present a lure precisely. Bigger fish often prefer the swimbait profile over a crankbait’s tight wobble. The 3-inch size covers walleye applications; the 4-inch crosses into smallmouth and small pike work.

    Trolling Speed and Depth

    The single biggest variable in crankbait trolling success is speed. Different lures hit their best action at different speeds:

    Lure Optimal Speed (GPS) Approximate Depth
    Berkley Flicker Shad 5 1.5-2.0 mph 6-12 ft
    Berkley Flicker Shad 7 1.7-2.2 mph 10-18 ft
    Rapala Shad Rap SR5 1.8-2.4 mph 4-9 ft
    Rapala Shad Rap SR7 2.0-2.5 mph 7-13 ft
    Rapala Husky Jerk HJ10 1.0-2.5 mph (suspending) 4-7 ft
    Rapala X-Rap Magnum 2.0-3.0 mph 15-30 ft

    GPS speed over ground matters, not boat speedometer. Current and wind affect actual lure presentation significantly even if the boat’s speedometer shows constant speed. Always use GPS.

    Color Selection for Walleye Crankbaits

    Conditions Best Colors Why
    Clear water, bright sun Natural shiner, perch, blue/silver Mimics live bait, less aggressive flash
    Stained water Chartreuse, fire tiger, orange High visibility through turbidity
    Low light / dawn / dusk Glow, purple, dark patterns Silhouette matters more than color
    Deep water (15+ ft) Glow, UV, contrasting patterns Most colors fade at depth; visibility key
    Cold water (spring/fall) Glass perch, clown, silver/black Cold-water fish respond to subtle natural patterns

    Trolling Setup for Walleye

    Walleye crankbait trolling typically uses 4-6 rods spread across the boat:

    1. Center/back rod (1): Direct line behind the boat. Closest to prop wash but produces in active fish situations.
    2. Outside lines on planer boards (2-4): Spread the lures wider than the boat’s footprint. Church Tackle TX-22 planer boards are the walleye-specialized standard.
    3. Dipsy diver lines (0-2): Reach mid-depth without downriggers. Useful for getting crankbaits down to 15-20 feet.
    4. Downrigger lines (0-2): Deep trolling for Lake Erie or summer walleye on big water. See the downrigger guide for setup.

    Use line counter reels on all rods to set precise depths via line out. Without a line counter, you can’t accurately repeat the depth that’s producing.

    Line and Leader Selection

    Walleye crankbait trolling demands the right line setup. Three common configurations:

    Pure monofilament (10-12 lb): The traditional walleye trolling setup. Stretch helps cushion strikes and reduces hook-pulls on light walleye bites. Simple — no leader knot required.

    Braid mainline with monofilament leader (30 lb braid + 15-20 ft of 10-12 lb mono leader): Modern setup. Braid provides line counter precision and sensitivity; mono leader provides stretch near the lure for strike absorption. Connect with an FG knot or modified Albright. See the best fishing knots guide for the connections.

    Pure braid (15-20 lb): For deep cold water and pressured fish. Sensitivity is maximum, no stretch. Some walleye anglers prefer this for the strike detection it provides. Adds a barrel swivel or tippet ring to the leader connection to allow flexibility at the lure.

    For full background on line selection trade-offs, see braid vs mono vs fluorocarbon and best fishing line by pound test.

    Common Mistakes

    Trolling too fast for walleye. Walleye prefer 1.5-2.4 mph for most crankbaits. Boats coming over from bass fishing often troll at 2.5-3.0 mph and miss walleye. Slow down — use GPS to confirm actual speed.

    Wrong leader length. Short leaders kill the lure’s natural action. Walleye crankbait setups typically use 8-15 foot fluorocarbon or mono leaders. Don’t go shorter than 6 feet.

    Not varying the depth. Walleye hold at specific depths that change throughout the day. If you’re not getting bites, change crankbait sizes (deeper-running or shallower) before changing lures. Cover the water column systematically.

    Bouncing crankbaits off bottom. Sometimes effective for triggering strikes, but constant bottom contact wears out lips and creates noise that spooks fish. Aim for the lure to occasionally tick bottom, not crash it.

    Skipping the temperature check. Before setting up your spread, check the SST charts and identify the prime walleye temperature band (65-72°F). Run your crankbaits at that depth, not just at whatever depth the lure naturally fishes.

    Gear to Pair with Your Crankbaits

    Frequently Asked Questions

    What’s the best crankbait for walleye?

    The Berkley Flicker Shad in size 5-7 is the most-used walleye crankbait. The Rapala Shad Rap is the classic alternative with 40 years of proven track record. For deep water, the Rapala X-Rap Magnum.

    What size crankbait for walleye?

    Size 5 (Flicker Shad and Shad Rap) covers most shallow-to-mid-depth water. Size 7 reaches deeper. Magnums for deep summer work or trophy targeting. Start with size 5 in chartreuse, fire tiger, and natural shiner colors.

    What’s the best trolling speed for walleye crankbaits?

    1.5-2.4 mph GPS for most walleye crankbaits. Flicker Shads run best at 1.5-2.0 mph; Shad Raps at 2.0-2.4 mph; X-Rap Magnums at 2.0-3.0 mph. Always use GPS speed over ground, not boat speedometer.

    Do I need planer boards for walleye trolling?

    Not strictly necessary, but they dramatically improve coverage. Church Tackle TX-22 walleye-specific planer boards are the standard. Without boards, you’re trolling 4 rods through the same water; with boards, you’re covering 100+ feet wide of strike zone.

    What line should I use for walleye trolling?

    Either pure mono (10-12 lb) for simplicity, or braid mainline (30 lb) with monofilament leader (10-12 lb) for sensitivity. The braid vs mono guide covers the trade-offs. Avoid pure braid in clear water.

    How deep do walleye crankbaits run?

    Depends on size and trolling speed. Size 5 crankbaits reach 6-12 feet. Size 7 reach 10-18 feet. Magnum crankbaits reach 15-30 feet. For specific depth/speed charts, check the manufacturer’s dive chart for each lure.

    Plan Your Trip

    Related Guides

    Tight lines!

  • River Salmon Fishing Guide: Great Lakes Tributaries

    River Salmon Fishing Guide: Great Lakes Tributaries

    River salmon fishing on the Great Lakes is its own distinct fishery. The fish are the same kings and coho that anglers troll for offshore in summer, but the techniques, gear, and tactics are entirely different. Once kings push out of the lake and into tributaries to spawn — typically mid-August through October — they stop feeding the way they did in open water. They strike out of aggression and spawning instinct, not hunger. The lures that produce shift dramatically. Your downrigger rod becomes useless. The fish become harder to catch and easier to spot at the same time.

    This guide covers what works for river salmon across Great Lakes tributaries — drift fishing, float fishing, plug fishing, bead drifting, and fly techniques. It applies to the Manistee, Pere Marquette, Salmon River, Niagara, Big Manistee, and dozens of other tributaries that run salmon. For region-specific information, see the Manistee River guide and the Lake Ontario guide.

    ⚡ Quick Picks by Technique

    Drift fishing plugs: Kwikfish K15 — the river plug standard.

    Alternative plug: Yakima Mag Lip 3.5 — modern alternative to Kwikfish.

    Casting: Mepps Aglia #4 or #5 — the river spinner standard.

    Smaller water: Rapala Original F05 — tight wobble for educated fish.

    Distance casting: Acme Kastmaster 1 oz — casts a mile, deadly on bigger water.


    Let’s go Fishing!
    Search for the Perfect Fishing Trip or Charter
    Great Lakes River Salmon
    Verified reviews · Free cancellation · 90-day price match
    Powered by FishingBooker · Affiliate partner

    Understanding River Salmon

    The biggest mental shift for river salmon fishing is recognizing that the fish aren’t feeding. Lake salmon hunt — they chase bait, they strike to eat. River salmon don’t. By the time they enter the rivers, they’ve already begun the metabolic shift to spawning. Their digestive system is shutting down. They strike for two reasons only:

    Aggression / territory. A spawning king will hammer a plug that invades the holding water. This is the primary trigger for plug fishing.

    Egg-eating instinct. Throughout their life, salmonids eat each other’s eggs. In rivers, this instinct stays active even after they stop feeding generally. This is the primary trigger for bead and egg fishing.

    Once you understand this, the techniques make sense. You’re not trying to make a salmon hungry — you’re trying to make them mad enough or instinct-driven enough to strike.

    Reading Rivers for Salmon

    Where salmon hold in a river changes by stage of run:

    Fresh fish (chrome). Recently entered from the lake. Bright, silver, still ocean-conditioned. Holding in deeper pools and current seams, often resting between push periods. Most aggressive bite — these fish still have some feeding response left.

    Staging fish. Holding in pools waiting for water conditions to push them upstream. May stay in the same hole for days. Most accessible to anglers because they’re stationary.

    Pre-spawn (dark). Beginning to color up. Holding near suspected spawning gravel. Selective biters, but aggressive on plugs that invade their space.

    Spawning fish. On gravel beds (redds). Should be left alone — Michigan and most other states prohibit fishing for actively spawning fish. Fish the water below redds where post-spawn drop-back fish hold.

    Look for these features when reading a river:

    • Deep pools below riffles — Where fresh fish rest after pushing through fast water
    • Current seams — Edges between fast and slow water concentrate fish
    • Log jams and undercut banks — Shelter for staging fish, particularly larger kings
    • Tailouts of pools — The downstream lip where pools shallow before the next riffle. Fish stage here before moving up.
    • Boulder fields — Pockets behind individual boulders break the current and hold fish

    Drift Fishing with Plugs

    The dominant technique on the bigger Great Lakes tributaries. A boat anchors or holds position upstream of a known holding pool, and a plug drifts back into the strike zone on a controlled line. When a king hits, it’s an unmistakable rod-bender.

    Kwikfish K15

    Buy it on Amazon

    The Kwikfish K15 is the classic salmon drift plug. The size (about 5″) matches what kings react to in river conditions. The wobble is aggressive — wider and more erratic than spoons — which triggers strikes from territorial fish. Most river anglers wrap the plug with a sardine or herring wrap (a strip of bait secured around the body with thread) which adds scent attraction and slows the action slightly for better presentation. Run with a long fluorocarbon leader (8–12 feet) to keep the line out of the strike zone. Colors that produce: chartreuse, fluorescent orange, pink/chartreuse, and the classic “Hot Tamale” pattern. Drift slowly through holding water — the plug should wobble seductively without spinning out.

    Yakima Mag Lip 3.5

    Buy it on Amazon

    The Yakima Mag Lip is the modern alternative to the Kwikfish. The lip design produces a tighter, more consistent wobble than the Kwikfish, which some anglers prefer for educated fish on pressured water. The 3.5 size matches the K15 for application. Mag Lips also accept bait wraps. Colors run similar to Kwikfish patterns. Some river anglers swear by Mag Lips; others stay loyal to Kwikfish. Carry both — when one color or action isn’t producing, switch to the other and you often find what’s working.

    Float Fishing

    Float fishing — sometimes called centerpin fishing or bobber fishing — drifts a presentation at a set depth through holding water. The float (bobber) marks the location, the leader sets the depth, and the lure or bait drifts naturally with the current. Steelhead anglers are the masters of this technique, but it works for salmon too.

    Setup: a long rod (10–13′), small bobber sized to the current and bait, 4–6 feet of fluorocarbon leader, and your bait. The bait can be:

    • Spawn bags — Cured salmon eggs in mesh netting. The most-used bait.
    • Beads — Plastic beads in colors that match natural salmon eggs (orange, peach, mottled pink). Pegged 1–2 inches above a single hook so the bead floats freely.
    • Glo bugs — Yarn flies tied to imitate single eggs. Cross between fly and bait fishing.
    • Pink worms — Soft plastic worms in pink/red. Drift naturally and trigger reaction strikes.

    Drift the float through the suspected holding water. When the float goes down, set the hook with a long sweep — circle hooks especially require steady pressure rather than a hard hookset.

    Spinner and Spoon Casting

    Casting from shore or wading. The fundamental technique on smaller rivers and pier-adjacent stretches.

    Mepps Aglia #4 or #5

    Buy it on Amazon

    The Mepps Aglia in #4 or #5 size is the universal river spinner for salmon and steelhead. Cast across and slightly downstream, then retrieve at a moderate pace as the current sweeps the spinner across holding water. The rotating blade creates flash and vibration that triggers reaction strikes from aggressive fish. Silver blade with red dressing is the classic. Fluorescent orange and chartreuse for stained water. Replace the standard treble with a single hook for catch-and-release water — easier to release fish unharmed.

    Rapala Original F05 / F07

    Buy it on Amazon

    The Original Rapala in F05 (2″) or F07 (2.75″) is the small-river alternative to the Mepps. Where the spinner gives you flash, the Rapala gives you a more bait-like tight wobble. Particularly effective in clear water or when fish are pressured and rejecting spinners. Twitch the rod tip during the retrieve to give the lure erratic action. Silver/black and gold/orange are classic colors.

    Acme Kastmaster 1 oz

    Buy it on Amazon

    The Kastmaster’s distance is its primary virtue. On bigger rivers where you need to reach the far bank or a holding pool 80 feet out, no spinner will get there. The Kastmaster will. The action is simpler than spinners — a tight wobble on retrieve, fluttering fall on the drop — but it triggers strikes consistently from staged salmon. Chrome/blue and chrome/red are the standard colors. Replace the factory hook with an upgraded single or treble.

    Fly Fishing for River Salmon

    Fly fishing for Great Lakes salmon and steelhead has a dedicated following, particularly on the Manistee, Salmon River, and Pere Marquette systems. Two main approaches:

    Single-hand fly rods (8–10 wt) for traditional river fly fishing. Standard fly casting technique. Fly patterns include intruders (large hair-and-flash flies for kings), egg patterns (single egg imitations), stoneflies (large nymphs), and streamers.

    Two-hand spey rods (11–13 ft) for swinging flies through long runs. Spey casting allows long, accurate casts in confined spaces. Particularly effective on bigger rivers like the Salmon River and the Big Manistee.

    Fly fishing requires more learning curve than spinning gear, but produces excellent results on pressured water where conventional anglers have struggled. The “swung fly” approach — letting the fly drift across the current at swimming depth — often produces strikes from fish that have refused everything else.

    River Salmon Gear Setup

    Match gear to water size and technique:

    Technique Rod Reel Line
    Drift fishing plugs (boat) 8’–9′ medium-heavy Line counter conventional 30lb braid + 25lb mono leader
    Casting (shore) 8’6″–9′ medium-heavy spinning 5000–6500 spinning 20lb braid + 15lb fluoro leader
    Float fishing 10’–13′ float rod Centerpin or large spinning 8–10lb mono mainline + 6–10lb fluoro
    Single-hand fly 9’–10′ 8–10 wt Large arbor fly reel WF8–10 floating + sink tips
    Two-hand spey 11’–13′ 7–9 wt spey Spey-specific large arbor Skagit or scandi head

    What to Bring

    • Rod and reel matched to chosen technique
    • Chest waders + wading boots with felt or cleated soles
    • Wading staff for current safety
    • Polarized glasses — essential for spotting fish
    • Large rubber-mesh landing net
    • Tackle: Kwikfish, Mepps, beads, spawn bags, leader material
    • Fishing pliers, line clippers, hook hone
    • Layered clothing (river mornings get cold)
    • Headlamp for pre-dawn / post-sunset fishing
    • Snacks, water, and cash for parking fees or pay access

    Etiquette and Conservation

    River salmon fishing has its own ethics:

    • Don’t crowd other anglers — Give space, particularly at pools and runs
    • Rotate through holes — On busy water, take turns rather than camping a single spot
    • Avoid actively spawning fish — Illegal in most states; ethical even where legal
    • Practice catch-and-release on dark fish — Fish that have colored up are spawning fish; bright chrome is fresh
    • Pack out everything — Including used spawn sacks and leader trimmings
    • Respect private property — Some river sections have private banks; know boundaries

    Frequently Asked Questions

    When is the fall salmon run?

    Mid-August through late October for kings. Coho follow with peak runs in late September and early October. Steelhead extend the river fishery into November and through winter into spring. Peak king window is the second week of September through the first week of October.

    What’s the best technique for river salmon?

    Depends on the river and your access. From a boat on bigger rivers like the Manistee: drift fishing wrapped Kwikfish K15. From shore casting: Mepps Aglia spinners. From float fishing setups: beads or spawn bags. Each technique has its place.

    Do salmon feed in rivers?

    Not in the traditional sense. River salmon are in pre-spawn or spawning mode and their digestive system has largely shut down. They strike from aggression (territorial) or instinct (egg-eating), not hunger. This is why lures that mimic eggs or invade their space produce, while lures that mimic baitfish (which work in the lake) are less effective.

    Are river salmon as big as lake salmon?

    Slightly smaller on average. Fish that have made the migration burn weight on the journey. A 20–25 lb king is excellent for the river; 30+ lb fish are more common in the lake during pre-spawn staging.

    Do I need waders for river salmon fishing?

    Yes for most situations. Chest waders give the most flexibility for accessing productive water. Wading staff helps in current. Some fishing from boats and bigger bridges doesn’t require waders, but the majority of river salmon fishing involves wading.

    Can I fly fish for Great Lakes salmon?

    Yes — there’s a strong fly fishing tradition for kings, coho, and steelhead. Two-handed spey rods are particularly popular for swinging flies through larger water. Single-hand 8–10 weight rods work for smaller rivers and traditional techniques.

    Plan Your Trip

    Related Guides

    Tight lines!

  • Lake Ontario Salmon Fishing: Complete Guide

    Lake Ontario produces some of the most legendary salmon fishing in North America. The Salmon River at Pulaski, New York runs gigantic kings during the fall — fish that anglers travel across the country to catch. The Niagara River below the falls holds resident salmon year-round. The Olcott spring brown trout fishery is one of the best on any Great Lake. And the eastern basin offshore trolling produces consistently from May through October.

    This guide covers what to know if you’re planning a Lake Ontario trip — when to go, where to fish, and what to bring. The fishery is well-developed with strong charter and shore-based options, but each region has its own peak timing. Pair this with the king salmon temperature guide and the Lake Michigan calendar for seasonal context that applies to Ontario as well.


    Let’s go Fishing!
    Search for the Perfect Fishing Trip or Charter
    Lake Ontario & Salmon River
    Verified reviews · Free cancellation · 90-day price match
    Powered by FishingBooker · Affiliate partner

    Best Times to Fish Lake Ontario

    Lake Ontario has the longest salmon season of any Great Lake, with the eastern basin and tributaries producing throughout the year:

    Season Primary Target Where to Fish
    March–April Brown trout, early Steelhead Olcott, Niagara River, tributary mouths
    May Brown trout, early Kings Olcott, Wilson, Oak Orchard
    June–August King salmon, Coho, Lake trout Offshore trolling — entire eastern basin
    September–October King salmon (river run) Salmon River Pulaski, Oswego
    October–November Steelhead, Brown trout, Coho Salmon River, Niagara River, tributaries
    December–March Steelhead, Brown trout Salmon River, Niagara River

    If you’re planning one trip a year, the second week of September through mid-October is peak. King salmon are at trophy weight, the fall run is underway in the rivers, and conditions are most cooperative.

    Salmon River — Pulaski, New York

    The Salmon River runs into Lake Ontario at Pulaski, about 50 miles north of Syracuse. For about 6 weeks a year — mid-September through late October — it becomes the most famous salmon water in North America east of the Pacific. Anglers from across the country and around the world descend on the small town for the king salmon run.

    The river has roughly 13 miles of fishable water from the Lake Ontario mouth up to the Salmon River Falls. The most famous sections:

    • The Lower River (Mouth to Compton Bridge) — Where kings first push into the river. Heavy pressure, big fish, classic combat fishing.
    • The Estuary — Tidewater zone where the river meets the lake. Light tackle works for jumping fresh-run fish.
    • The Long Bridge to Pineville — Public access water with good wading. Fly anglers and gear anglers mix here.
    • The Douglaston Salmon Run (private, paid access) — Premier private water. Restricted access keeps pressure manageable. Worth the daily fee for serious anglers.
    • The Upper River (Altmar to the Hatchery) — Less pressured but still strong runs of fish working upstream.

    What to bring: heavy spinning or float rod, 10–15lb fluorocarbon leader, a selection of Mepps Aglia spinners, egg sacks, glo bugs, and Kwikfish-style plugs. Polarized glasses, waders, and a wading staff for the current.

    Niagara River

    The Niagara River — flowing from Lake Erie through Niagara Falls into Lake Ontario — holds salmon year-round in its lower section below the falls. The Devil’s Hole and Whirlpool sections produce excellent fishing for kings, coho, lake trout, and steelhead. Strong current, deep water, and consistent fish make this one of the most reliable Lake Ontario destinations.

    Both shore-based and drift-boat fishing produce. Charters out of Lewiston run drifts through the productive water. Shore anglers cast from the gorge access points. The water is extremely cold (mostly from deep Lake Erie discharge), which means salmon are present and active even in months when the lake itself is too cold for boat trolling.

    Olcott Harbor

    Olcott on Lake Ontario’s south shore is the classic spring brown trout destination. From early April through June, brown trout push into shallow harbor and shoreline water in numbers that haven’t been seen on most other Great Lakes in decades. The fish hit Husky Jerks, small spoons, and stickbaits cast from piers or trolled with planer boards.

    Olcott’s protected harbor allows small-boat anglers and even kayakers to fish productively when offshore conditions are too rough for typical charters. The mix of pier and small-boat access makes it one of the most beginner-friendly destinations on Lake Ontario.

    Eastern Basin Offshore Trolling

    The deep eastern basin of Lake Ontario — particularly the water off Oswego, Mexico Bay, and the Salmon River mouth — produces excellent offshore trolling from May through September. Kings, coho, lake trout, and Atlantic salmon all use this water. Charter fleets operate out of Oswego, Mexico, and Pulaski (the latter primarily for river fishing but with some lake operations).

    Summer thermocline depths on Lake Ontario tend to run slightly deeper than Lake Michigan due to the lake’s deeper average depth. Plan for downrigger setups reaching 80–140 feet down in July and August. Quality downriggers and planer boards are essential for serious offshore work.

    What to Bring

    For an offshore trolling trip:

    For a Salmon River fall run trip:

    • Hip waders or chest waders
    • Heavy spinning rod 8–9 feet, medium-heavy power
    • 14–17 lb mainline, 10–15 lb fluoro leader
    • Mepps Aglia spinners in silver/red, fluorescent orange, chartreuse
    • Kwikfish K15
    • Egg sacks, glo bugs, beads
    • Polarized glasses
    • Wading staff for current
    • Fishing pliers, line clippers, hook hone

    Charter and Lodging Options

    🚤 Finding a Lake Ontario Charter

    Strong charter fleet operates out of all major ports. For booking, look for:

    • USCG-certified captains (verify license)
    • Insured boat and clear cancellation policy
    • Recent fishing reports and reviews
    • Specialization matching your target (offshore trolling vs river guide)

    We’ll publish our vetted charter directory as it develops. For now, check the Great Lakes fishing trips guide for current options.

    Lodging in Pulaski during the September–October run books out months in advance — reservations should be made 6+ months out for peak weekends. Off-peak weeks have easier availability. Hotels in nearby Syracuse offer easy access for trips not requiring pre-dawn departures.

    License and Regulations

    New York State fishing license required for all anglers 16 and older. Available online through NY DEC. Special regulations apply on the Salmon River — current bag and size limits should be checked at the time of your trip. Many sections of the Salmon River are catch-and-release for steelhead during certain windows.

    Frequently Asked Questions

    When is the Pulaski salmon run?

    Mid-September through late October on the Salmon River. Peak is the last week of September through the second week of October. Smaller runs of cohos and steelhead continue into November and December.

    Do I need waders for the Salmon River?

    Yes — most productive fishing on the Salmon River requires wading. Chest waders give the most flexibility. Bring a wading staff for current safety.

    What’s the best charter port on Lake Ontario?

    Oswego for general offshore trolling. Pulaski for river fishing. Niagara River charters out of Lewiston for that specific fishery. Olcott for spring brown trout focus.

    Can I fish Lake Ontario from shore?

    Yes — especially during the fall run in tributaries, and at piers in places like Olcott, Wilson, Oak Orchard, and the Niagara River gorge. Spring and fall offer the best shore-based opportunities.

    What’s the biggest king salmon caught in Lake Ontario?

    The Lake Ontario king salmon record is over 40 pounds. Fish in the 25–35 lb range are realistic targets during the pre-spawn fall run, particularly on the Salmon River and adjacent waters.

    How does Lake Ontario compare to Lake Michigan for salmon?

    Lake Ontario typically produces larger average king salmon than Lake Michigan. The tributary fishery is more developed (particularly the Salmon River). Lake Michigan has more charter capacity and easier offshore access. Both are world-class fisheries with different strengths.

    Plan Your Trip

    Related Guides

    Tight lines!

  • How to Fish Kelp Paddies in Southern California

    How to Fish Kelp Paddies in Southern California

    Kelp paddies are floating islands of drifting kelp that accumulate in SoCal’s offshore waters, and they are fish magnets. A single clump of kelp the size of a dining table can hold dorado, yellowtail, yellowfin tuna, bonito, calico bass, and a cloud of baitfish underneath. Finding productive paddies is one of the most reliable ways to catch quality fish on SoCal’s offshore grounds — and knowing how to fish them properly is the difference between a handful of bites and a wide-open day.

    Why Paddies Hold Fish

    Floating kelp creates shade, which attracts small baitfish looking for cover in the open ocean. The baitfish attract predators. A fresh paddy that’s drifted into warm, clean water can build a food chain underneath it within hours — starting with microscopic organisms, then small baitfish, then progressively larger predators.

    Not all paddies are equal. The best paddies are in clean, blue water with good dorado temperatures (68°F+), have a visible bait ball underneath (polarized glasses are essential), and show signs of life — birds circling, bait flipping on the surface, or predators boiling near the edges. Dead, brown paddies with no visible life are worth a quick check but rarely produce consistent action.


    Book a Yellowtail Charter
    Southern California & Baja · Verified reviews · Free cancellation

    Powered by FishingBooker


    How to Find Paddies

    Kelp paddies form when strong swells or currents tear kelp from the coastal beds and carry it offshore. They concentrate along current edges, temperature breaks, and debris lines where different water masses meet.

    SST charts: Check the SST chart on fishing-reports.ai for temperature breaks — paddies accumulate along these boundaries. Where warm offshore water meets cooler coastal water, floating debris (including kelp) collects in the convergence zone.

    Chlorophyll maps: The chlorophyll map shows where productive water meets clean water. Paddies in the transition zone between green (nutrient-rich) and blue (clean) water tend to hold the most fish because bait is nearby but the water is clear enough for predators to hunt.

    Fleet tracker: The fleet tracker shows where boats are clustering offshore. A cluster of boats 20+ miles out that aren’t on a known bank or high spot usually means they’ve found productive paddies.

    Visual scanning: Once offshore, slow down and scan the surface. Paddies range from basketball-sized clumps to mat-sized rafts. Look for bird activity — terns and shearwaters circling or sitting on paddies indicate baitfish presence. A good set of binoculars and calm seas make paddy hunting much easier.

    Species You’ll Find

    Dorado: The signature paddy species. Dorado associate with floating structure throughout their range, and SoCal paddies are no exception. When water temps are above 68°F, dorado are the first species to check for. They usually sit close to the paddy — often within 50 feet — and are the most aggressive feeders on artificials. See our best dorado lures guide.

    Yellowtail: Yellowtail relate to paddies differently than dorado — they often circle wider, 50–200 feet away, and hold deeper. They’ll come up for surface iron or live bait but are less likely to charge the paddy the way dorado do. Yellowtail prefer 65–72°F water, so early season paddies in slightly cooler water may hold yellowtail but not dorado.

    Yellowfin tuna: In late summer and fall, yellowfin will hold under paddies — usually deeper, 30–100 feet below the kelp. They’re harder to catch on artificials around paddies and often respond better to live bait dropped below the kelp mat. Fly-lining a sardine or small mackerel near the paddy with the current is the standard approach.

    Calico bass: Coastal paddies that drift near the islands or kelp beds often hold excellent calico bass. These fish relate to the kelp exactly like they do to fixed kelp beds — hiding in the canopy and ambushing bait that swims by.

    How to Approach a Paddy

    Approach is everything. A noisy, fast approach will scatter fish before you ever get a line in the water.

    Step 1: When you spot a paddy, slow down at least 200 yards away. Cut the engines to idle.

    Step 2: Idle upwind or up-current of the paddy. Let the drift carry you toward it. If there’s no wind, make a wide arc and approach from 100+ feet away.

    Step 3: Look before you cast. Put on polarized glasses and scan the water around and under the paddy. Look for shadows, color changes, or bait behavior that indicates predators. If you see fish, note their depth and position — this tells you what technique to start with.

    Step 4: Make your first cast count. The first lure or bait that hits the water near a fresh paddy often gets the best response. If dorado are visible, cast past the paddy and retrieve through the school. If you see fish but can’t identify them, start with a surface iron or popper to draw a reaction.

    Techniques for Paddy Fishing

    Casting Iron and Poppers

    The most exciting method. Cast past the paddy (never into it — you’ll snag the kelp) and retrieve through the zone where fish are holding. For dorado and yellowtail on the surface, a fast retrieve with a Tady 45 or Salas 7X is deadly. If they follow but won’t commit, switch to a popper. See our jigs vs irons vs poppers guide for when to switch.

    Fly-Lining Live Bait

    The most consistent producer. Hook a live sardine or mackerel and let it swim toward the paddy on a fly-line rig — no weight, just a hook and fluorocarbon leader. The bait will swim naturally toward the shade of the paddy, and anything holding underneath will eat it. This is the best technique for yellowfin tuna hiding deep under the kelp.

    Vertical Jigging

    When fish are holding deep — visible on the sonar but not coming to the surface — drop a flat-fall jig to their depth and work it. The fluttering action on the fall imitates a dying baitfish drifting down from the paddy. Deadly on yellowtail and yellowfin that won’t come up.

    Chunking

    Cut sardines into chunks and toss pieces near the paddy to create a chum slick. This draws fish up and closer to the boat. Once you see activity in the chum, drop a hooked chunk or live bait into the action. Particularly effective for starting a bite that’s been slow.

    Gear for Paddy Fishing

    Two setups cover most paddy situations: a 20lb spinning setup for casting iron, poppers, and light live bait (handles dorado and average yellowtail), and a 30lb conventional setup for live bait drops and heavier fish (yellowtail and yellowfin). Spool with braid and carry fluorocarbon leader in 20–40lb for different situations.

    Plan Your Trip

    Paddies form in warm, clean water. Check conditions:

    Tight lines!

  • How to tie a Dropper Loop Rig for Saltwater Fishing

    How to tie a Dropper Loop Rig for Saltwater Fishing

    The dropper loop rig is the workhorse of SoCal bottom fishing. If you’ve ever fished a party boat targeting rockfish, sheephead, or whitefish, you’ve seen this rig on every rail. It’s simple, effective, and lets you fish multiple baits at different depths — which is exactly what you want when you’re working structure and don’t know exactly where the fish are sitting.

    This guide covers how to tie the dropper loop knot, how to set up a complete rig, and when to use it versus a Carolina rig or other bottom rigs.

    What Is a Dropper Loop Rig?

    A dropper loop rig places one or more hooks on short loops that extend perpendicular to your main line, with a weight at the bottom. The hooks sit above the weight, suspending your baits at specific depths off the bottom. This design is different from a Carolina rig where the bait sits on the bottom — a dropper loop keeps baits up in the water column where species like rockfish, whitefish, and sheephead actively feed.

    Most SoCal dropper loop rigs run two hooks — one about 12 inches above the sinker and another 12–18 inches above that. This covers a band of water column and doubles your chances of finding where the fish are holding.

    How to Tie the Dropper Loop Knot

    Step 1: Form a loop in your line where you want the hook to sit. Make the loop about 4–5 inches across — this will become the arm that holds your hook away from the main line.

    Step 2: Pinch the crossing point with one hand. With the other hand, twist the loop around itself 6–8 times. The more twists, the stiffer the loop arm will be (which is what you want — it keeps the hook from tangling with the main line).

    Step 3: Find the center of your twists and push the top of the loop through the middle opening. Pull it through firmly.

    Step 4: Moisten the knot and pull both ends of the main line to tighten. The loop should stand out perpendicular to the line. If it lays flat against the line, you didn’t use enough twists — retie with more wraps.

    Step 5: Clip one side of the loop to create a single tag end, then tie your hook to this tag using a Palomar knot. Alternatively, you can pass the hook directly through the uncut loop — this lets you change hooks quickly without retying. See our complete knot guide for step-by-step instructions on the Palomar and other terminal connections.

    Repeat the process at your second hook position. Then tie a sinker to the bottom of the rig using a simple overhand loop or a snap swivel for quick weight changes.

    Complete Rig Setup

    Main line: 30–50lb fluorocarbon or heavy monofilament. Many anglers pre-tie dropper loop rigs on heavy mono and attach them to their braided main line with a swivel. This lets you swap entire rigs quickly if one gets tangled or cut off on the rocks. See our fishing line guide for specific brand recommendations by pound test.

    Hook 1 (lower): Positioned 10–14 inches above the sinker. Use a circle hook in 2/0–4/0 for rockfish and whitefish, or a J-hook if you prefer setting the hook manually. The Owner Mutu Circle (5163) in 2/0–3/0 is the go-to for dropper loop rigs — the medium wire handles rockfish and sheephead without straightening, and the circle design means jaw-corner hookups for easy releases on short fish. The loop arm should be 3–4 inches long — long enough to keep the bait away from the main line but short enough to avoid tangles.

    Hook 2 (upper): Positioned 12–18 inches above the first hook. Same hook size and style. This hook fishes higher in the water column, which often catches a different species than the lower hook.

    Sinker: 4–16 ounces depending on depth and current. For party boat fishing in 150–300 feet of water, 8–12 ounces is standard. For shallower rockfish spots (50–100 feet), 4–6 ounces works. Use a torpedo or bank sinker — their streamlined shape cuts through current better than round sinkers.

    For a complete breakdown of hook models, wire weights, and sizes for every SoCal bottom species, see our hooks by species guide.

    Best Baits for a Dropper Loop Rig

    Squid strips are the all-time top bait for dropper loop rigs — tough, stays on the hook, and catches everything. Cut a squid into strips about 3–4 inches long and 1/2 inch wide. Thread the hook through one end so the strip trails behind.

    Other top baits: shrimp (whole or pieces) for sheephead, sardine chunks for rockfish, and live anchovies when you can get them. Tip: double up by putting squid on one hook and shrimp on the other — you’ll quickly learn what the fish prefer that day.

    Tackle Setup

    Bottom fishing with a dropper loop doesn’t require the heavy offshore gear you’d use for tuna, but you still need enough backbone to haul fish up from deep structure:

    Rod: A 7-foot medium to medium-heavy rod for most party boat bottom fishing. Enough backbone to lift 8–12 ounces of lead plus a fish from 200 feet, with enough sensitivity to feel the bite.

    Reel: A 20lb class conventional reel or 30lb class for deeper water. Conventional reels are preferred over spinning reels for dropper loop fishing because the vertical drop-and-retrieve is easier to control.

    Line: 30–40lb braid as mainline with your pre-tied dropper loop rig attached via a barrel swivel. Braid’s zero stretch lets you feel bites clearly from 200+ feet, and its thin diameter cuts through current better than mono. See our braid vs fluorocarbon guide for why braid mainline with a mono/fluoro rig is the standard setup.

    Hooks: Circle hooks in 2/0–4/0 are the best choice for dropper loops — jaw-corner hookups, fewer gut-hooks, and better survival on released fish. The Owner Mutu Circle (5163) and Owner SSW Circle (5178) are both excellent for bottom fishing. See our hooks by species guide for specific models and sizes for rockfish, sheephead, and whitefish.

    For complete rod and reel pairing advice, see our best rod and reel combo guide.

    When to Use a Dropper Loop vs Other Rigs

    SituationBest RigWhy
    Bottom fish on structure (rockfish, sheephead)Dropper loopBaits suspended above rocks, less snags
    Halibut on sandCarolina rigBait right on the bottom where halibut ambush
    Surf fishingCarolina rigSlides with current, natural presentation
    Deep water party boat (200+ ft)Dropper loopTwo baits cover more water column
    Tuna on live baitFly-line rigFree-swimming bait, no weight
    Yellowtail on live baitSlider rigAdjustable depth, natural swim

    Tips for Fishing the Dropper Loop

    Drop to the bottom, then reel up 2–3 cranks. This lifts your baits into the active feeding zone and reduces snags. When you feel a bite, don’t jerk — if you’re using circle hooks, just reel tight and the hook will set itself. With J-hooks, a moderate lift of the rod is enough. Big hooksets pull the bait away from the fish more often than not.

    If you’re getting bit on one hook consistently but not the other, adjust. If the lower hook is producing, the fish are tight to the bottom — consider shortening the distance between your sinker and first hook. If the upper hook is hot, the fish are suspended — add a third dropper loop even higher.

    Pre-tie several rigs at home and store them on a rig winder. On the boat, tangles happen — having backups ready means you spend more time fishing and less time retying. Use different hook sizes on each rig so you can match what the fish want that day.

    Plan Your Trip

    Check conditions before you head out:

    Related Guides

    Tight lines!

  • How to Use Chlorophyll Maps to Find Fish Offshore

    How to Use Chlorophyll Maps to Find Fish Offshore

    🌊 View Today’s Chlorophyll Map

    Check the current chlorophyll conditions for SoCal and Baja right now on our free animated chlorophyll map — updated daily with NOAA satellite data. Pair it with the Animated SST chart or AI Enhanced Regional SST charts to find where bait is stacking up along temperature breaks.

    Most offshore anglers know about SST charts — sea surface temperature maps that show water temperature and temperature breaks. Fewer know about chlorophyll maps, and that’s a missed opportunity. Chlorophyll data tells you where the food chain starts, and ultimately, where gamefish are feeding.

    If SST charts tell you where fish are comfortable, chlorophyll maps tell you where fish are eating. Used together, they’re the most powerful combination of satellite data available to recreational anglers.


    Book a Dorado Charter
    Southern California & Baja · Verified reviews · Free cancellation

    Powered by FishingBooker


    What Chlorophyll Maps Show

    Chlorophyll is the green pigment in phytoplankton — microscopic plants floating at the ocean surface. Satellites measure the color of the ocean from space. Green water has high chlorophyll (lots of phytoplankton). Blue water has low chlorophyll (clear, nutrient-poor water).

    Why does this matter for fishing? Because the ocean food chain works like this:

    Phytoplankton → Zooplankton → Baitfish → Gamefish

    Areas with high chlorophyll are producing plankton, which attracts krill and small organisms, which attract anchovies, sardines, and squid, which attract tuna, yellowtail, dorado, and everything else you’re trying to catch. Chlorophyll maps show you the foundation of that food chain from 400 miles up.

    How to Read a Chlorophyll Map

    Chlorophyll maps on fishing-reports.ai use a color scale from blue to green:

    • Dark blue — Very low chlorophyll. Clear, deep oceanic water. Low productivity. Fish density is usually low unless there’s other structure (temperature breaks, seamounts, debris).
    • Light blue / cyan — Moderate chlorophyll. Transitional water. This zone often marks the boundary between productive coastal water and clean offshore water — a key area for fishing.
    • Green / yellow-green — High chlorophyll. Productive, nutrient-rich water. Baitfish concentrations are likely. Nearshore and upwelling areas typically show this.
    • Bright green / yellow — Very high chlorophyll. Extremely productive — often associated with active upwelling zones, river mouths, or nutrient plumes. Water may be too murky for pelagic fishing but holds bait.

    The Money Zone: The Chlorophyll Edge

    The single most valuable feature on a chlorophyll map is the chlorophyll edge — the boundary where green, productive water meets clean blue water. This is the fishing equivalent of the tree line at the edge of a field. Prey congregates along the edge, and predators patrol it.

    Here’s why the edge is so productive:

    • Bait stacks up — Small fish feed in the green productive water and get pushed against the boundary by currents. The edge acts as a concentration line.
    • Predators prefer clean water — Tuna, dorado, and billfish generally prefer the cleaner blue side where they can see and hunt effectively. They work the edge, darting into the green side to feed.
    • Current convergence — Chlorophyll edges often mark the boundary between two water masses moving at different speeds or directions. This convergence zone concentrates floating debris, kelp paddies, and bait.

    On the chlorophyll map, look for a sharp transition from green to blue. The sharper and more defined the edge, the better. A gradual fade from green to blue over 50 miles is less useful than a crisp boundary over 5 miles.

    Combining Chlorophyll with SST Charts

    This is where the real power lies. Each data layer tells you something different, and together they paint a complete picture:

    Step 1: Check the SST Chart

    Open the SST chart and identify water in the right temperature range for your target species. (See our species temperature guides for bluefin tuna, yellowfin tuna, dorado, yellowtail, white seabass, and halibut.)

    Step 2: Check the Chlorophyll Map

    Switch to the chlorophyll layer and find the chlorophyll edge in the same area. Where is the green-to-blue transition relative to the water temperature you identified?

    Step 3: Find the Overlap

    The magic spot is where three things intersect:

    1. Water temperature in the right range for your target species
    2. A chlorophyll edge (green meets blue)
    3. A temperature break (warm meets cool)

    When all three line up in the same area, you’ve found a high-probability fishing zone. This combination concentrates bait, provides the right thermal environment, and creates structure in the open ocean where gamefish feed.

    Step 4: Check the Fleet

    Confirm your analysis by looking at the fleet tracker. Are boats heading to or fishing in the area you identified? If the satellite data and the fleet agree, you’ve found the bite.

    Chlorophyll Patterns for Each Species

    Bluefin Tuna

    Bluefin often work the chlorophyll edge from the blue side. They’re comfortable in moderate-to-clean water and will push into greener water to feed on bait schools. Look for the chlorophyll edge where it intersects with the 62–68°F temperature range. Bluefin tend to hold along the edge rather than ranging through open blue water. When you find them, surface iron, poppers, and trolling lures are how you capitalize — have your tuna setup rigged with 50–65lb braid and ready before you reach the edge. For live bait along the edge, circle hooks on a fly-line rig are deadly.

    Yellowfin Tuna and Dorado

    Both species prefer the clean blue side of the edge in water 72°F+. They’re more sight-oriented feeders that want visibility. The best dorado fishing is often a few miles on the blue side of the chlorophyll edge, especially when kelp paddies or debris are present. The edge concentrates the floating structure that dorado associate with. Run a trolling spreadcedar plugs and feathers — along the blue side of the edge while searching for paddies. When you find fish on a paddy, switch to casting: surface iron (Tady 45) and poppers draw explosive strikes from both species. A 20lb spinning setup handles dorado, but size up to a 40lb class if yellowfin are in the mix.

    Yellowtail

    Yellowtail are less picky about water clarity than tuna or dorado. They’ll feed comfortably in greener, more productive water — especially around kelp beds and structure where chlorophyll levels are naturally higher. For yellowtail, the chlorophyll data is most useful for identifying areas of strong upwelling (very high chlorophyll) that concentrate squid and baitfish near structure. When you find 62–70°F water with high chlorophyll near islands or kelp, bring your iron and jigs. A 30lb class setup with 40lb braid handles everything from casting iron at boils to yo-yoing structure. See our hooks guide for the right hook sizes.

    White Seabass

    White seabass thrive in the greener, more productive water that other pelagics avoid. They’re often caught in areas with moderate-to-high chlorophyll where squid are spawning. If the chlorophyll map shows a productive zone near islands or kelp beds in 59–65°F water during spring, that’s white seabass territory. Fish the kelp edges at dawn with a slider rig and live squid on a 4/0–6/0 circle hook. A 20–25lb class setup with 30lb braid and 25lb fluoro leader is the standard. See our hooks guide for specific models.

    Halibut

    For inshore species like halibut, chlorophyll maps help you identify where bait is stacking up along the coast. High chlorophyll nearshore — especially near sandy flats and bay mouths — means baitfish concentrations that pull halibut into shallow water. This is when swimbaits and Carolina rigs on the sandy flats produce best. From shore, a 4000–5000 spinning reel on a 9–10 foot surf rod with 20lb braid covers it. See our halibut surf fishing guide for beach-specific techniques.

    Common Mistakes When Reading Chlorophyll Maps

    Fishing in the green — New users see high chlorophyll and think “bait = fish.” But if you’re targeting tuna or dorado, the green water itself is often too murky. Fish the edge, not the middle of the green zone.

    Ignoring the time lag — Chlorophyll responds to nutrients with a delay. An upwelling event might take 3–7 days to produce a visible chlorophyll bloom. And baitfish may take another few days to aggregate. A brand-new upwelling plume might not hold fish yet, but one that’s been established for a week is worth fishing.

    Cloud cover gaps — Like SST charts, chlorophyll maps are satellite-based and blocked by clouds. If the latest image is patchy, check the previous day’s image or use the multi-day composite view on the charts page.

    Trusting it alone — Chlorophyll maps are one piece of the puzzle. Always combine with SST data, fleet intel, swell conditions, and fishing reports. No single data source tells the whole story.

    Seasonal Chlorophyll Patterns in SoCal

    The chlorophyll picture off Southern California changes throughout the year:

    Winter–Spring (Jan–Apr): Strong coastal upwelling produces high chlorophyll nearshore. The green water extends well offshore, and the chlorophyll edge may be 30–50+ miles out. This is when the ocean is most productive overall — good for bait production that fuels the spring and summer fisheries. Prime time for white seabass in the green water and early-season yellowtail near structure.

    Late Spring–Summer (May–Aug): Upwelling relaxes, and the chlorophyll edge moves closer to shore. Offshore water becomes cleaner and bluer. Clear temperature and chlorophyll edges form between the coastal upwelling zone and the clean offshore water — these are prime fishing boundaries for bluefin, yellowfin, and dorado as warm water pushes in.

    Fall (Sep–Nov): Chlorophyll levels decrease as upwelling weakens and surface water warms. The green-to-blue transition can be quite sharp and close to shore. Look for remaining productive pockets around the islands and banks. Late-season dorado and yellowfin concentrate along these tightening edges.

    Plan Your Trip

    Ready to add chlorophyll data to your pre-trip planning? Start here:

    Related Guides

    Tight lines!

  • How to Read SST Charts for Fishing

    How to Read SST Charts for Fishing

    🌊 View Today’s SST Chart

    Check today’s water temperatures on our free animated SST chart — updated daily with NOAA satellite data. Pair it with the chlorophyll map and AI enhanced regional charts to find where fish are holding.

    Why SST Charts Matter for Fishing

    Sea surface temperature (SST) charts are one of the most powerful tools in a saltwater angler’s toolkit. They show you where warm and cold water masses meet, where currents are flowing, and ultimately where the fish are likely holding. Learning to read them takes your fishing from guesswork to strategy.

    Whether you’re running offshore out of San Diego chasing bluefin or trolling the Baja coast for yellowtail, understanding what you’re looking at on an SST chart can mean the difference between a wide-open bite and a long boat ride home.

    Understanding the Color Scale

    Every SST chart uses a color gradient to represent water temperature. Typically, cooler water appears in blues and greens while warmer water shows up in yellows, oranges, and reds. The exact temperature each color represents is shown in the chart’s legend — always check it, because the scale changes depending on the region and time of year.

    For Southern California waters in winter, you might see a scale ranging from 56°F to 64°F. In summer, that same region could show 62°F to 74°F. A chart of the Sea of Cortez in August might run from 80°F to 90°F. Context matters.


    Book an Offshore Charter
    Southern California & Baja
    Verified reviews · Free cancellation · 90-day price match
    Powered by FishingBooker · Affiliate partner

    What to Look For First

    Don’t get overwhelmed by the full chart. Start with these three things:

    1. Color contrast. Areas where colors change sharply — where deep blue sits right next to bright green, for example — indicate rapid temperature changes over a short distance. These are temperature breaks, and they’re where you want to fish. See our fishing the edges guide for how to work them once you’re on the water.

    2. Warm-water intrusions. Look for tongues or fingers of warmer water pushing into cooler areas. These often indicate current flow bringing warm offshore water closer to the coast, and gamefish follow them inshore. Dorado and yellowfin ride these intrusions, and the edges are where kelp paddies and debris collect.

    3. Eddies. Circular patterns in the temperature data indicate eddies — rotating pockets of water that concentrate bait and plankton along their edges. Warm-core eddies spinning clockwise (in the Northern Hemisphere) are particularly productive for tuna and billfish. The edges of these eddies are where you want to troll and cast iron.

    Satellite Data: What You’re Actually Seeing

    SST charts are built from satellite-mounted infrared sensors that measure the thermal radiation coming off the ocean’s surface. The data represents roughly the top millimeter of water. A few important caveats:

    Cloud cover creates gaps. Infrared sensors can’t see through clouds. If you notice blank spots or oddly smooth areas on a chart, that’s likely cloud contamination. Multi-day composite charts (like our 14-day SST animation) help fill these gaps by layering multiple days of data.

    Surface vs. depth. What the satellite sees is skin temperature. The water 10 or 20 feet down can be significantly different, especially in areas with strong thermoclines. SST charts tell you where to start looking — your fishfinder and temperature gauge tell you the rest of the story. When bluefin are sitting below the thermocline, flat-fall jigs and deep-set baits get down to where the fish are actually holding.

    Morning vs. afternoon. Solar heating can warm the surface by 1–2°F during calm, sunny days. Most satellites pass in the early morning or late evening to minimize this effect, but it’s worth knowing.

    What Temperature Does Each Species Want?

    Once you can read the chart, you need to know what temperature range to look for. Every species has a preferred window — here’s the quick reference for SoCal targets:

    SpeciesPreferred Temp (°F)Sweet SpotGear Guide
    Bluefin Tuna60–72°F62–68°FJigs · Lures · Reels
    Yellowfin Tuna68–78°F72–78°FLures · Poppers
    Dorado72–82°F74–78°FLures · Reels
    Yellowtail62–70°F64–68°FJigs · Reels
    White Seabass58–66°F60–64°FSlider Rig · Hooks
    Halibut56–68°F59–65°FSwimbaits · Carolina Rig
    Wahoo72–82°F76–80°F40lb Reels

    Find the temperature range for your target on the SST chart, then look for breaks within that range. That’s where the fish are concentrated.

    Reading SST Charts by Region

    Southern California

    The SoCal Bight is defined by the interaction between the cold, south-flowing California Current and warmer water pushing up from Baja. In spring and summer, look for warm-water intrusions pushing north past San Clemente Island and into the offshore banks. Bluefin tuna often stage along the leading edge of these warm pushes in 64–68°F water. Have your tuna setup rigged with 50–65lb braid and iron ready before you reach the break.

    Baja Pacific Coast

    The Baja coast features dramatic upwelling zones where cold, nutrient-rich water rises to the surface near headlands and points. Look for tight color gradients near Punta Colonet, San Quintín, and Cedros Island. Yellowtail and white seabass stack up along these upwelling boundaries. The chlorophyll map is especially useful here — upwelling creates bright green productive zones that concentrate bait along defined edges.

    Cabo & Sea of Cortez

    Warm-water species like dorado, wahoo, and marlin key on the warmest water. During summer and fall, look for blue water (80°F+) pushing close to the cape. In the Cortez, temperature breaks can form mid-channel between the Baja peninsula and the mainland — these are highway on-ramps for striped marlin. Run a trolling spreadcedar plugs and feathers — along these mid-channel breaks.

    Putting It Into Practice

    Here’s a simple workflow for planning your next trip using SST data:

    Step 1: Check the regional SST chart for your fishing area. Note any obvious temperature breaks or warm-water intrusions.

    Step 2: Compare today’s chart to the past few days using the 14-day animation. Is warm water pushing in or pulling back? Stable conditions fish better than rapidly changing ones.

    Step 3: Cross-reference with chlorophyll data. High chlorophyll (green water) adjacent to clean blue water is a bait magnet. Where bait stacks up, gamefish follow. See our chlorophyll map guide for the full breakdown.

    Step 4: Factor in the boat reports. Check what the fleet is finding — our fleet tracker shows you where the boats are running in real time. If multiple boats are working the same area, there’s probably a reason.

    Step 5: Check marine weather and swell conditions. A perfect temperature break doesn’t help if you can’t get there safely or fish it effectively in heavy seas.

    SST charts won’t guarantee fish, but they dramatically improve your odds by putting you in the right water. The more you study them and correlate what you see on the chart with what happens on the water, the better you’ll get at reading the ocean.

    Plan Your Trip

    Start reading the water today:

    Related Guides

    Tight lines!